Nothing says sweet like these Valentine’s Day Cookie Cups with Hershey's Hugs Recipe — soft, buttery sugar cookie cups hugging a melty chocolate-and-vanilla Hershey’s Hug at the center. They’re like little love bites, perfect for sharing or gifting this Valentine’s Day.

Jump to:
- Why You'll Love This Recipe
- Ingredients & Why They Work
- Make It Your Way
- Step-by-Step: How I Make Valentine’s Day Cookie Cups with Hershey's Hugs Recipe
- Top Tip
- How to Serve Valentine’s Day Cookie Cups with Hershey's Hugs Recipe
- Make Ahead and Storage
- Frequently Asked Questions:
- Final Thoughts
- Valentine’s Day Cookie Cups with Hershey's Hugs Recipe
Why You'll Love This Recipe
I have to admit, the first time I made these cookie cups, I was instantly hooked. They’re ridiculously easy to whip up and look seriously impressive when you bring them to a party or gift them to loved ones. Plus, that Hershey’s Hug surprise inside? Pure magic.
- Easy to make: Using a simple sugar cookie mix means you can have these ready in under 40 minutes.
- Perfect size: Mini cookie cups are bite-sized and downright irresistible.
- Fun to customize: Add your favorite sprinkles or tweak the food coloring to match your Valentine’s vibe.
- Great for gifting: They keep well at room temperature and can be frozen for later.
Ingredients & Why They Work
This recipe keeps the ingredient list wonderfully simple, which means it’s perfect for last-minute baking or if you’re just starting out. Grab a quality sugar cookie mix and the iconic Hershey’s Hugs to tantalize that sweet tooth.
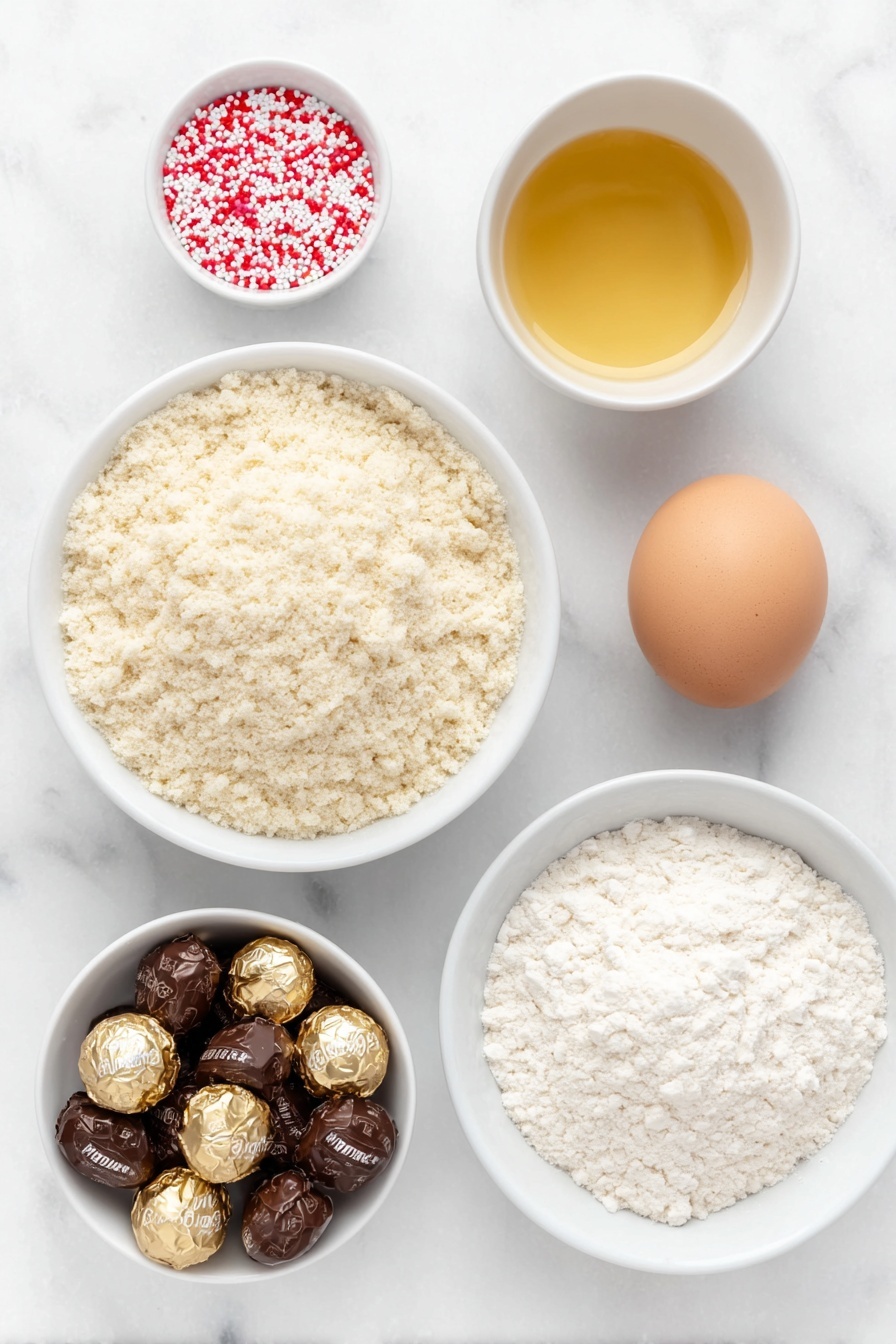
- Sugar cookie mix: The base of these cookie cups, it keeps things simple and ensures a buttery soft texture.
- Salted butter: Adds richness and moisture that makes the cookie base tender and flavorful.
- All-purpose flour: Helps strengthen the dough so it holds its shape well around the chocolate.
- Large egg: Binds all the ingredients together while adding moisture.
- Pink/red food coloring: The festive touch that makes these cookie cups just right for Valentine’s Day.
- Hershey’s Hugs: The star filling with creamy white and milk chocolate — a perfect surprise inside each cookie cup.
- Decorative sprinkles (optional): Adds a charming and colorful finishing touch that’s totally customizable.
Make It Your Way
One of the best things about this Valentine’s Day Cookie Cups with Hershey's Hugs Recipe is how easy it is to adapt to your own tastes and style. Whether you want to tweak the color, add some festive toppings, or make a dietary swap, these cookie cups invite your creativity!
- Variation - Chocolate Chip Twist: Instead of using just sugar cookie mix, I sometimes fold mini chocolate chips into the dough for extra bursts of melty chocolate that complement the Hershey’s Hugs. It adds a bit of texture and makes the cookie cups feel a bit more indulgent.
- Dietary Swap - Gluten-Free: You can swap the sugar cookie mix for a gluten-free sugar cookie mix. Just be mindful that texture and baking time might vary slightly, but the soft, chewy charm of the cookie cups still shines through.
- Festive Flair: Aside from classic pink or red food coloring, I’ve also played around with pastel colors or added edible glitter on top for a fun Valentine’s Day sparkle. Decorative heart sprinkles or sanding sugar work beautifully pressed onto warm cookies.
- Seasonal Spin: While perfect for Valentine’s Day, these cookie cups are also great for other holidays—swap the red food coloring with green or gold and use holiday-themed sprinkles to transform them instantly.
Step-by-Step: How I Make Valentine’s Day Cookie Cups with Hershey's Hugs Recipe
Step 1: Prep Your Oven and Pan
Start by spraying your mini cupcake pan with cooking spray to prevent sticking—trust me, this step makes removal a breeze later on. Then, preheat your oven to 350 degrees Fahrenheit. Getting the oven fully preheated ensures your cookie cups bake evenly and develop that perfect soft but set edge.
Step 2: Mix the Cookie Dough
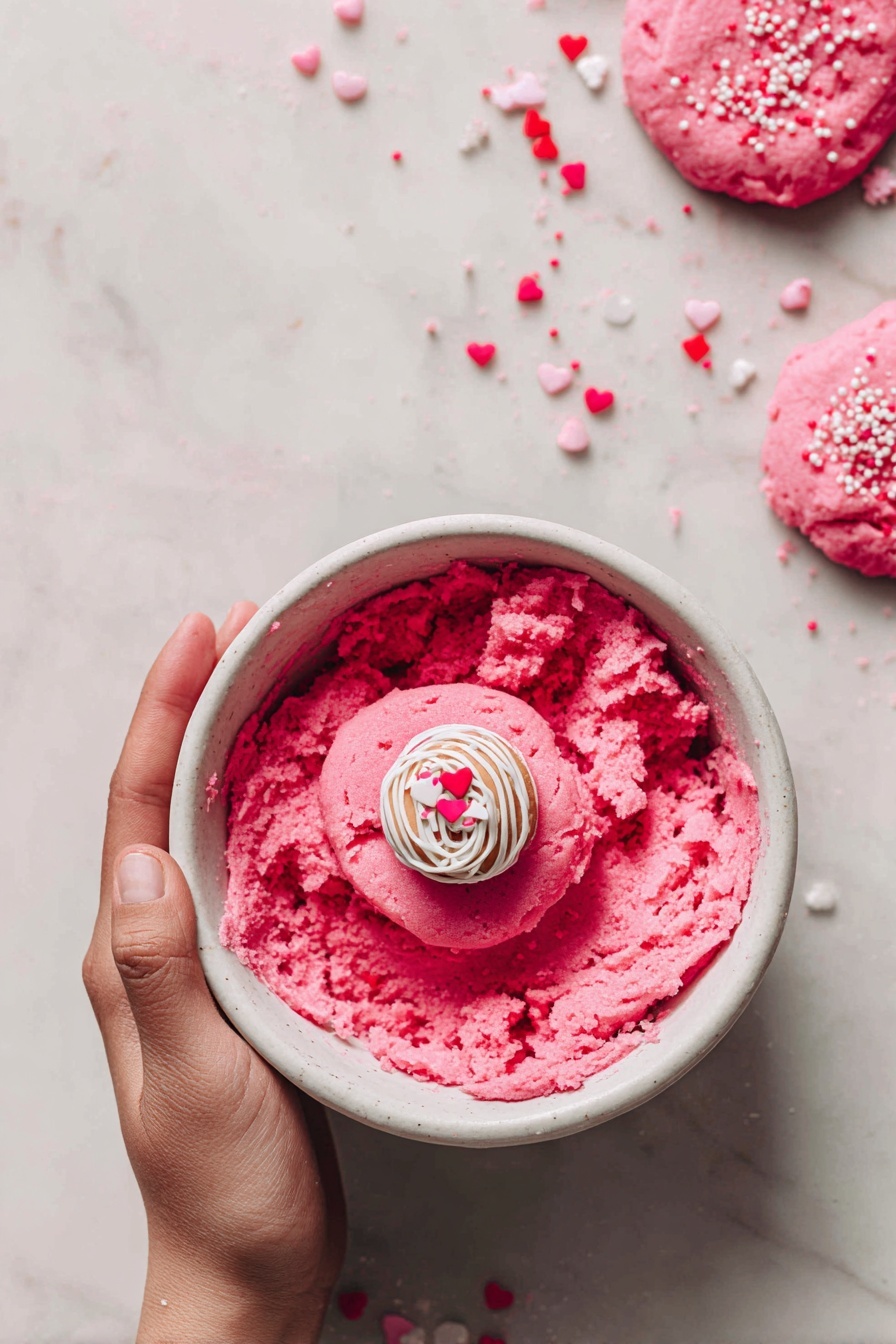
In a large bowl, combine the sugar cookie mix with melted salted butter, all-purpose flour, the egg, and your choice of pink or red food coloring. Beat them together just until combined—overmixing can lead to tougher cookies, and we want soft, chewy bites here. Keep adding food coloring little by little if you want a more vibrant shade.
Step 3: Form the Dough Bases and Add Filling
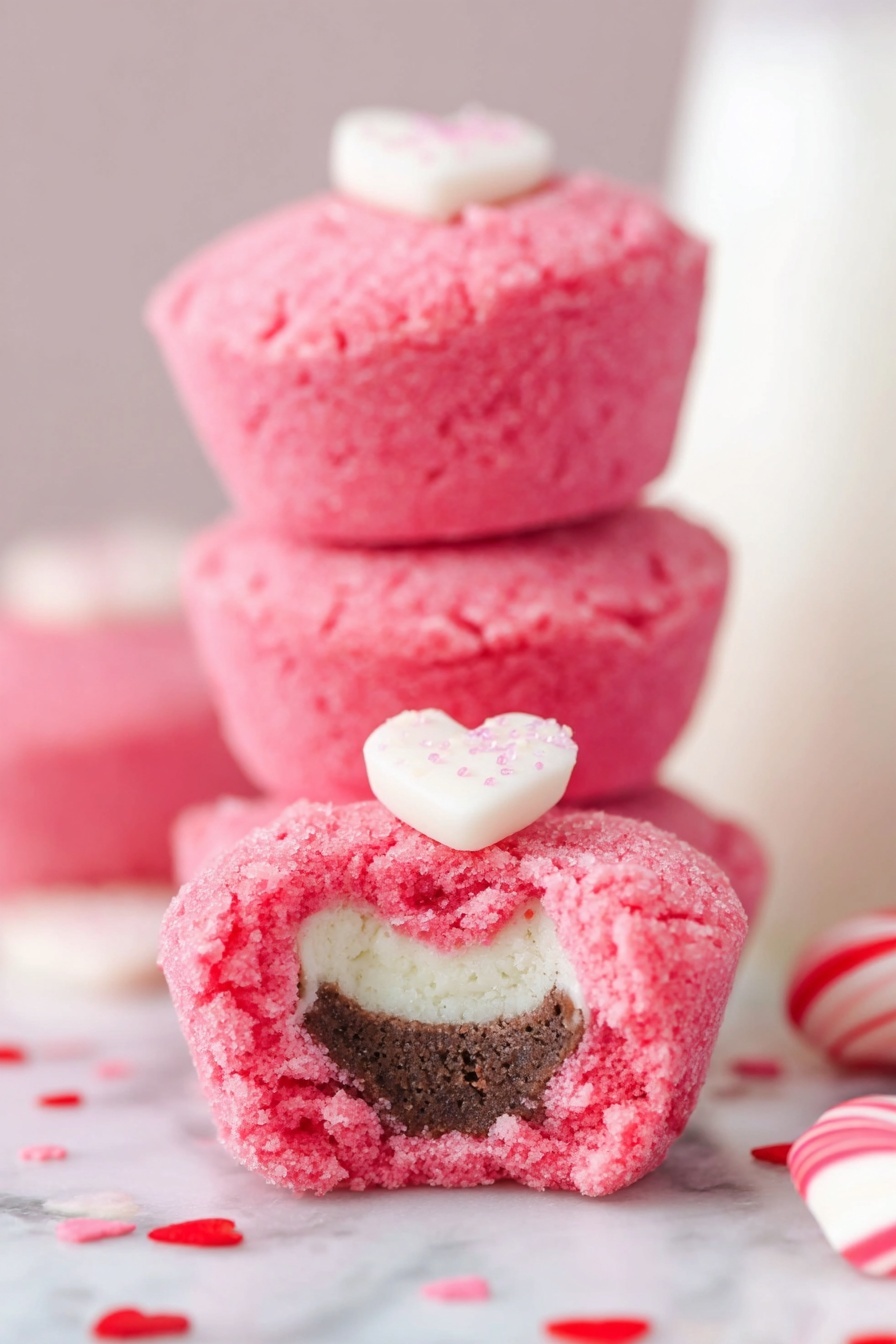
Scoop about 1 tablespoon of dough and flatten it gently with your hand or rolling pin to roughly the size of your palm. Place one unwrapped Hershey’s Hug right in the center. Now comes the fun part—wrap the dough all the way around the Hug, smoothing with your hands to patch any cracks or gaps. This will help keep the filling snug inside and your cookie cups looking neat.
Step 4: Position in Pan and Bake
Set each dough-wrapped Hug upright into the mini cupcake pan’s cavities. You’ll fit approximately 25 cookie cups total. Pop the pan into your preheated oven and bake for 12 minutes. Look for the edges to set and start turning lightly golden while the centers remain soft. This signals the perfect balance between chewy and baked through.
Step 5: Add Sprinkles and Cool
As soon as the cookie cups come out of the oven, press decorative sprinkles gently on top if you want to add that festive touch. Because the cookies are warm, the sprinkles will stick nicely without rolling off. Let the cookie cups cool in the pan for 15 minutes—that’s key to letting them firm up enough so they won’t fall apart when you remove them.
Top Tip
Making Valentine’s Day Cookie Cups with Hershey's Hugs Recipe is such a joy, but a few simple tips can make your baking experience smoother and your results even better!
- Perfect Dough Wrapping: When you wrap the dough around each Hershey’s Hug, gently smooth out any cracks with your fingers. This ensures the cookie cups hold together well and look picture-perfect.
- Don’t Skip the Cooling: Letting the cookie cups cool in the pan for about 15 minutes before removing them really helps prevent breakage. Hot cookie cups are delicate, so patience pays off!
- Sprinkle Strategy: Press decorative sprinkles onto the tops immediately after baking while the cookie is still warm. This helps them stick beautifully and adds that lovely festive touch.
- Use Mini Cupcake Pan: Baking your cookie cups in a mini cupcake pan keeps the shape uniform and makes handling them much easier compared to free-form baking.
How to Serve Valentine’s Day Cookie Cups with Hershey's Hugs Recipe
Garnishes
For a charming Valentine’s Day presentation, try garnishing your cookie cups with heart-shaped or pink/red sprinkles as mentioned, or add a dusting of powdered sugar once cooled. Fresh raspberries or a small dollop of whipped cream on the side can complement the sweetness and add a pop of color, perfect for that romantic vibe.
Side Dishes
Serve these bite-sized treats alongside a cup of hot cocoa, a warm latte, or even a refreshing glass of cold milk. For a Valentine’s Day dessert spread, pair them with chocolate-dipped strawberries or a small fruit salad to balance the sugary goodness.
Make Ahead and Storage
Storing Leftovers
Once cooled completely, store your Valentine’s Day Cookie Cups in an airtight container at room temperature. They stay fresh and chewy for up to two weeks — perfect if you want to make them ahead of time for a Valentine's Day party or gift.
Freezing
If you want to enjoy these cookie cups later, individually wrap each one and place them all in a freezer-safe container or resealable bag. They'll keep their deliciousness for up to 5-6 months frozen. Just thaw at room temperature before serving.
Reheating
To warm your cookie cups, pop a few into the microwave for about 10-15 seconds — just enough to soften the Hershey’s Hug center without melting the cookies completely. This little reheating trick makes them taste freshly baked, perfect for a cozy treat whenever you want.
Frequently Asked Questions:
Absolutely! While Hershey’s Hugs give a perfect creamy and minty surprise, you can substitute with your favorite chocolates like Kisses, mini chocolate bars, or even flavored candies, just keep them roughly the same size.
If your dough feels overly sticky, chill it in the refrigerator for 15-20 minutes. This firms it up, making it easier to flatten and wrap around the Hershey’s Hugs without tearing.
Definitely! You can bake them a few days ahead and store them in an airtight container at room temperature for up to two weeks, or freeze them as described to enjoy even later.
Yes, be sure to spray the mini cupcake pan with cooking spray before placing the dough balls in. This prevents sticking and helps the cookie cups release easily after baking and cooling.
Final Thoughts
Thanks for joining me on this baking journey for the Valentine’s Day Cookie Cups with Hershey's Hugs Recipe! These little beauties bring so much joy—not just in their sweet flavor, but in the smiles they inspire when shared. Whether you’re making them as a gift, for a party, or just to spoil your loved ones (including yourself!), I hope these cookie cups warm your heart and taste buds alike. Happy baking and Happy Valentine’s Day!
Print
Valentine’s Day Cookie Cups with Hershey's Hugs Recipe
- Prep Time: 25 minutes
- Cooling Time: 15 minutes
- Cook Time: 12 minutes
- Total Time: 37 minutes
- Yield: 25 servings
- Category: Dessert
- Method: Baking
- Cuisine: American
Description
Valentine’s Day Cookie Cups are delightful bite-sized treats perfect for celebrating love. With a soft, chewy, buttery sugar cookie base enveloping a sweet Hershey’s Hug, these cookie cups are easy to make and perfect for sharing or gifting on Valentine’s Day.
Ingredients
Cookie Dough
- 17.5 ounce package sugar cookie mix
- ½ cup (1 stick) salted butter, melted
- 3 tablespoon all-purpose flour
- 1 large egg, room temperature
- Pink/red food coloring, as needed
Filling and Topping
- 24-26 Hershey’s Hugs, unwrapped
- Decorative sprinkles (optional)
Instructions
- Prepare Oven and Pan. Spray a mini cupcake pan with cooking spray and preheat the oven to 350 degrees Fahrenheit to ensure it’s hot and ready for baking.
- Mix Dough. In a large bowl, beat together the sugar cookie mix, melted salted butter, all-purpose flour, egg, and pink/red food coloring until just combined. Adjust the food coloring to achieve the desired hue.
- Form Dough Bases. Scoop about 1 tablespoon of the cookie dough mixture and flatten it using your hand or rolling pin to roughly the size of your palm.
- Add Filling. Place an unwrapped Hershey’s Hug in the center of the flattened dough, then wrap the dough completely around the Hug to form a ball. Use your hands to smooth out any cracks or gaps.
- Arrange in Pan. Place each filled dough ball upright into the cavities of the mini cupcake pan. Repeat until all dough is used.
- Bake. Bake in the preheated oven for 12 minutes or until the edges look set and the cookie exterior is lightly golden but soft.
- Add Sprinkles. Remove the cookie cups from the oven and immediately press decorative sprinkles onto the tops if desired so they adhere as the cookies cool.
- Cool. Let the cookie cups cool in the pan for 15 minutes before carefully removing and serving.
Notes
- Allow cookie cups to cool about 15 minutes before removing from the muffin tin to prevent them from falling apart.
- When wrapping dough around Hershey’s Hugs, smooth out cracks with your hands to ensure even coverage.
- Decorative sprinkles add a festive touch; press them gently onto the tops while cookies are still warm for best adhesion.
- Store cookie cups in an airtight container at room temperature for up to 2 weeks.
- To freeze, wrap each cookie cup individually and store in a freezer-safe container or bag for up to 5-6 months.
Nutrition
- Serving Size: 1 cookie cup
- Calories: 120 kcal
- Sugar: 9 g
- Sodium: 80 mg
- Fat: 6 g
- Saturated Fat: 3.5 g
- Unsaturated Fat: 2 g
- Trans Fat: 0 g
- Carbohydrates: 15 g
- Fiber: 0.5 g
- Protein: 1.2 g
- Cholesterol: 20 mg


Leave a Reply