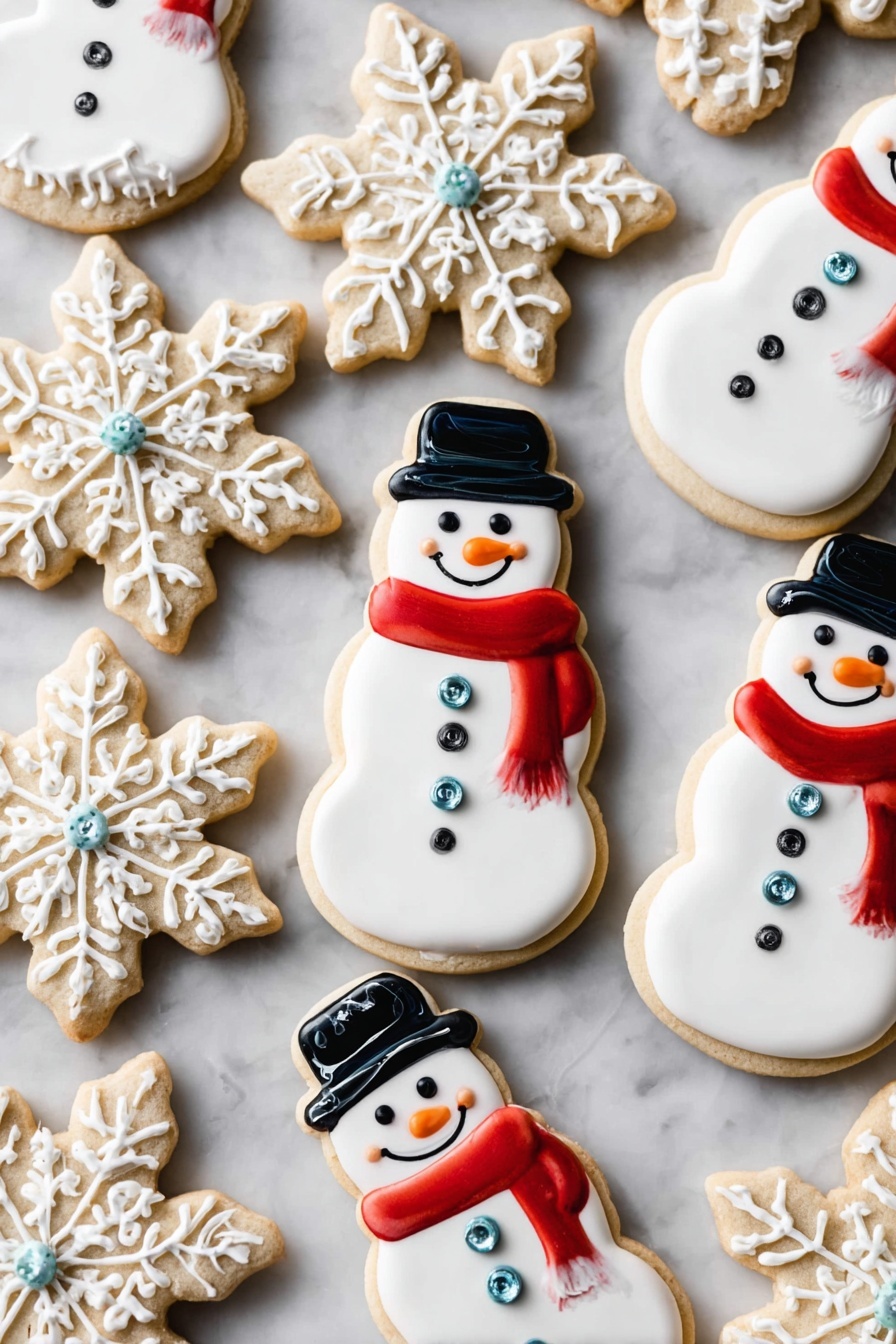
There’s something truly magical about biting into a sweet, buttery cookie shaped like a jolly snowman, don’t you think? This Snowman Sugar Cookies Recipe is my go-to when I want to sprinkle a little festive joy around the kitchen—perfect for sharing with family, friends, or just enjoying a cozy moment yourself.

Jump to:
Why You'll Love This Recipe
This Snowman Sugar Cookies Recipe isn’t just a treat for the taste buds—it’s a sweet project that brings a bit of holiday magic right to your kitchen counter. The flavors are classic but with a little almond extract twist that feels so special every winter. Decorating the snowmen turns cookie baking into a fun art session (kids absolutely love it) and the texture stays soft yet sturdy enough to hold all those cute icing details.
- Classic & Delicious: The buttery sugar cookie base is perfectly tender and easy to work with, making every bite melt in your mouth.
- Festive Fun: Decorating these snowmen with royal icing brings holiday cheer and allows you to get creative with colors and designs.
- Kid-Friendly Activity: It’s a great recipe for involving the whole family—kids especially love rolling dough and piping icing.
- Make Ahead & Freeze: This recipe is forgiving and stores well, so you can prep dough or cookies ahead and have festive treats ready when you need them.
Ingredients & Why They Work
The magic of these snowman sugar cookies lies in their simple but well-balanced ingredients. Each one plays a key role—from buttery richness to just the right hint of almond for flavor depth. Here’s a peek at what makes this recipe work so well together and a few tips for picking the best ingredients.
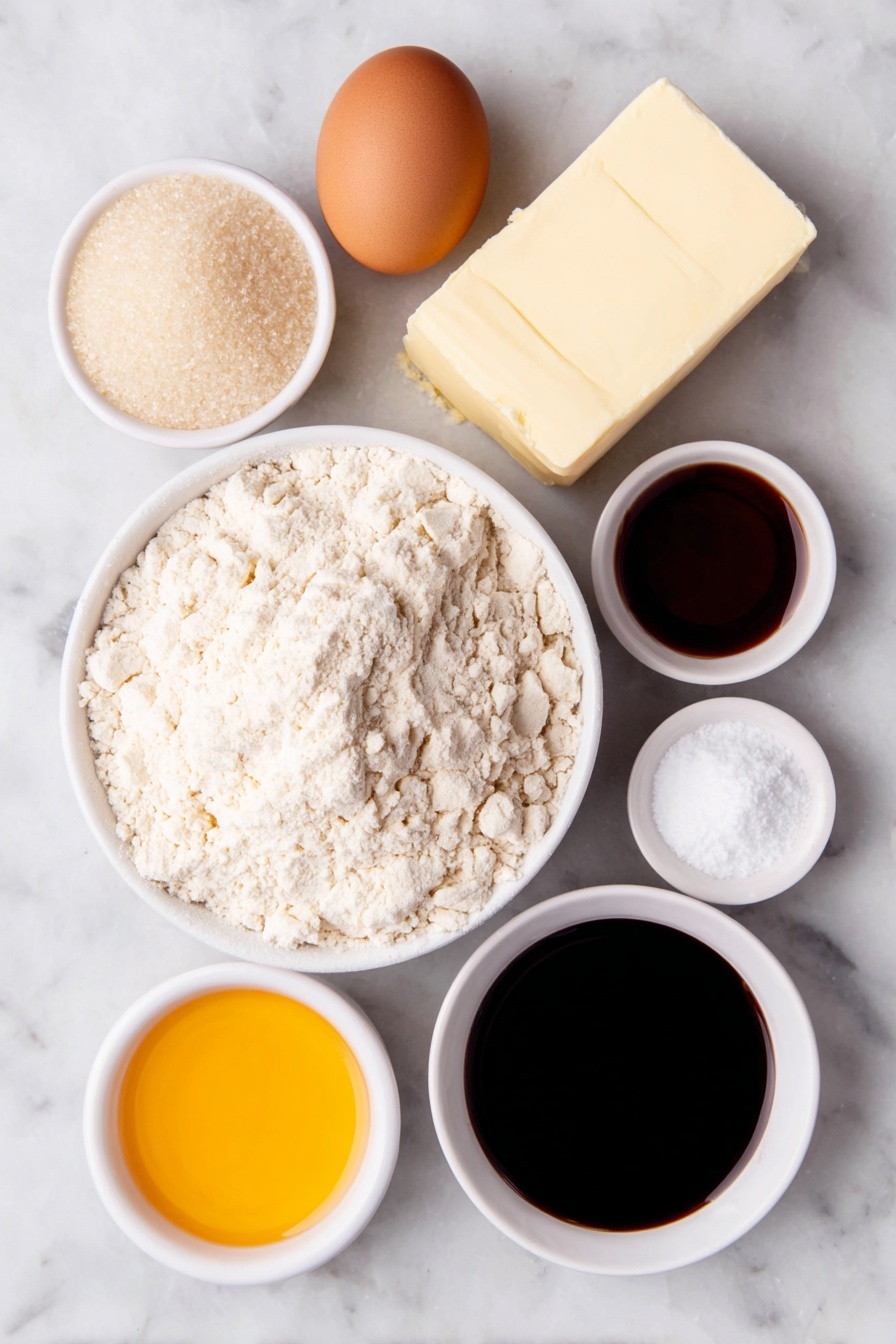
- All-purpose flour: The sturdy backbone of the dough, this flour ensures your cookies have the perfect texture—not too cakey, not too crunchy.
- Baking powder: Just a touch to keep the cookies tender and slightly puffy without spreading too much.
- Salt: Enhances the butter and sugar flavors for a well-rounded taste.
- Unsalted butter: Softened to room temperature for smooth mixing; using unsalted lets you control the saltiness perfectly.
- Granulated sugar: Sweetens the dough while also helping with that classic crisp-green edges.
- Egg: Binds ingredients and adds richness—room temp eggs mix more evenly into the dough, making life so much easier.
- Pure vanilla extract: Classic flavor that everyone loves, it lifts the cookie’s sweetness beautifully.
- Almond extract (optional): This little splash adds a delightful, cozy depth—try at ¼ or ½ teaspoon depending on how bold you want the flavor.
- Royal icing: The perfect decoration medium—dries hard and lets you get super detailed with your snowman designs.
- Gel food coloring: Red, black, and orange are the essential colors for scarves, hats, eyes, noses, and buttons—gel colors are best because they won’t thin your icing.
Make It Your Way
One of the things I adore about this Snowman Sugar Cookies Recipe is how easy it is to make it your own. Whether you want to swap out the almond extract for something else or change up the decorations, this recipe invites creativity!
- Variation: I once swapped the almond extract for peppermint extract during Christmas, and it gave the cookies a refreshing twist that everyone enjoyed—especially great with a cup of hot cocoa.
- Flavor Twists: Try adding a teaspoon of pumpkin pie spice for fall vibes or lemon zest plus lemon extract for a bright citrus version.
- Dietary Modifications: For a dairy-free version, you can use a vegan butter substitute, just keep an eye on dough consistency as it may vary.
Step-by-Step: How I Make Snowman Sugar Cookies Recipe
Step 1: Whisking the Dry Ingredients
Start by whisking together the all-purpose flour, baking powder, and salt in a medium bowl. This step ensures everything is evenly distributed and helps avoid pockets of baking powder or salt in your cookies—especially important in a delicate sugar cookie base.
Step 2: Creaming Butter and Sugar
Using a stand mixer or handheld mixer, beat the softened butter and sugar together on high speed until the mixture is smooth and creamy—this usually takes me about 2 minutes. You want it light and fluffy because this is what gives the cookies their tender texture.
Step 3: Adding the Egg and Extracts
Next, beat in the room temperature egg, vanilla extract, and almond extract if you’re using it. This step brings moisture and that lovely fragrant flavor into your dough. Make sure to scrape down the bowl so everything mixes evenly.
Step 4: Combining Wet and Dry Ingredients
Now, add the dry ingredients and mix on low speed until just combined. The dough will feel a bit soft—that’s good—but if it’s too sticky to handle, I usually throw in an extra tablespoon of flour. Don’t overdo it though, or the cookies will get dry.
Step 5: Rolling and Chilling the Dough
Divide the dough in half and roll each piece out between floured parchment papers or silicone mats to about ¼-inch thickness. Layer them and pop them in the fridge for at least one to two hours (or up to 2 days). Chilling is key—it makes the dough easier to cut and helps the cookies keep their perfect shape.
Step 6: Cutting and Baking Snowman Shapes
Preheat your oven to 350°F (177°C). Use your favorite snowman cookie cutter to cut shapes from the chilled dough, re-rolling scraps as you go. Place the cookies 3 inches apart on a parchment-lined baking sheet. Bake for 11-12 minutes or until edges just begin to turn golden. Let them cool on the sheet for 5 minutes, then transfer to a wire rack to cool completely before decorating.
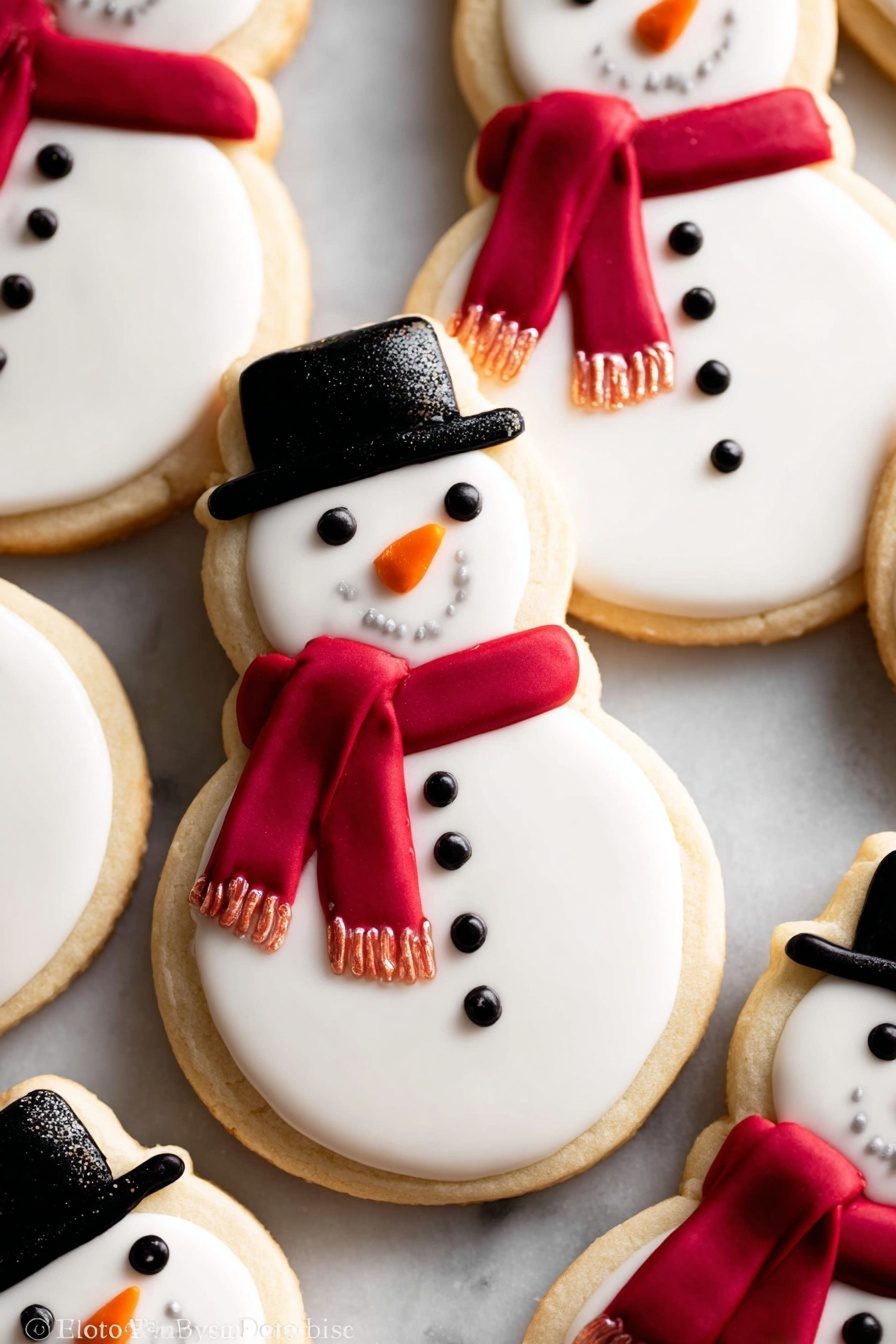
Step 7: Decorating with Royal Icing
Divide your royal icing into bowls—leaving most white, and tinting small amounts red, black, and orange for scarves, hats, eyes, buttons, and noses. Pipe white icing first, filling in the body and leaving hats free. Let it set in the fridge to speed drying. Then add scarves, hats, eyes, and noses with piping tips. Patience here really pays off—wait a few hours for the icing to fully set, then voilà, your snowmen are ready to dazzle!
Top Tip
When I first started decorating these snowman sugar cookies, I learned the hard way that patience and chilling are your best friends. Taking your time and letting the icing set between colors prevents smudging and gives you crisp, cheerful snowmen.
- Room Temperature Butter: Use butter that's cool to the touch—not soft or greasy. This controls dough texture and helps prevent spreading in the oven.
- Dough Chilling: Don’t skip or shorten chilling—chilled dough rolls easier and keeps those snowman shapes from getting misshapen.
- Use Gel Food Colors: They won’t water down your royal icing, giving you vibrant, clean designs with less bleeding.
- Let Icing Set Fully: I always wait 2-3 hours for the icing to harden completely before stacking or gifting to keep your masterpieces perfect.
How to Serve Snowman Sugar Cookies Recipe
Garnishes
I love adding a sprinkle of edible glitter or white sparkling sugar on the finished icing for that snowy shimmer—it makes these cookies even more magical, especially under twinkly holiday lights.
Side Dishes
Pair your snowman sugar cookies with a mug of hot cocoa topped with whipped cream or a spiced chai latte for cozy vibes. These drinks complement the sweet, buttery flavor perfectly and make an inviting holiday treat spread.
Creative Ways to Present
For holiday parties, I like arranging the cookies on a festive platter with fresh pine sprigs and cranberries tucked in between. Wrapping a few in a clear bag tied with a red ribbon also makes for sweet, thoughtful gifts that friends adore.
Make Ahead and Storage
Storing Leftovers
Once decorated and fully dried, I keep my snowman sugar cookies in an airtight container at room temperature. They stay soft and fresh for up to five days—perfect for munching through the week without losing their charm.
Freezing
I’ve frozen both the cookie dough and the decorated cookies with great success. For dough, shape it into disks, wrap well, and freeze for up to three months. For decorated cookies, wait until the icing is completely set, then layer them with parchment paper in a freezer-safe container. Thaw gently in the fridge or at room temp.
Reheating
Reheating isn’t necessary since these cookies taste best cooled, but if you want that fresh-baked warm feeling, pop them in a warm oven (about 300°F) for a few minutes. Just don’t overdo it or they’ll turn crisp.
Frequently Asked Questions:
Absolutely! This recipe is flexible—you can swap almond extract for vanilla, peppermint, lemon, or even maple extract. Just adjust the amount to your taste since some extracts are stronger than others.
Chilling the dough firms it up, which makes rolling and cutting much easier. It also helps the cookies keep their shape in the oven and prevents spreading too much, resulting in crisp edges and soft centers.
Make sure your royal icing isn’t too thick or too dry when piping. Keep a small bowl of water nearby to add drops if needed to maintain smooth consistency. Also, avoid exposing decorated cookies to rapid temperature changes or drafts while drying.
You can try substituting the all-purpose flour with a gluten-free flour blend designed for baking. However, texture and handling may differ slightly; chilling the dough and using a binding agent like xanthan gum can help maintain structure.
Final Thoughts
Making these Snowman Sugar Cookies Recipe treats in my kitchen has become a kind of holiday ritual—one that turns baking into a joyful, creative experience. I love watching the dough come alive with snowmen, and there’s nothing quite like sharing the finished cookies with loved ones. I’m confident you’ll find the same simple pleasure in this recipe. Give it a try; I promise it’s as fun to make as it is delicious to eat!
Print
Snowman Sugar Cookies Recipe
- Prep Time: 2 hours 30 minutes
- Cook Time: 12 minutes
- Total Time: 4 hours 45 minutes
- Yield: 20 cookies
- Category: Dessert
- Method: Baking
- Cuisine: American
Description
Delight in these charming Snowman Sugar Cookies, perfectly soft sugar cookies decorated with vibrant royal icing. Featuring a tender crumb enhanced with vanilla and optional almond extract, these treats are ideal for festive occasions. The detailed piping work allows for playful snowman designs using red, black, and orange icing for scarves, hats, eyes, buttons, and noses. A fun and decorative cookie recipe that yields beautiful, delicious results.
Ingredients
Cookie Dough
- 2 and ¼ cups (281g) all-purpose flour (spooned & leveled), plus more as needed for rolling and work surface
- ½ teaspoon baking powder
- ¼ teaspoon salt
- ¾ cup (12 Tbsp; 170g) unsalted butter, softened to room temperature
- ¾ cup (150g) granulated sugar
- 1 large egg, at room temperature
- 2 teaspoons pure vanilla extract
- ½ teaspoon almond extract (optional, but makes the flavor outstanding)
For Decorating
- Royal Icing
- Red gel food coloring
- Black gel food coloring
- Orange gel food coloring
Instructions
- Prepare Dry Ingredients: Whisk together the all-purpose flour, baking powder, and salt in a medium bowl. Set aside for later use.
- Cream Butter and Sugar: In a large bowl, use a handheld or stand mixer fitted with a paddle attachment to beat the softened butter and granulated sugar on high speed until smooth and creamy, about 2 minutes.
- Add Wet Ingredients: Add the egg, vanilla extract, and almond extract if using. Beat on high speed until fully combined, about 1 minute. Scrape down the sides and bottom of the bowl to ensure even mixing.
- Combine Dry and Wet Ingredients: Add the dry ingredient mixture to the wet mixture and mix on low speed until combined. The dough will be soft; if it feels too sticky for rolling, add 1 more tablespoon of flour.
- Divide and Roll Dough: Split the dough into two equal parts. Place each on lightly floured parchment paper or silicone baking mat. Roll each portion out to about ¼-inch thickness using a lightly floured rolling pin.
- Chill Dough: Dust one rolled-out dough lightly with flour and cover with a piece of parchment. Place the second rolled dough on top, cover with plastic wrap or foil, and refrigerate for 1-2 hours or up to 2 days.
- Preheat Oven and Prepare Baking Sheets: Set oven to 350°F (177°C). Line two large baking sheets with parchment paper or silicone mats.
- Cut Cookies: Remove the top dough from the fridge and gently separate if sticking. Using a snowman cookie cutter, cut shapes from the dough. Re-roll scraps to cut additional cookies. Repeat with second dough.
- Bake Cookies: Place cookies 3 inches apart on baking sheets. Bake for 12 minutes until edges are lightly browned. Rotate sheets halfway through if needed. Cool cookies on baking sheets for 5 minutes, then transfer to wire racks to cool completely.
- Prepare Colored Icing: Divide royal icing into four portions: leave one white, color the others red, black (dark gray before drying), and orange using gel food coloring.
- Decorate Cookies - White Icing Base: Fit a piping bag with Wilton tip #4 or #5, fill with white icing, pipe borders and fill cookie surfaces leaving space for hat. Refrigerate to set icing.
- Decorate Cookies - Details: Use separate piping bags with Wilton tip #1 for black icing to pipe hats, eyes, mouth, and buttons. Use same tip for orange icing for the nose. Use tip #4 or #5 for red icing to pipe scarves.
- Set Icing: Allow decorated cookies to set at room temperature for 2-3 hours before serving or packaging.
Notes
- Freezing: Cookies freeze well up to 3 months after icing sets. Separate with parchment paper. Cookie dough also freezes for 3 months; thaw in refrigerator, then roll and chill before baking.
- Flavors: Substitute almond extract with maple, coconut, lemon, or peppermint extract; or add pumpkin pie spice or cinnamon for seasonal variations. Using lemon extract, add lemon zest for enhanced flavor.
- Room Temperature Ingredients: Butter should be cool to the touch but soft; eggs should be at room temperature for even incorporation.
- Tools: Electric mixer with paddle, rolling pin, snowman cookie cutter, silicone mats, piping bags and specific Wilton tips (#1, #4 or #5), couplers, Americolor or gel food colors enhance ease and results.
- Storage: Store plain or decorated cookies covered tightly at room temperature for up to 5 days, refrigerated for up to 10 days.
Nutrition
- Serving Size: 1 cookie
- Calories: 150 kcal
- Sugar: 12 g
- Sodium: 90 mg
- Fat: 7 g
- Saturated Fat: 4 g
- Unsaturated Fat: 3 g
- Trans Fat: 0 g
- Carbohydrates: 20 g
- Fiber: 0 g
- Protein: 2 g
- Cholesterol: 30 mg


Leave a Reply