There’s something truly magical about homemade classic treats, and this Shortbread Cookies with Festive Decorations Recipe really brings that cozy holiday spirit to life. Crisp edges, buttery richness, and those fun festive embellishments make these cookies a total crowd-pleaser every time.

Jump to:
- Why You'll Love This Recipe
- Ingredients & Why They Work
- Make It Your Way
- Step-by-Step: How I Make Shortbread Cookies with Festive Decorations Recipe
- Top Tip
- How to Serve Shortbread Cookies with Festive Decorations Recipe
- Make Ahead and Storage
- Frequently Asked Questions:
- Final Thoughts
- Shortbread Cookies with Festive Decorations Recipe
Why You'll Love This Recipe
These shortbread cookies are one of my all-time favorites because not only do they taste incredible, but decorating them is half the fun. You can get really creative with simple ingredients, turning your kitchen into a festive cookie workshop.
- Buttery Perfection: The dough uses a perfect balance of butter and powdered sugar for that melt-in-your-mouth texture you crave.
- Easy To Customize: The decorations let you play with colors and shapes, making the cookies uniquely yours every time.
- Kid-Friendly Fun: Decorating these cookies is a great family activity that draws everyone into the kitchen.
- Freezer Friendly: You can prep dough ahead or store baked cookies without losing any of that fresh-baked deliciousness.
Ingredients & Why They Work
Each ingredient in this recipe plays an important role in creating the classic crumbly yet sturdy shortbread base that’s ideal for decorating. Here’s a little rundown so you can nail it in your own kitchen.
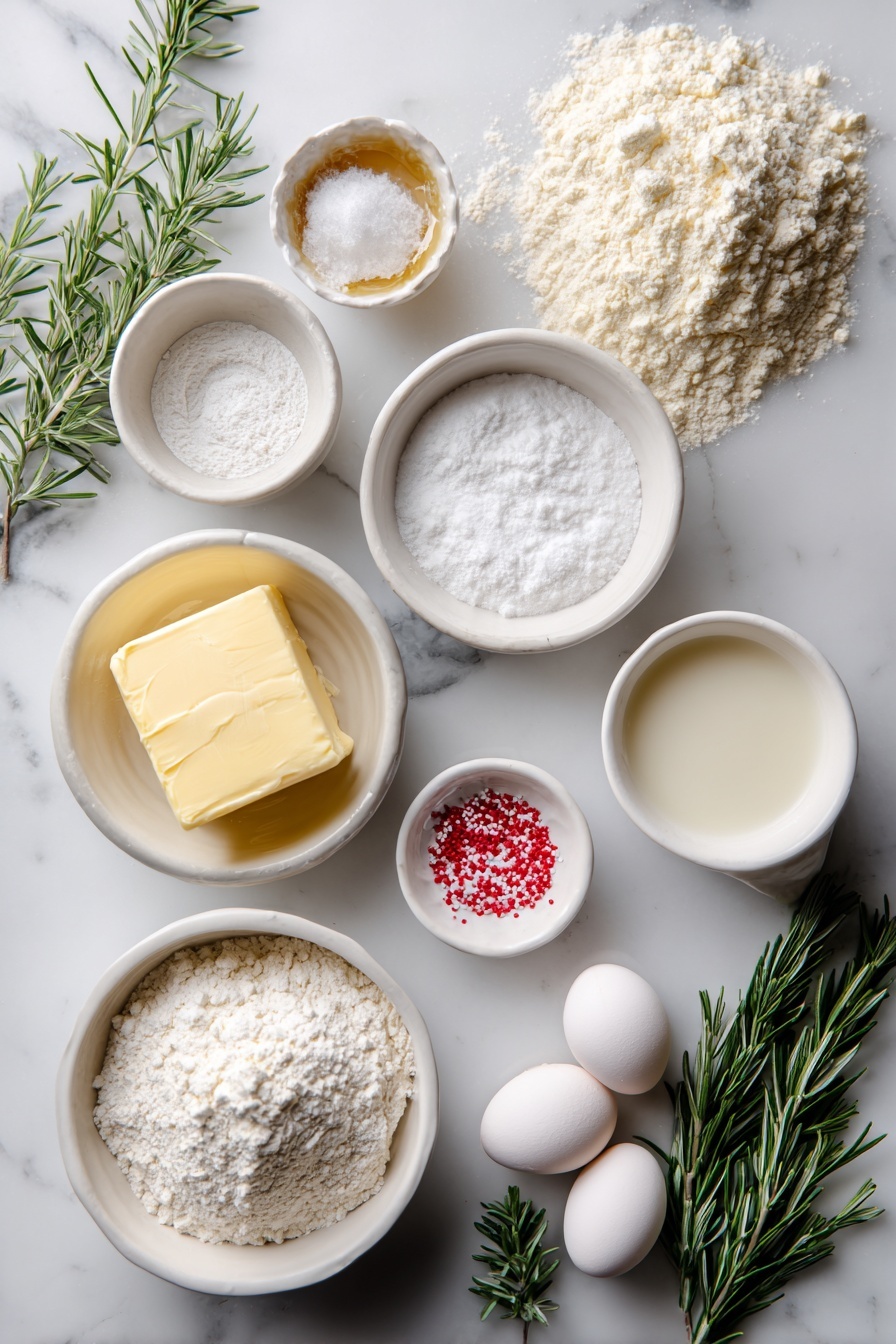
- Unsalted butter: Using room temperature butter gives you the creamiest dough and controls the salt in the recipe.
- Powdered sugar: It blends smoothly into the butter, making the texture soft and tender, unlike granulated sugar.
- Vanilla bean paste: Adds a real vanilla kick with little flecks of vanilla bean, making the flavor rich and authentic.
- Salt: Just a pinch to balance the sweetness and bring out all the other flavors.
- All-purpose flour: The main structure builder, choose gluten-free flour if needed to suit dietary needs.
- Cornstarch: Helps keep the cookies tender yet firm enough to hold their shape when cut and baked.
- Powdered sugar (for icing): Creates that glossy smooth coating that sets nicely on the cookies.
- Vanilla extract: Lends subtle depth to the icing's sweetness.
- Milk: Just enough to thin the icing for dipping without making it runny.
- White chocolate: Perfect for piping details and adding that extra festive flair.
- Rosemary sprigs, sprinkles, sanding sugar: Natural and colorful touches that make these cookies pop with holiday spirit.
- Red oil-based food coloring: Essential for coloring white chocolate without it seizing up.
Make It Your Way
I love tweaking this Shortbread Cookies with Festive Decorations Recipe depending on the occasion or who I'm baking for. You should absolutely make it your own, adding twists that fit your style and taste buds.
- Variation: One year, I swapped out vanilla bean paste for almond extract to give the cookies a cozy, nutty aroma—so good with coffee!
- Dietary tweak: I've made this with gluten-free all-purpose flour, and it still baked up lovely and tender.
- Seasonal shapes: Try autumn leaves or Easter eggs if you want to change the theme while keeping the basic recipe.
Step-by-Step: How I Make Shortbread Cookies with Festive Decorations Recipe
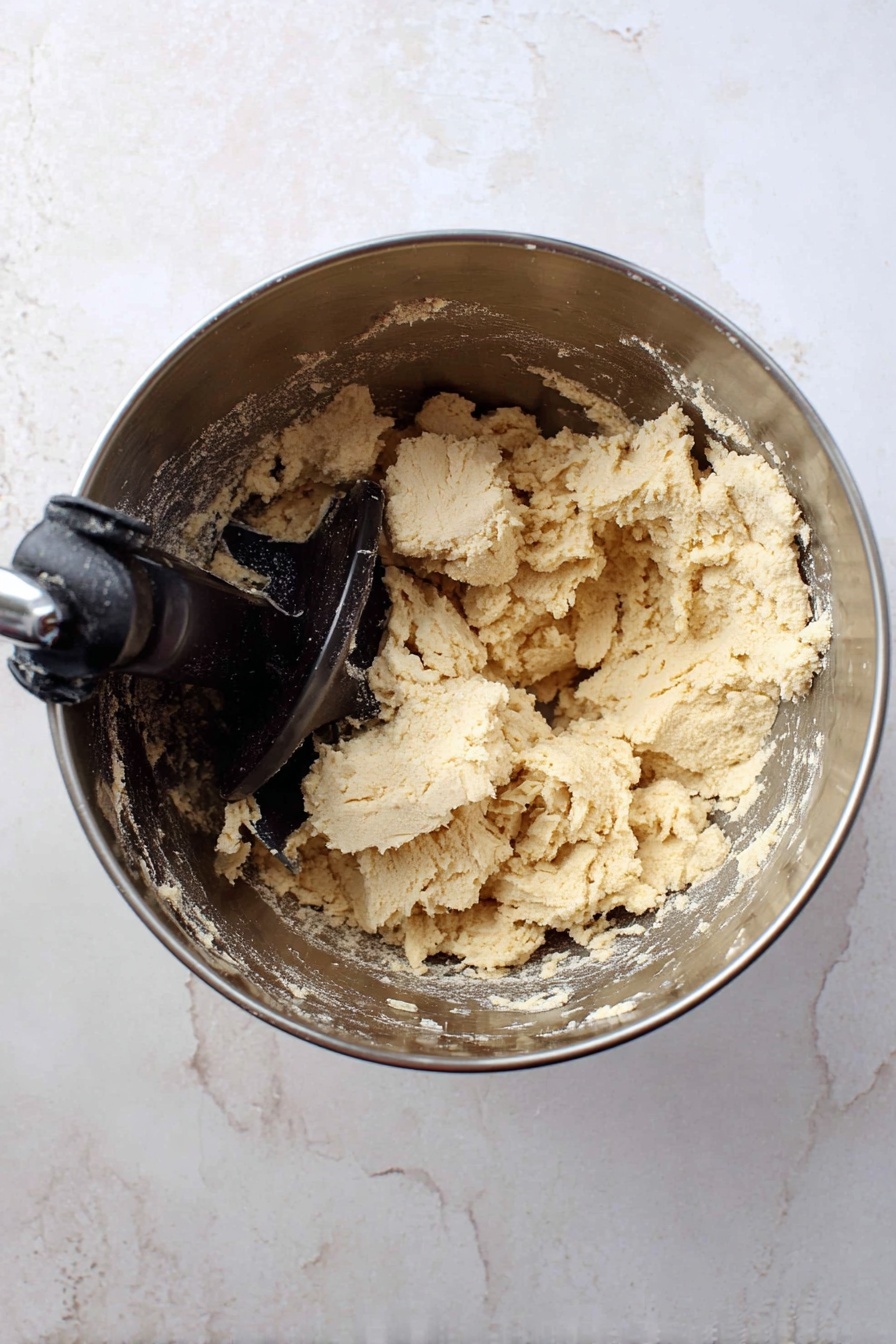
Step 1: Cream the Butter and Sugar
Start by beating the room temperature butter on medium-high speed until it’s smooth and creamy, about 1-2 minutes. This air incorporation is key for tender cookies. Then, add powdered sugar and beat again for about a minute until fluffy. Remember to scrape down the sides to keep everything even.
Step 2: Add Flavor and Dry Ingredients
Mix in the vanilla bean paste and salt until well combined. Next, switch to medium-low speed and gradually add the flour and cornstarch. Initially, the dough will seem crumbly, but keep scraping and mixing until it starts pulling away from the bowl sides and forms a soft dough. This is the moment when you know you’re on the right track!
Step 3: Chill and Roll Out the Dough
Cover your dough with plastic wrap and pop it in the fridge for 30 minutes — this step firms up the dough, making it easier to roll. Once chilled, generously flour your surface and roll the dough out to about ¼ inch thick. Use your favorite cutters: classic rounds and scalloped shapes make beautiful wreaths. Don’t forget to flour the cutter to prevent sticking!
Step 4: Bake the Cookies
Place your cookie cutouts about an inch apart on a parchment-lined baking sheet. Chill again for 15-30 minutes to help cookies keep their shape. Preheat your oven to 350°F (175°C). Bake for 8-10 minutes, turning the sheets halfway through to ensure even baking. Look for edges that are just lightly golden—you want tender, not crunchy.
Step 5: Make the Icing and Decorate
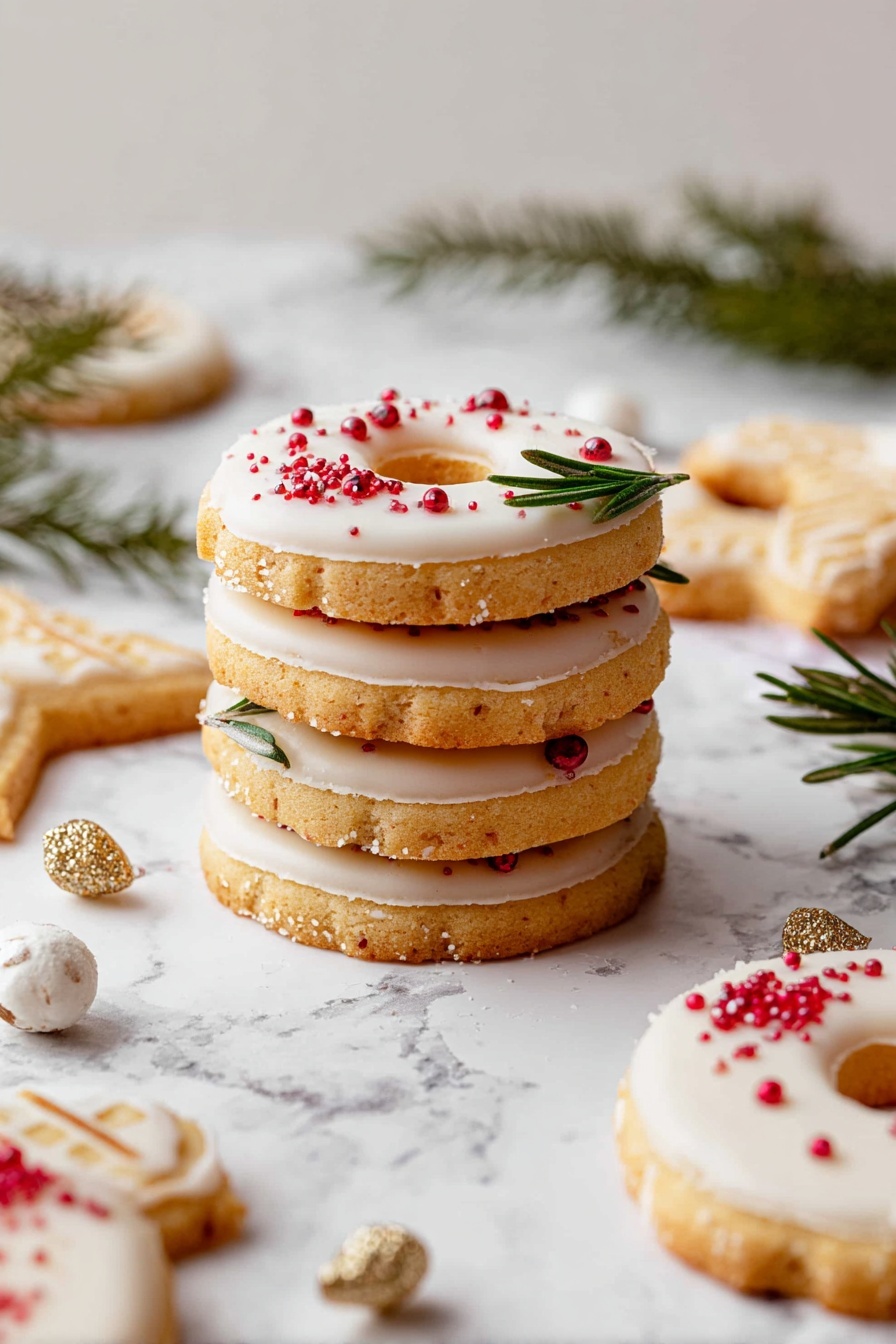
While the cookies cool on a wire rack, whisk together powdered sugar, vanilla extract, and milk until smooth. For the wreath cookies, dip the cooled cookies upside down into the icing carefully—they’re fragile right after baking. Place rosemary sprigs on the icing before it sets, and sprinkle red sugar or sprinkles for that festive touch.
For Santa hats, melt white chocolate and fill a pastry bag for the white trim and pom-pom details. Then mix red oil-based food coloring into remaining white chocolate for that classic hat color, piping hats freehand right onto the cookies. Don’t forget a dust of sparkling sugar to mimic snow!
Top Tip
I’ve baked these cookies countless times and learned a few things that really make a difference. These tips will help you get the texture just right and decorate your festive cookies like a pro.
- Butter Temperature Matters: Always use room temperature butter, not melted or cold, for that perfect creamy dough.
- Don’t Skip the Chill: Chilling the dough before and after cutting helps prevent spreading and keeps your shapes crisp.
- Oil-Based Food Coloring Only: Using water-based colors with white chocolate causes it to seize; I’ve learned this the hard way!
- Handle Cookies Gently: When dipping or piping, work carefully since shortbread is delicate but rewarding once you master it.
How to Serve Shortbread Cookies with Festive Decorations Recipe
Garnishes
I personally love garnishing these cookies with fresh rosemary sprigs — they add that piney aroma that instantly feels festive. For a bit of sparkle, coloured sanding sugar or tiny red sprinkles elevate both flavor and appearance beautifully.
Side Dishes
These cookies are perfect with a warm cup of spiced tea or rich hot cocoa. A platter alongside soft cheeses and fresh fruit can also make for a charming holiday spread.
Creative Ways to Present
For special occasions, I often present these cookies tucked into festive boxes or stacked on a tiered cake stand. Adding a sprig of rosemary or a cinnamon stick with each plate makes the setup feel extra special and fragrant.
Make Ahead and Storage
Storing Leftovers
I keep leftover cookies in an airtight container at room temperature, and they stay deliciously fresh for up to 5 days. Just make sure they’re fully cooled and dry before storing to avoid sogginess.
Freezing
I like to freeze either the unbaked dough or the baked cookies separately. For dough, roll it out, wrap tightly, and freeze for up to 3 months — then bake straight from frozen, adding a minute or two to the bake time. For baked cookies, freeze plain, then decorate after thawing to keep them fresh.
Reheating
If you’re warming up stored cookies, a quick 5-minute blast in a 300°F oven restores that fresh-baked feel without drying them out. I avoid microwaving because it can turn them chewy or unevenly warm.
Frequently Asked Questions:
I recommend using oil-based food coloring when mixing with white chocolate, as regular water-based or gel food colors can cause the chocolate to seize and get grainy. If you don’t have oil-based coloring, try tinting the icing instead for safer results.
Chilling the dough both before rolling and after cutting your shapes helps the cookies hold their edges and not spread in the oven. Also, don’t overwork the dough once flour is added, and avoid using warm ingredients.
Absolutely! Swap out the all-purpose flour for your favorite gluten-free blend. I’ve done this successfully, and the cookies come out just as tender and easy to decorate.
Store your fully cooled and decorated cookies in an airtight container at room temperature for up to 5 days. If you want to keep them longer, freeze the undecorated baked cookies and decorate them fresh after thawing.
Final Thoughts
Honestly, this Shortbread Cookies with Festive Decorations Recipe has become a treasured tradition in my holiday baking lineup. It’s approachable enough for everyone in the family to enjoy baking together, but the results are so elegant and delicious they impress everyone who tries them. Give this recipe a whirl—you might find yourself coming back to decorate another batch season after season.
Print
Shortbread Cookies with Festive Decorations Recipe
- Prep Time: 15 minutes
- Cook Time: 10 minutes
- Total Time: 1 hour 10 minutes
- Yield: 20 servings
- Category: Dessert
- Method: Baking
- Cuisine: American
Description
Delightful shortbread cutout cookies perfect for holiday decorating with a buttery, tender texture and customizable icing and decorations like rosemary sprigs, sprinkles, and colored white chocolate.
Ingredients
Cookie Dough
- 1 cup unsalted butter room temperature
- ¾ cup powdered sugar
- 1 tablespoon vanilla bean paste
- ¼ teaspoon salt
- 2 cups all purpose flour gluten free if needed
- 1 tablespoon cornstarch
Icing
- 1 cup powdered sugar
- ½ teaspoon vanilla extract
- 2 tablespoons milk
Decorations
- 4 ounces white chocolate
- Rosemary sprigs
- Sprinkles
- Sanding sugar for decorating
- Red food coloring oil-based
Instructions
- Prepare the dough: Add the unsalted butter to a stand mixer bowl or large bowl with an electric mixer. Beat on medium-high speed for 1-2 minutes until smooth. Scrape down the sides.
- Add sugar and flavorings: Add the powdered sugar and beat again for 1 minute. Then add vanilla bean paste and salt, beat until combined, scraping sides and bottom of the bowl as needed.
- Incorporate dry ingredients: Add the flour and cornstarch. Beat on medium-low until the dough just starts to come together and pulls away from the bowl sides. It may seem dry at first; scrape and continue beating until dough forms. Cover with plastic wrap and chill for 30 minutes.
- Roll and cut cookies: Line a baking sheet with parchment paper and lightly flour a clean surface. Roll the dough to ¼ inch thickness. Use a floured round cookie cutter to cut half of the cookies and use scalloped and small cutters for wreath shapes. Re-roll scraps as needed. Arrange cookies 1 inch apart on baking sheet and chill for 15-30 minutes.
- Bake cookies: Preheat oven to 350°F. Bake cookies for 10 minutes, rotating halfway through, until edges are set and just barely golden. Cool on baking sheet 5 minutes, then transfer to wire rack to cool completely.
- Make icing and dip cookies: Whisk powdered sugar, vanilla extract, and milk in a shallow bowl until smooth and lump-free. Dip cooled cookie bottoms into icing carefully, lifting without breaking.
- Decorate wreath cookies: Arrange rosemary sprigs and place 2-3 small rosemary pieces on each side with red sprinkles underneath before icing sets. Add more sprinkles around cookie as desired.
- Create Santa hats: Melt white chocolate and fill a pastry bag. Mix remaining chocolate with red oil-based food coloring in a piping bag. Snip bag tips or use small tip. Pipe red hat shape with white chocolate trim and top, then add sanding sugar. Optionally, use green coloring to pipe Christmas tree designs on remaining cookies.
Notes
- Store cookies in an airtight container at room temperature up to 5 days.
- For longer storage, freeze undecorated baked cookies up to 3 months; thaw completely before decorating.
- The cookie dough can be rolled out and frozen up to 3 months; bake directly from frozen.
- Use oil-based food coloring with white chocolate to prevent seizing; water-based colorings like gel will cause white chocolate to seize.
Nutrition
- Serving Size: 1 cookie
- Calories: 150 kcal
- Sugar: 10 g
- Sodium: 70 mg
- Fat: 9 g
- Saturated Fat: 5 g
- Unsaturated Fat: 3 g
- Trans Fat: 0 g
- Carbohydrates: 17 g
- Fiber: 0.5 g
- Protein: 1 g
- Cholesterol: 25 mg

Leave a Reply