There's just something magical about combining the rich, velvety flavors of red velvet with the crunchy, chocolaty goodness of Oreos in a cheesecake. The Red Velvet Oreo Cheesecake Recipe I'm sharing today is a showstopper that's perfect for holidays or any time you want to impress without stress.

Jump to:
Why You'll Love This Recipe
I can tell you from experience, this cheesecake nails the perfect balance: it’s creamy yet dense, with just the right pop from crushed Oreos in the crust and throughout. It’s festive in color but not cloyingly sweet — honestly, it’s become my go-to recipe for any cozy get-together.
- Unique Layering: The Oreo cookie crust adds a delightful crunch that contrasts beautifully with the smooth red velvet cheesecake filling.
- Rich Flavor with a Twist: The hint of cocoa mixed with red food coloring creates that classic red velvet taste but with a cheesecake’s luscious texture.
- Manageable Size: This recipe works perfectly in small springform pans, so you can enjoy a generous dessert without leftovers overwhelming your fridge.
- Make-Ahead Friendly: It holds up well in the fridge and tastes even better the next day, making your dessert prep stress-free.

Ingredients & Why They Work
This cheesecake is all about quality and texture. Every ingredient plays a role in creating that luscious, creamy bite paired with a crunch that makes your taste buds happy. Here’s a little insight on what I use and why.

- Chocolate Sandwich Cookie Crumbs: Using crushed Oreos adds that signature chocolate crunch to the crust — don't skip the filling bits mixed into the batter for extra texture!
- Unsalted Butter: Melts into the crumbs for a sturdy yet tender crust. Salted butter can throw off balance here, so stick with unsalted.
- Cream Cheese: Full-fat and at room temperature for the creamiest, smoothest cheesecake texture — this is the star ingredient.
- Granulated Sugar: Sweetens while helping create that fluffy texture once beaten with the cream cheese.
- Full-Fat Sour Cream: Adds tang and moisture, keeping the cheesecake from being too dense.
- Eggs: They bind everything together and add richness; make sure they're at room temperature to avoid lumps!
- Unsweetened Cocoa Powder: Enhances the traditional red velvet chocolate flavor without overpowering it.
- Liquid Red Food Coloring: Gives that iconic, vibrant red—McCormick’s liquid red food coloring is my favorite for a deep, natural hue.
- Vanilla Extract: Just a touch to round out the flavors beautifully.
- Cream Cheese Whipped Cream or Small Batch Whipped Cream: For topping, I love a lightly sweetened whipped cream that balances the richness.
Make It Your Way
I love putting my spin on recipes, and this Red Velvet Oreo Cheesecake is no exception. Feel free to make it your own by adjusting sweetness, experimenting with toppings, or even swapping Oreos for a different chocolate cookie. It’s easy to personalize!
- Variation: I once added crushed peppermint Oreos to the crust for a festive twist during the holidays—totally unexpected and so delicious!
- Dairy-Free Option: I haven’t tried a full dairy-free version yet, but substituting cream cheese with a plant-based alternative could work—just be ready for a slightly different texture.
- Extra Cocoa Punch: If you like a deeper chocolate flavor, bump up the cocoa powder by a teaspoon or two. Just keep it balanced so the red velvet flavor shines through.
Step-by-Step: How I Make Red Velvet Oreo Cheesecake Recipe
Step 1: Prepping the Crust with Care
Start by preheating your oven to 325°F and wrapping your 6-inch springform pan with foil—this water bath technique helps prevent cracks and keeps the filling silky. Mix your Oreo crumbs with melted butter and press firmly into the bottom of the pan. Baking the crust for 10 minutes sets it perfectly so it won't get soggy later. Patience here pays off!
Step 2: Whipping the Cream Cheese Mixture
Beat full-fat cream cheese until smooth and fluffy with sugar and sour cream—about 2 to 3 minutes. Scrape the bowl occasionally to avoid lumps. Then, add eggs one at a time on medium-high speed. Taking your time here helps your cheesecake stay creamy and not cracked. Resist the urge to overbeat!
Step 3: Adding Flavor and Color
Mix in cocoa powder, the liquid red food coloring, and vanilla extract. This step gives you that stunning red velvet look and rich depth of flavor. I love how vivid the batter becomes — it's almost too pretty to bake!
Step 4: The Water Bath and Baking
Pour your batter over the crust and place the pan inside a larger baking pan. Adding hot water halfway up the sides of the springform pan keeps everything moist and crack-free. Bake for about 65 to 75 minutes, watching for those edges to set and the center to jiggle slightly when shaken. Using a thermometer to hit 150°F internally really helps nail perfect doneness.
Step 5: Cooling and Chilling
After baking, loosen the edges with a knife and cool the cheesecake in the water bath for 15 minutes. Then, bring it to room temperature for about an hour before refrigerating it for at least 4 hours or overnight. This resting period is key to getting that velvety texture you’ll love.
Top Tip
Over time, I’ve learned a few tricks that make all the difference in this Red Velvet Oreo Cheesecake Recipe—here are some must-know tips to get it just right on your first try.
- Room Temperature Ingredients: Make sure your cream cheese, sour cream, and eggs are not cold—this helps prevent lumps and keeps your batter slooooth.
- Don’t Overbeat the Eggs: Adding eggs slowly and beating just until smooth keeps air bubbles minimal, which prevents cracks in the finished cheesecake.
- Water Bath Magic: Wrapping the pan in foil and using the water bath ensures even baking and a perfect silkiness that’s hard to beat.
- Knife Trick: Running a knife around the pan edges right after baking stops the cheesecake from sticking and cracking as it cools.
How to Serve Red Velvet Oreo Cheesecake Recipe

Garnishes
I love topping mine with a generous swirl of cream cheese whipped cream—lightly sweetened to balance the tangy cheesecake. Sometimes I sprinkle crushed Oreos and a dusting of cocoa powder on top for that extra wow factor. It’s the kind of garnish that makes guests ask for the recipe.
Side Dishes
This cheesecake is a dessert star on its own, but I like serving it alongside fresh berries or a scoop of vanilla ice cream for a refreshing contrast. A hot cup of coffee or rich hot chocolate pairs like a charm, especially when you’re digging into the last slice.
Creative Ways to Present
For Christmas or special parties, I’ve layered the cheesecake with whole Oreo cookies embedded in the batter for a surprise bite. I also tried mini cheesecake jars with whipped cream and Oreo crumbs for easy individual portions—super cute and perfect for gifting!
Make Ahead and Storage
Storing Leftovers
Once chilled, cover the cheesecake tightly with plastic wrap or store it in an airtight container. It keeps beautifully in the fridge for up to a week, and honestly, I’ve never had it last that long because it gets devoured quickly!
Freezing
I’ve frozen individual slices wrapped in freezer-safe foil and bags. When you thaw them overnight in the fridge, the texture is just as creamy. It’s a fantastic way to prep ahead or save some for later indulgence.
Reheating
Cheesecake is best served cold, but if you want to soften it slightly, leave it at room temperature for about 15 minutes before serving. This wakes up the flavors without risking losing that signature creamy texture.
Frequently Asked Questions:
I don’t recommend whipped or low-fat cream cheese for this recipe since it affects the texture and richness. Full-fat cream cheese at room temperature gives you the smooth, creamy cheesecake everyone loves.
Pre-baking the Oreo crust helps it set up firmly so it won’t get soggy when the cheesecake batter is added. It also enhances the cookie flavor and adds a little crunch to your cheesecake base.
Absolutely! This recipe fits well in a 7-inch springform pan without adjustments. For larger pans, like 9 inches, you might want to look for a dedicated chocolate cheesecake recipe and adjust the flavors accordingly as noted in the recipe notes.
I prefer liquid red food coloring, such as the McCormick brand, because it delivers a rich, vibrant color without altering the texture. Gel food coloring can work too, but use sparingly to avoid a bitter taste.
Final Thoughts
Honestly, the Red Velvet Oreo Cheesecake Recipe has quickly become one of my favorite desserts to make and share. It feels special but isn't complicated, and trust me, everyone’s going to ask you for seconds. Give it a try—you’ll enjoy the rich flavors, playful texture, and the festive vibe it brings to your table. Plus, it’s a delicious excuse to indulge in something extraordinary at home with family or friends.
Print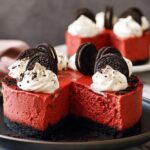
Red Velvet Oreo Cheesecake Recipe
- Prep Time: 20 minutes
- Cook Time: 1 hour 15 minutes
- Total Time: 6 hours 35 minutes
- Yield: 6 servings
- Category: Dessert
- Method: Baking
- Cuisine: American
Description
This festive Christmas Red Velvet Oreo Cheesecake features a rich, creamy cream cheese filling with classic red velvet flavors and a crunchy Oreo cookie crust. Perfect for holiday celebrations, it’s baked in a water bath for a smooth and silky texture, then topped with whipped cream for an indulgent finish.
Ingredients
Crust
- 1 cup chocolate sandwich cookie crumbs, such as Oreo
- 2 tablespoons unsalted butter, melted
Filling
- 16 ounces (2 blocks or 16 tablespoons) full-fat cream cheese, room temperature and not cold to the touch (do not sub fat free or whipped)
- ½ cup granulated sugar
- 2 tablespoons full-fat sour cream, room temperature and not cold to the touch
- 2 eggs, room temperature and not cold to the touch
- 1 tablespoon unsweetened cocoa powder
- 2 teaspoons liquid red food coloring (McCormick brand or similar)
- 1 teaspoon vanilla extract
Topping
- Cream Cheese Whipped Cream or Small Batch Whipped Cream, for topping
Instructions
- Preheat and prepare pan: Preheat oven to 325 degrees Fahrenheit. Wrap the outside of a 6x2 or 6x3 springform pan with foil to prevent water from leaking in. Lightly grease the inside of the pan.
- Make crust: In a large bowl, combine the chocolate sandwich cookie crumbs and melted butter until evenly mixed. Press the mixture firmly into the bottom of the springform pan. Bake for 10 minutes to set the crust.
- Mix filling: In a large bowl with a stand mixer fitted with a paddle attachment or using a hand mixer on medium-high speed, beat cream cheese, granulated sugar, and sour cream until light and fluffy, about 2 to 3 minutes, scraping down the sides of the bowl as needed.
- Add eggs: Beat in the eggs one at a time, about 1 minute each, blending well but avoiding overbeating to maintain a smooth texture.
- Add flavorings: Scrape down the bowl then add the unsweetened cocoa powder, red food coloring, and vanilla extract. Beat until just combined with a uniform red velvet color.
- Assemble cheesecake: Pour the batter over the baked crust in the springform pan. Place the springform pan inside a larger 8x8-inch or bigger baking pan.
- Water bath bake: Carefully pour hot water into the larger pan until it reaches halfway up the sides of the springform pan, being careful not to let water seep inside the foil. Bake for 65 to 75 minutes or until the edges are set and lightly browned, the center is mostly set with a slight wiggle, and internal temperature reaches 150 degrees Fahrenheit.
- Cool slightly: Remove the cheesecake from the oven and gently run a knife around the edges to loosen it from the pan. Let it cool in the water bath for 15 minutes.
- Cool completely: Remove the springform pan from the water bath and let it cool to room temperature for 1 hour.
- Chill: Cover and refrigerate the cheesecake for at least 4 hours or overnight to fully set.
- Serve: Before serving, top with cream cheese whipped cream or small batch whipped cream. Store leftover cheesecake covered in an airtight container in the refrigerator for up to 5 to 7 days.
Notes
- For a 9-inch cheesecake, follow the 9 Inch Chocolate Cheesecake recipe but omit the chocolate, adding ¼ cup sour cream, 2 tablespoons cocoa powder, and 1 tablespoon red food coloring instead.
- Try other small cheesecake recipes such as 6 Inch Cheesecake, Chocolate Cheesecake with Oreo Crust, Small Pumpkin Cheesecake, and Peanut Butter Cheesecake for variety.
- For more red velvet treats, check out Small Red Velvet Cake, Red Velvet Cupcakes, Red Velvet Sugar Cookies, and Red Velvet Bars recipes.
Nutrition
- Serving Size: 1 slice (⅙ of cheesecake)
- Calories: 450 kcal
- Sugar: 30 g
- Sodium: 280 mg
- Fat: 33 g
- Saturated Fat: 19 g
- Unsaturated Fat: 10 g
- Trans Fat: 0.5 g
- Carbohydrates: 30 g
- Fiber: 1 g
- Protein: 7 g
- Cholesterol: 115 mg


Leave a Reply