If you’re anything like me and can’t resist the charm of a soft, chewy cookie, then this Red Velvet Chocolate Chip Cookies Recipe is about to become your new obsession. Imagine classic red velvet flavors swirling with mixed chocolate chunks in every bite—it’s seriously magical!

Jump to:
Why You'll Love This Recipe
I still remember the first time I made these cookies—I was hooked after the first batch came out of the oven! They seriously combine the best of two worlds: red velvet’s rich, slightly tangy flavor with the gooey goodness of chocolate chunks.
- Soft, Chewy Texture: Thanks to the caramelized brown butter and balanced cocoa, these cookies melt in your mouth.
- Flavor Complexity: The mix of white, milk, and dark chocolate creates layers of chocolatey bliss.
- Perfectly Balanced Sweetness: Brown and white sugars blend for depth without overwhelming sweetness.
- Make Ahead Friendly: Chilling the dough improves flavor, and you can even freeze the dough balls for convenience.
Ingredients & Why They Work
Before you start, gather everything fresh. I highly recommend using good-quality Dutch-processed cocoa and real vanilla bean paste—not only for flavor but also for that beautiful color and aroma. And don’t skimp on the butter; caramelizing it adds a nutty note that takes these cookies next level.

- Unsalted Butter: Browning it develops a rich, caramel flavor that makes the cookie base irresistibly delicious.
- Light or Dark Brown Sugar: Adds moisture and depth of flavor with a subtle molasses touch.
- White Sugar: Balances the sweetness and aids in crispness on the edges.
- Egg & Egg Yolk: Provide structure and richness for a tender crumb.
- Vanilla Bean Paste: Offers an intense vanilla flavor without the seeds fuss.
- Vinegar: Enhances the classic tang of red velvet and works with leaveners for a soft texture.
- Gel Red Food Color: Gives that iconic red hue without watering down the dough.
- All Purpose Flour: The base that provides structure while keeping things tender.
- Dutch Processed Cocoa Powder: For that deep chocolate flavor with smooth bitterness characteristic of red velvet.
- Salt: Balances sweetness and enhances all flavors in the cookie.
- Baking Powder & Baking Soda: Help achieve the perfect rise and soft texture.
- Chopped Chocolate (White, Milk & Dark): A mix of chocolate varieties adds richness, variety, and bursts of flavor in every bite.
- Flakey Sea Salt (Optional): A final sprinkle creates a gourmet touch by contrasting the sweet and highlighting the chocolate.
Make It Your Way
One of the best things about this Red Velvet Chocolate Chip Cookies Recipe is how easy it is to put your own spin on it. Whether you want to tweak the chocolate blend, add a little extra flair, or adapt it for special dietary needs, these cookies are a great canvas for creativity and personalization.
- Variation: I love swapping some of the chopped chocolate for white chocolate chips only to make the cookies sweeter and creamier. It adds a lovely contrast to the rich red velvet base and gives each bite a silky smooth surprise.
- Less Salt: If you prefer a milder salt flavor, reduce the salt in the dry mix from ¾ teaspoon to ½ tsp. It softens the overall flavor and is great if you’re serving these to kids or those sensitive to salt.
- Overnight Chilling: Chilling the dough overnight instead of just 2 hours makes a huge difference in flavor depth and cookie texture. Trust me—this step is totally worth the wait for chewy, perfectly thick cookies every time.
- Freeze & Bake Later: Don’t have time to bake them all at once? Freeze the dough balls in an airtight container and bake them straight from frozen, just adding 2-3 minutes to the baking time. Perfect for spontaneous cookie cravings!
- Seasonal Touch: During the holidays, try folding in peppermint chips or swapping the vanilla bean paste for almond extract for a festive twist that will wow your family and friends.
Step-by-Step: How I Make Red Velvet Chocolate Chip Cookies Recipe
Step 1: Brown the butter to unlock rich, nutty flavors
Start by placing 10 tablespoons of unsalted butter in a non-stick pan over medium-low heat. Stir the butter continuously—this part is key—until you see it turn a beautiful golden brown and it fills your kitchen with a deep caramel-y, nutty aroma. This step takes just a few minutes but adds unbelievable depth and complexity to your cookies.
Step 2: Gently mix sugars without melting them
Turn the heat to the lowest setting and whisk in ½ cup packed brown sugar and ⅓ cup white sugar. Do this for just about one minute. Remember, the goal here is to gently dissolve the sugars into the butter, creating a slightly grainy texture but not caramelizing or melting them. Then, immediately take the mixture off the heat to prevent burning.
Step 3: Cool and add eggs and flavorings
Give the butter and sugar mixture 5 minutes to cool to warm but no longer hot. This is important so you don’t scramble the eggs. Now whisk in 1 large egg and 1 egg yolk, 1 tablespoon vanilla bean paste, ½ teaspoon vinegar, and ½ tablespoon gel red food color. Whisk vigorously for about 2 minutes until silky smooth and creamy, showcasing a gorgeous deep red hue.
Step 4: Prepare the dry ingredients and combine carefully
Sift together 1 ¼ cups all-purpose flour, 2 tablespoons Dutch processed cocoa powder, ¾ teaspoon salt, ½ teaspoon baking powder, and ¼ teaspoon baking soda in a separate bowl. Then, make sure the wet ingredients are still warm (not hot), and gently fold the dry mixture into the wet with a rubber spatula. This light folding helps keep the cookies tender and prevents toughness—stop mixing as soon as everything is just combined.
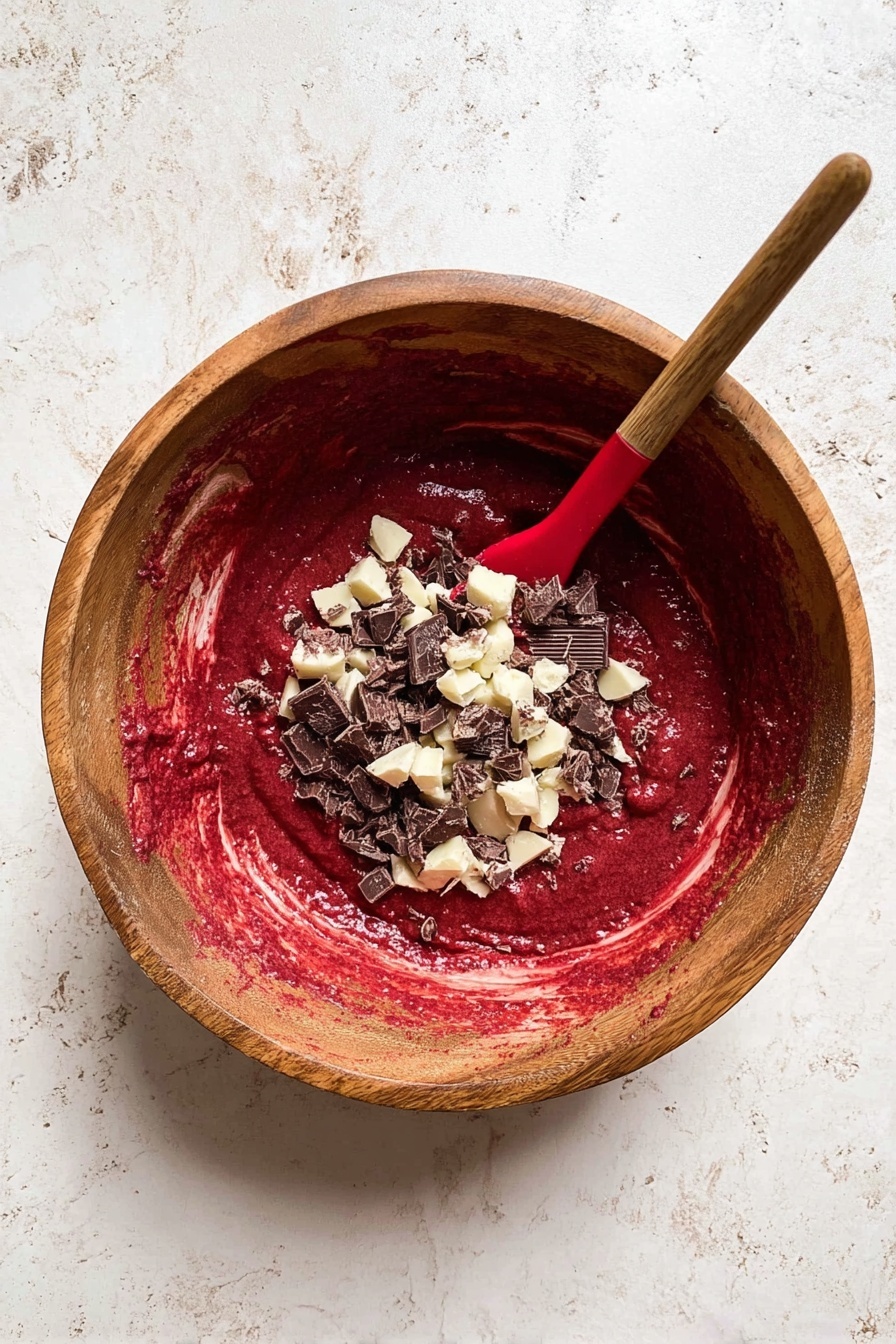
Step 5: Fold in your chocolate chunks
Carefully stir in 8 ounces of chopped chocolate, using a mix of white (3 oz), dark (2.5 oz), and milk (2.5 oz) chocolates for the perfect balance of creamy, bittersweet, and sweet bites. The chunks should be evenly distributed but handled gently so the dough doesn’t get overworked.
Step 6: Scoop dough and chill for the best texture
Use a 2-tablespoon cookie scoop to portion out 10 dough balls. If your dough feels too runny to shape, pop it into the refrigerator for 10 minutes to firm up. Arrange the balls on a plate or baking sheet, optionally sprinkle some extra chocolate chunks on top, then chill for at least 2 hours—overnight chilling will deliver the best flavor and texture, I promise!
Step 7: Bake at 375°F for soft and gooey cookies
Preheat your oven to 375°F (conventional, no fan). Line a large light-colored baking sheet with parchment paper for even baking. Place the chilled dough balls onto the sheet with at least 3 inches between them to allow spreading. Bake for 12 minutes, or slightly adjust if you want them softer or firmer. I always recommend testing with one cookie first to dial in your preferred gooeyness.
Step 8: Add finishing touches and enjoy warm
Once baked, sprinkle the cookies with a pinch of flakey sea salt if you like that sweet-salty balance. Let them cool right on the baking sheet for 10-15 minutes so they set perfectly without losing softness. Serve warm for the ultimate indulgence—these cookies taste heavenly right out of the oven!
Top Tip
These tips come straight from my kitchen to yours—little nuggets of wisdom that can make all the difference when baking the Ultimate Red Velvet Chocolate Chip Cookies Recipe.
- Brown Butter Technique: Keep stirring continuously and watch closely; the moment it turns a nice caramel-brown with a nutty aroma, it’s perfect. This step adds so much depth to the cookie's flavor—don’t rush it!
- Dough Temperature Matters: Make sure your wet ingredients are warm but not hot before adding dry ingredients. If your dough feels too soft to scoop, a 10-minute chill makes shaping easier and keeps the cookies from spreading too much in the oven.
- Chill for Texture: Refrigerating the dough for at least 2 hours, preferably overnight, really enhances the flavor and gives you cookies with that irresistible chewy-soft center and slightly crisp edges.
- Don’t Overmix: Folding the dry ingredients in gently until just combined is key. I learned that overmixing can make the cookies tough instead of tender, so patience here pays off big time.
How to Serve Red Velvet Chocolate Chip Cookies Recipe
Garnishes
Sprinkle a pinch of flaky sea salt on top immediately after baking to create a delightful contrast against the sweet, rich red velvet and chocolate. For a festive touch, add a dusting of powdered sugar or even a light drizzle of white chocolate glaze. A tiny dollop of whipped cream or a few fresh berries on the side can also lift the presentation beautifully.
Side Dishes
Pair these cookies with a cold glass of milk, a frothy cappuccino, or even a scoop of classic vanilla ice cream for an indulgent dessert experience. If you want to get creative, serve them alongside a warm cup of spiced chai or a fruity red wine to complement the cocoa and chocolate notes.
Make Ahead and Storage
Storing Leftovers
Store any leftover cookies in an airtight container at room temperature for up to 3 days to keep them soft and chewy. Make sure they are completely cooled before sealing to prevent sogginess. For a slightly refreshed texture, warm them briefly before eating.
Freezing
You can freeze the cookie dough balls in an airtight container or freezer bag. When you’re ready to bake, place the dough balls on your baking sheet directly from the freezer and increase the baking time by 2-3 minutes. This makes it super convenient to enjoy freshly baked cookies anytime.
Reheating
If you have leftover cookies that aren’t fresh, pop one in the microwave for 10–15 seconds to restore that gooey, melty chocolate goodness and soften the cookie again. Trust me, it’s like bringing them back to life!
Frequently Asked Questions:
You can substitute regular cocoa powder, but Dutch processed cocoa has a smoother, less acidic flavor which complements the red velvet taste better. If using regular cocoa, the flavor might be slightly more bitter.
Chilling solidifies the butter and helps control spread during baking, leading to thicker, chewier cookies. It also lets the flavors meld together, giving you a richer taste.
The vinegar helps enhance the red velvet’s signature tang and reacts slightly with the baking soda for lift. If you prefer to omit it, the cookies will still bake well but might be a touch less vibrant in flavor.
Try increasing the proportion of dark and milk chocolate chunks or add a handful of mini chocolate chips to the dough. You could also sprinkle extra chocolate chunks on top before baking for that extra indulgence.
Final Thoughts
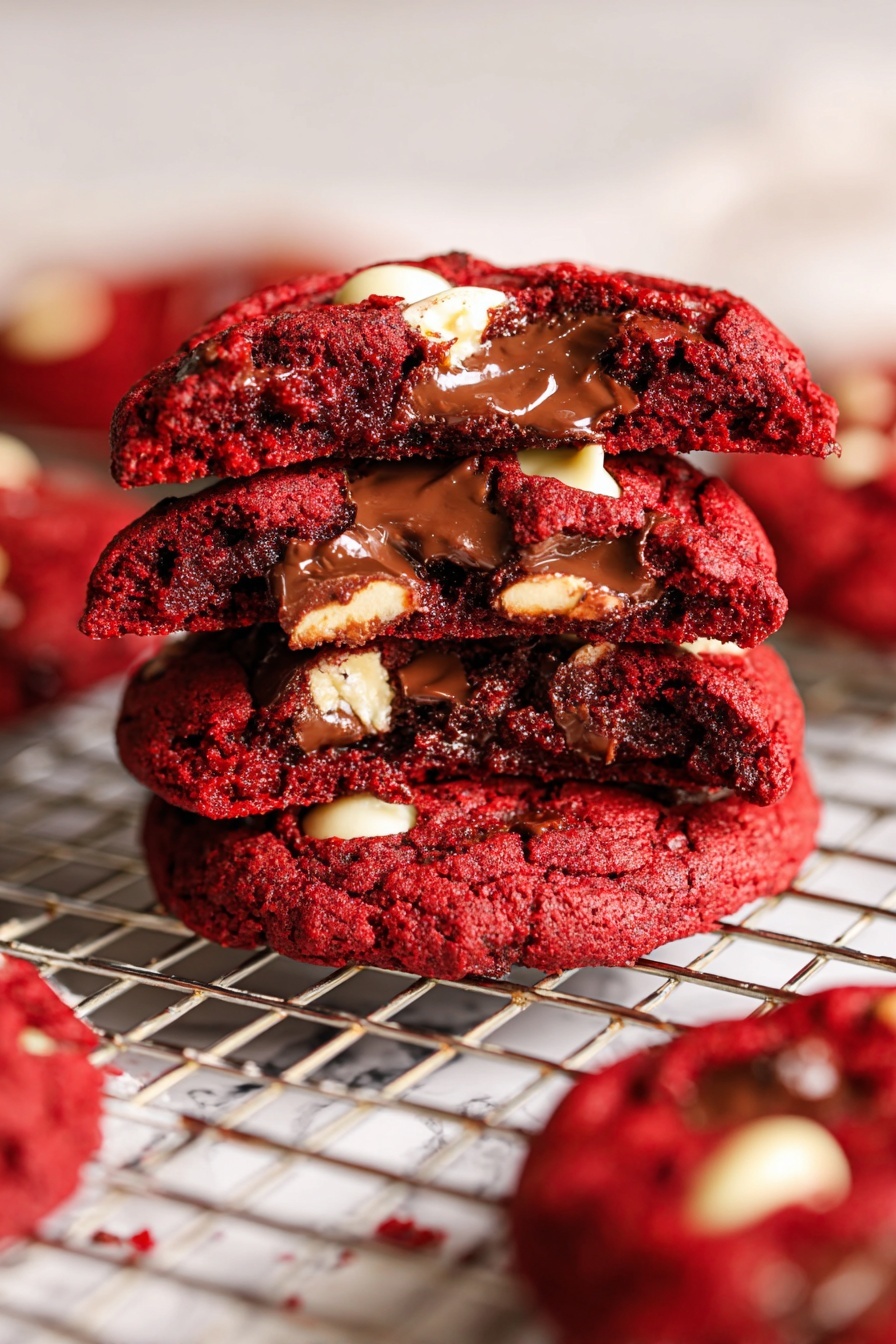
Baking these Ultimate Red Velvet Chocolate Chip Cookies always feels like a little celebration in my kitchen. Their tender, chewy texture paired with that stunning red color and gooey mixed chocolates never fails to impress family and friends. If you give this recipe a whirl, I hope it brings you just as much joy and comfort as it has for me. Happy baking and even happier eating!
Print
Red Velvet Chocolate Chip Cookies Recipe
- Prep Time: 20 minutes
- Chilling Time: 2 hours
- Cook Time: 12 minutes
- Total Time: 2 hours 32 minutes
- Yield: 10 cookies
- Category: Dessert
- Method: Baking
- Cuisine: American
Description
These Ultimate Red Velvet Chocolate Chip Cookies combine the rich flavor of red velvet with the indulgence of mixed chocolate chunks. Caramelized butter and a blend of cocoa and flour create a soft, chewy texture, while the mixture of white, milk, and dark chocolate adds a luscious bite. Perfect for a special dessert or cozy treat, these cookies are best enjoyed fresh but can be refrigerated or frozen for convenience.
Ingredients
Wet Ingredients
- 10 tablespoon unsalted butter (140g)
- ½ cup light or dark brown sugar, packed (100g)
- ⅓ cup white sugar (65g)
- 1 large egg
- 1 egg yolk
- 1 tablespoon vanilla bean paste
- ½ teaspoon vinegar
- ½ tablespoon gel red food color
Dry Ingredients
- 1 ¼ cup all purpose flour (160g)
- 2 tablespoon Dutch processed cocoa powder (12g)
- ¾ teaspoon salt
- ½ teaspoon baking powder
- ¼ teaspoon baking soda
Add-ins
- 8 oz chopped chocolate (225g) - mix of white, milk, and dark chocolate (3 oz white, 2.5 oz dark, 2.5 oz milk)
- Optional: flakey sea salt to sprinkle on top
Instructions
- Brown the butter: Place the unsalted butter in a non-stick pan over medium-low heat. Stir continuously for a few minutes until the butter turns brown and releases a caramel-y nutty aroma.
- Add sugars: Lower the heat to the lowest setting, add brown and white sugars, and whisk gently for 1 minute. Remove from heat. The sugars should dissolve slightly without caramelizing; the mixture may look grainy.
- Cool the mixture: Let the butter and sugar mixture cool off for 5 minutes until warm but not hot.
- Mix wet ingredients: Add the egg, egg yolk, vanilla bean paste, vinegar, and gel red food color to the warm butter mixture. Whisk vigorously for about 2 minutes until smooth and creamy.
- Combine dry ingredients: Sift together the all-purpose flour, Dutch processed cocoa powder, salt, baking powder, and baking soda in a separate bowl. Mix well.
- Incorporate dry into wet: Ensure the wet ingredients are warm, not hot. Gently fold the dry ingredients into the wet mixture using a rubber spatula until just combined. Avoid overmixing.
- Fold in chocolate chunks: Carefully fold in the chopped mixed chocolates until evenly distributed.
- Form cookie dough balls: Use a 2 tablespoon cookie scoop to make 10 dough balls. If the dough feels too runny to scoop, refrigerate it for 10 minutes. Shape dough gently without pressing.
- Prepare for chilling: Place dough balls on a plate or baking sheet, optionally adding some extra chocolate chunks on top. Refrigerate for at least 2 hours or ideally overnight for best texture.
- Preheat oven and prepare baking sheet: Preheat the oven to 375F (conventional, no fan). Line a large, light-colored baking sheet with parchment paper.
- Arrange cookies for baking: Transfer the chilled dough balls to the baking sheet, leaving at least 3 inches between each cookie to allow for spreading.
- Bake the cookies: Bake for 12 minutes, or adjust time to achieve desired softness and gooeyness. It’s recommended to bake a test cookie first.
- Finish and cool: Optionally sprinkle flakey sea salt on top immediately after baking. Let cookies cool on the baking sheet at room temperature for 10-15 minutes before serving.
Notes
- These cookies have the best texture when eaten freshly baked but can be microwaved for 10-15 seconds to refresh if not fresh.
- Cookie dough balls can be frozen in an airtight container and baked directly from frozen; increase baking time by 2-3 minutes accordingly.
- For a less salty flavor, reduce salt in dry ingredients from ¾ teaspoon to ½ tsp.
- Adjust the ratio of white, milk, and dark chocolate chunks to your preference for varied flavor profiles.
- Letting the dough chill overnight improves flavor and cookie texture significantly.
Nutrition
- Serving Size: 1 cookie
- Calories: 280 kcal
- Sugar: 18 g
- Sodium: 110 mg
- Fat: 15 g
- Saturated Fat: 8 g
- Unsaturated Fat: 6 g
- Trans Fat: 0 g
- Carbohydrates: 32 g
- Fiber: 2 g
- Protein: 3 g
- Cholesterol: 55 mg


Leave a Reply