There’s something magic about the crisp, airy texture combined with the refreshing burst of peppermint flavor in the Peppermint Meringue Cookies Recipe. These cookies are light, festive, and remarkably simple to make, perfect for sharing holiday cheer or enjoying a sweet moment anytime.

Jump to:
Why You'll Love This Recipe
I’ve made peppermint meringue cookies over several seasons now, and every time I’m surprised by how something so simple feels so special. Light as air, with that perfect peppermint kick, they’re an absolute crowd-pleaser and super rewarding to bake.
- Delightfully Light Texture: These cookies melt in your mouth, offering a crisp crunch without heaviness.
- Festive Peppermint Flavor: The peppermint extract adds that holiday vibe, instantly brightening your taste buds.
- Easy to Customize: You can pipe them in multiple colors or shapes, making them as playful or elegant as you like.
- Long Shelf Life: When stored properly, these cookies stay fresh and crisp for up to a week—perfect for making ahead.

Ingredients & Why They Work
The beauty of this Peppermint Meringue Cookies Recipe lies in its simple, clean ingredients. Each plays a role in creating that airy, crisp texture and refreshing flavor that’s so addictive.

- Egg whites: The foundation for meringues, they whip up into stiff peaks that create that classic lightness.
- White vinegar: Adds stability and helps the meringue hold its shape during baking.
- Cornstarch: Gives the cookies a tender texture and keeps them from becoming brittle.
- Caster sugar: Dissolves easily, helping the meringue become glossy and smooth without grittiness.
- Peppermint extract: The star flavor, giving that crisp, minty freshness that makes these cookies so festive.
- Gel food coloring: Optional, but fantastic for creating those charming red and green swirls that scream holiday spirit.
Make It Your Way
One of the reasons I keep coming back to this Peppermint Meringue Cookies Recipe is that it’s a blank canvas for fun variations. I love experimenting with colors and flavors—sometimes red and green for Christmas, other times a soft pink with raspberry extract for Valentine’s Day.
- Variation: I once added finely crushed candy canes on top before baking, which gave a delightful crunch and extra peppermint punch.
- Dietary option: This recipe is naturally gluten-free and low-fat, making it a great treat for many diets.
Step-by-Step: How I Make Peppermint Meringue Cookies Recipe
Step 1: Whip Those Egg Whites Just Right
Start by beating your room temperature egg whites on high speed until they’re frothy—about 30 seconds. This first step is crucial because if you add the sugar too early, the meringue won’t fluff properly. I always separate my eggs carefully; even a tiny bit of yolk can sabotage the whole batch!
Step 2: Add the Vinegar and Cornstarch
Once frothy, add the white vinegar and cornstarch, then continue beating until soft peaks form—this usually takes about a minute. The vinegar stabilizes the mixture, while cornstarch creates that tender texture.
Step 3: Incorporate Sugar Slowly
Now, the sugar goes in, but very slowly. I add it in a steady stream while beating on medium-high. This step takes roughly 4 minutes until you see stiff, glossy peaks. If you feel any graininess, keep beating a little longer—it’s worth the patience.
Step 4: Add Peppermint Extract and Gel Food Coloring
Gently fold in your peppermint extract to distribute that cool flavor evenly. If you want, you can prepare two portions, tint one red and the other green using gel food coloring. I like to prep a pastry bag lined with a star tip and brush some red gel along the inside for an extra festive touch.
Step 5: Pipe and Bake Low and Slow
Pipe one-inch star-shaped cookies onto parchment-lined sheets—don’t crowd them. Bake in a 200°F oven for 80 minutes, then turn the oven off and let the cookies dry in there for at least 4 hours or overnight. This slow drying is essential for that melt-in-your-mouth crispness.
Top Tip
From my many batches of peppermint meringue cookies, I've learned a few tricks that really make a difference in your results. These will help you avoid the common pitfalls and get perfect cookies every time.
- Perfect Egg Whites: Make sure your mixing bowl is squeaky clean and grease-free before whipping whites—any fat will stop the peaks from forming.
- Sugar Timing: Don’t rush adding the sugar; wait until you get that initial foamy texture so the meringue develops fully.
- Low and Slow Baking: The slow drying turns these cookies crispy without browning—keep your oven temperature steady to avoid overbaking.
- Storage: Store your baked cookies in airtight containers with parchment paper layers to keep them crisp and prevent sticking.
How to Serve Peppermint Meringue Cookies Recipe

Garnishes
I love serving these with a little extra crushed candy cane sprinkled on top or alongside a dollop of whipped cream for a fun contrast. The festive red and green swirls make these cookies stand out even without extra garnish.
Side Dishes
These cookies pair beautifully with hot chocolate or peppermint-flavored lattes. For a party, I sometimes add a bowl of fresh berries or even a small cheese platter to balance the sweetness.
Creative Ways to Present
For Christmas gatherings, I like arranging the meringues on a tiered dessert stand, alternating red and green rows for that festive feel. You can also gift them in decorative boxes wrapped with a ribbon—a personal touch that friends and family adore.
Make Ahead and Storage
Storing Leftovers
I store my leftover peppermint meringue cookies in airtight containers layered with parchment paper. This keeps them crisp and prevents any flavors from mingling. They’ll last beautifully for up to a week if stored in a cool, dry place.
Freezing
Freezing is a great option if you want to prep batches ahead of time. I flash-freeze the piped cookies on parchment sheets until firm, then transfer them to sealed freezer bags. Bake straight from frozen, adding a few minutes to the bake time.
Reheating
I generally don’t reheat meringue cookies because the residual warmth from baking is perfect. However, if they soften, a brief few minutes in a low oven (around 200°F) can restore crispness without melting them.
Frequently Asked Questions:
Powdered sugar is not a good substitute for caster sugar in meringues because it contains cornstarch and is much finer, which affects the texture and stability. If you don’t have caster sugar, you can process granulated sugar in a food processor until fine, but avoid powdered sugar.
Adding sugar before the egg whites become frothy can prevent the meringue from whipping up properly, resulting in a wetter, less stable dough that won’t form stiff peaks. Always wait until the whites are frothy before adding sugar slowly.
When you lift your whisk from the meringue, the peaks should stand straight and not fold over. The mixture should look glossy and hold its shape firmly—that’s stiff peaks, exactly what you want for meringue cookies.
While it’s possible to whisk egg whites by hand, it’s quite labor-intensive and time-consuming. An electric mixer makes it easier to achieve stiff, glossy peaks consistently, which is crucial for perfect meringue cookies.
Final Thoughts
This Peppermint Meringue Cookies Recipe holds a special place in my heart because it brings together simplicity and celebration in every bite. I hope these cookies bring that same joy and festive spirit to your kitchen. Trust me, once you try making these crisp, minty delights, you’ll find yourself reaching for this recipe again and again—whether it’s the holidays or just a day that calls for something sweet and lovely.
Print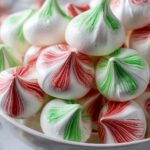
Peppermint Meringue Cookies Recipe
- Prep Time: 15 minutes
- Cook Time: 1 hour 20 minutes
- Total Time: 5 hours 35 minutes
- Yield: 60 cookies
- Category: Dessert
- Method: Baking
- Cuisine: American
- Diet: Vegetarian
Description
Delight in these light and airy Christmas Meringue Cookies, flavored with peppermint and artistically decorated with festive gel food coloring. Perfectly crisp and melt-in-your-mouth sweet, these cookies make a charming holiday treat or gift.
Ingredients
Meringue Base
- 4 egg whites room temperature
- 1 tablespoon white vinegar
- 1 tablespoon cornstarch
- 1 cup caster sugar
- ¾ teaspoon peppermint extract
Decoration
- Red gel food coloring
- Green gel food coloring
Instructions
- Beat Egg Whites: Beat egg whites on high speed until foamy, approximately 30 seconds, to build initial structure.
- Add Vinegar and Cornstarch: Incorporate the white vinegar and cornstarch and continue beating until soft peaks form, about 1 minute.
- Slowly Add Sugar: Gradually add caster sugar in a steady stream while beating, then blend in peppermint extract. Beat vigorously for about 4 minutes until stiff peaks form for the perfect meringue texture.
- Prepare Pastry Bags: Using a star tip, pipe lines of red gel food coloring inside one pastry bag and lines of green gel food coloring inside another to create festive patterns on the cookies.
- Pipe Cookies: Fill each pastry bag with half of the meringue mixture and pipe approximately one-inch star-shaped cookies onto parchment-lined baking sheets.
- Bake Meringues: Bake in a preheated oven at 200 degrees Fahrenheit for 80 minutes to dry out the cookies gently without browning.
- Drying Phase: After baking, turn off the oven and leave the cookies inside for 4 hours or overnight to ensure they dry thoroughly and develop the perfect crisp texture.
- Storage: Store completely cooled cookies in an airtight container for up to one week. For optimal taste and texture, consume within a few hours after baking.
Notes
- Do not add sugar too early; wait until egg whites are foamy to ensure the meringue forms stiff peaks.
- Be careful separating egg whites from yolks as any yolk contamination can prevent proper meringue formation.
- Monitor oven temperature carefully; higher temperatures can spoil the light texture by cooking rather than drying.
- Meringue cookies are best eaten soon after baking to enjoy their delicate crispness.
- If caster sugar is unavailable, pulse granulated sugar in a food processor until finer, but do not substitute powdered sugar.
Nutrition
- Serving Size: 1 cookie
- Calories: 15 kcal
- Sugar: 3 g
- Sodium: 5 mg
- Fat: 0 g
- Saturated Fat: 0 g
- Unsaturated Fat: 0 g
- Trans Fat: 0 g
- Carbohydrates: 4 g
- Fiber: 0 g
- Protein: 0.3 g
- Cholesterol: 0 mg


Leave a Reply