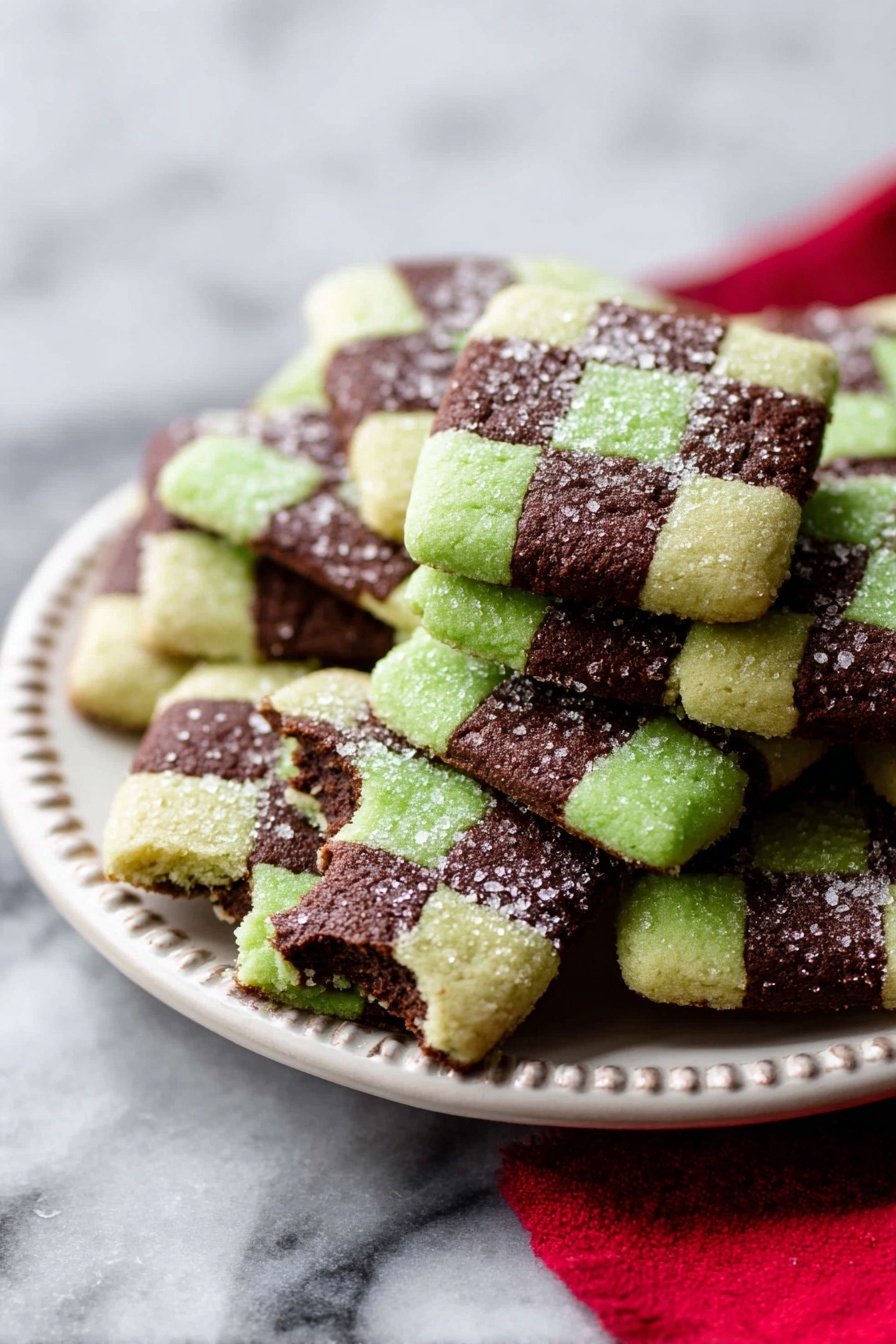
There’s something so delightfully fun about making treats that are as much a joy to look at as they are to eat. That’s exactly why I adore this Mint Chocolate Checkerboard Cookies Recipe—each bite bursts with refreshing mint and rich chocolate, all wrapped up in an eye-catching checkerboard pattern.

Jump to:
- Why You'll Love This Recipe
- Ingredients & Why They Work
- Make It Your Way
- Step-by-Step: How I Make Mint Chocolate Checkerboard Cookies Recipe
- Top Tip
- How to Serve Mint Chocolate Checkerboard Cookies Recipe
- Make Ahead and Storage
- Frequently Asked Questions:
- Final Thoughts
- Mint Chocolate Checkerboard Cookies Recipe
Why You'll Love This Recipe
I first tried making these mint chocolate checkerboard cookies on a cozy Sunday afternoon, and not only were they a crowd-pleaser, but crafting the checkerboard pattern felt like edible art. What’s great is how the mint and chocolate balance perfectly without overpowering each other, making these cookies seriously addictive.
- Visual Impact: The checkerboard pattern is stunning and impresses every single time, perfect for gifting or holiday gatherings.
- Flavor Harmony: The fresh peppermint extract pairs beautifully with rich cocoa for a perfect flavor combo.
- Manageable Prep: While it looks fancy, the step-by-step process is totally doable without fancy tools.
- Versatility: You can customize these with your favorite extracts or tweaks without losing the classic appeal.
Ingredients & Why They Work
These ingredients come together to give you a cookie dough that's both flavorful and sturdy enough to hold the checkerboard shape when baked. A few simple details help make the flavor pop and the pattern crisp.

- All-purpose flour: Provides structure; spoon and level it for accuracy to avoid a dense dough.
- Baking powder: Gives just the right amount of lift and lightness without spreading too much.
- Salt: Enhances all the flavors—don’t skip it!
- Unsalted butter: Softened to room temperature for perfect creaming with sugar; avoids greasy dough.
- Granulated sugar: Adds sweetness and helps with that classic cookie snap.
- Egg + egg yolk: The yolk adds richness and chewiness while the egg white can be saved for an egg wash to make your cookies sparkle.
- Pure vanilla extract: Balances the mint and chocolate for a warm undernote.
- Peppermint extract: Use just 1 teaspoon to give that fresh mint flavor without overwhelming the dough.
- Green food coloring (optional): Just a drop or two to get that pretty minty green shade without making your dough taste artificial.
- Cocoa powder: Unsweetened and high quality to deepen the chocolate flavor without bitterness; Dutch-process works beautifully.
- Milk: Helps loosen up the chocolate dough a bit, making it easier to work with.
- Espresso powder (optional): Intensifies the chocolate flavor without making it taste like coffee.
- Coarse sugar (optional): Adds a sparkly crunch on top when sprinkled after an egg wash.
Make It Your Way
I love experimenting with the amount of peppermint extract depending on the season—more mint for holidays, less for every day. You can swap the vanilla for almond extract for a nutty twist, or even try orange zest for a fun, fresh spin. The pattern itself invites personalization—I sometimes use mini chocolate chips to add an extra bit of texture to the chocolate dough.
- Variation: Once, I swapped peppermint extract for spearmint and added crushed candy canes in the dough for an ultra festively minty treat.
Step-by-Step: How I Make Mint Chocolate Checkerboard Cookies Recipe

Step 1: Whisk together your dry ingredients
This is where your foundation starts. Mix the flour, baking powder, and salt in a medium bowl and set it aside. I always double-check my spooning and leveling here with the flour—this little habit makes a big difference in dough texture.
Step 2: Cream butter and sugar until light and fluffy
Using a hand mixer or stand mixer, beat the softened butter with the granulated sugar on medium-high speed for about 3 minutes. You want the mixture to be pale and airy—that’s your cue that you’ve got plenty of air in there for a tender cookie. If you’re not confident with creaming, don’t worry; there’s a handy tutorial linked above to get you started.
Step 3: Add eggs and vanilla, then combine dry ingredients
Beat in the egg, extra yolk, and vanilla on high speed until combined well. Scrape the sides so everything mixes evenly, then lower your mixer and add the flour mixture. Mix on low just until the dough comes together—a bit thick and sticky, which is totally normal. Remember, don’t over-mix here or the cookies might turn out tough!
Step 4: Divide and flavor your doughs
Split the dough into two even halves. One half is for the mint flavor—add peppermint extract and one or two drops of green food coloring until you reach the shade you love. The other half gets cocoa powder, milk, and optionally espresso powder for depth. Mix both until well combined but keep an eye on your dough's consistency—it should remain pliable.
Step 5: Shape dough blocks and chill just right
Shape each dough half into a 6-inch rectangle, about 2 inches thick and wide, then wrap tightly with plastic wrap. Here’s the trick: chill for exactly 1 hour. This step firms the dough enough to cut and shape but keeps it soft enough to assemble your checkerboard pattern neatly. If you over-chill, let the dough warm up for 15-30 minutes before moving on.
Step 6: Cut strips and assemble your checkerboard
Slice each block lengthwise into 3 strips, then each strip into thirds for 9 strips per dough. Trim edges to get nice square pieces. Lay out strips alternating mint and chocolate to build your checkerboard block—doing this twice with the alternate pattern starts you off with two blocks. Press gently but firmly to avoid gaps, ensuring a flawless pattern once baked.
Step 7: Chill your checkerboard blocks and prepare to bake
Wrap up your newly assembled blocks and refrigerate for 2 more hours or keep chilled for up to 4 days before slicing. When ready, slice into ½-inch thick cookies, trimming each slice for neat squares if you want that perfect look. Thinner cookies are delicious too; just reduce baking time by a minute.
Step 8: Bake and enjoy
Preheat your oven to 350°F (177°C), line baking sheets, and arrange cookies with space to spread. For an extra sparkle and slight crunch, brush with an egg wash made from leftover egg white mixed with water, then sprinkle coarse sugar on top. Bake 12-14 minutes until edges are lightly browned. Cool on sheets 5 minutes before transferring to wire racks. These cookies keep fresh for a week at room temperature if well covered.
Top Tip
From my kitchen to yours, I’ve found that the key to these beautiful Mint Chocolate Checkerboard Cookies is handling the dough gently and chilling just right. These tips saved me from ruined shapes and flavor loss time and again.
- Chill Smart: Only chill dough blocks for 1 hour initially—not too firm but firm enough for shaping.
- Trim Thoroughly: Don’t skip trimming dough strips and cookie edges if you want that crisp checkerboard pattern—it’s worth the extra effort!
- Egg Wash Magic: Brushing with egg wash and sprinkling coarse sugar gives the top a lovely sparkle and crunch you’ll want every time.
- Work Quickly: Keep your hands lightly floured and assemble the checkerboard promptly to prevent dough from warming too much.
How to Serve Mint Chocolate Checkerboard Cookies Recipe
Garnishes
I typically keep it simple here—just a light dusting of powdered sugar sometimes enhances the minty look and adds a subtle sweetness. For special occasions, crushed peppermint candies sprinkled on top before baking bring a festive crunch and extra mint kick.
Side Dishes
These cookies pair wonderfully with a creamy hot chocolate or a frothy mint latte. If serving at a party, I like offering them alongside a fresh fruit platter for a bright, balancing contrast.
Creative Ways to Present
For holiday parties, I arrange the cookies in a checkerboard pattern on a large platter, echoing the cookie design itself. Wrapping a stack with festive cellophane and tied with a mint-green ribbon makes a thoughtful homemade gift. I've even used the dough scraps to cut out small mint-shaped cookies to accompany the bigger ones—adorable and delicious!
Make Ahead and Storage
Storing Leftovers
Keep leftover cookies in an airtight container at room temperature, and they’ll stay fresh and chewy for up to a week. I find layering them between sheets of parchment paper helps prevent sticking and keeps the pattern intact.
Freezing
I usually freeze the unbaked checkerboard dough blocks wrapped tightly in plastic wrap and foil for up to 3 months. When it’s time to bake, just thaw overnight in the fridge and slice as directed. Baked cookies freeze well too—I stash them in a freezer-safe container and pull them out for quick treats anytime.
Reheating
To refresh thawed baked cookies, I pop them in a 300°F oven for about 5 minutes. This revives that fresh-baked warmth and crispy edges without drying them out—almost like freshly baked again!
Frequently Asked Questions:
If peppermint isn’t your thing, you could substitute vanilla or almond extract, but the signature mint flavor will be missing. For a true Mint Chocolate Checkerboard Cookies Recipe experience, I recommend sticking with peppermint extract to get that refreshing contrast.
Try chilling it longer, but remember to let it warm up a bit at room temperature if it gets too firm. Lightly flour your knife to prevent sticking, and trim edges after cutting to preserve a crisp checkerboard design.
You can swap the all-purpose flour for a gluten-free baking blend, but the dough texture might be a bit different and require slight adjusting of liquids. Adding a binder like xanthan gum (usually included in blends) will help keep the checkerboard shape intact.
Stored properly in an airtight container at room temperature, these cookies stay delicious for up to one week. If you want to keep them longer, freezing either baked cookies or dough blocks works wonderfully for months.
Final Thoughts
This Mint Chocolate Checkerboard Cookies Recipe is one of those kitchen projects that feels fancy but comes together with a bit of patience and a love for baking. Every time I pull these beautifully patterned cookies from the oven, I feel proud and excited to share them with friends. Give it a try—you’ll get a delicious treat and a little creative baking satisfaction rolled into one.
Print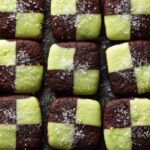
Mint Chocolate Checkerboard Cookies Recipe
- Prep Time: 4 hours 45 minutes
- Cook Time: 13 minutes
- Total Time: 5 hours
- Yield: 36 cookies
- Category: Dessert
- Method: Baking
- Cuisine: American
- Diet: Vegetarian
Description
Mint Chocolate Checkerboard Cookies are a delightful and visually stunning treat combining soft, buttery cookie dough with refreshing peppermint and rich chocolate flavors arranged in a classic checkerboard pattern. These cookies are perfect for festive occasions or gifting and offer a fun baking project that yields 24 to 36 beautifully patterned cookies with a crisp edge and tender center.
Ingredients
Base Cookie Dough
- 2 and ½ cups (313g) all-purpose flour (spooned & leveled)
- ½ teaspoon baking powder
- ½ teaspoon salt
- 1 cup (16 Tbsp; 226g) unsalted butter, softened to room temperature
- 1 cup (200g) granulated sugar
- 1 large egg + 1 egg yolk, at room temperature
- 1 and ½ teaspoons pure vanilla extract
- Optional for topping: 1 Tablespoon (15ml) water and ¼ cup (50g) coarse sugar
Mint Dough
- 1 teaspoon peppermint extract
- Optional: 1 drop green food dye
Chocolate Dough
- 2 Tablespoons (10g) unsweetened natural or dutch-process cocoa powder
- 1 Tablespoon (15ml) milk
- Optional: 1 teaspoon espresso powder
Instructions
- Make the dough: Whisk the flour, baking powder, and salt together in a medium bowl and set aside.
- Cream butter and sugar: In a large bowl, use a hand mixer or stand mixer with a paddle attachment to beat butter and granulated sugar on medium-high speed until smooth and creamy, about 3 minutes.
- Add eggs and vanilla: Add the egg, egg yolk, and vanilla extract to the creamed mixture and beat on high speed for about 1 minute until fully combined, scraping down the bowl as needed.
- Incorporate dry ingredients: Mix the flour mixture into the wet ingredients on low until just combined; the dough will be thick and sticky.
- Divide the dough: Remove dough from the bowl and divide it in half into two portions of slightly less than 2 cups each.
- Prepare mint dough: Place half the dough back in the bowl; add peppermint extract and optional green food coloring a drop at a time. Beat on low until evenly combined. Remove from bowl.
- Prepare chocolate dough: Place remaining half of the dough in the bowl; add cocoa powder, milk, and optional espresso powder. Beat on low until fully combined.
- Shape and chill: On a lightly floured surface, form each dough half into a 6-inch long by 2-inch wide by 2-inch tall rectangular block. Wrap in plastic wrap and refrigerate for 1 hour until pliable but less sticky.
- Form checkerboard pattern: Remove dough from fridge. Cut each block lengthwise into 3 even strips, then cut each strip into 3 equal pieces to yield 9 strips per block. Trim rounded edges if necessary for neatness. Alternate strips from mint and chocolate doughs to form two checkerboard blocks. Press strips tightly to eliminate gaps.
- Chill assembled blocks: Wrap blocks in plastic wrap or cover and refrigerate for 2 more hours or up to 4 days to firm up.
- Preheat oven and prep pans: Preheat oven to 350°F (177°C). Line baking sheets with parchment paper or silicone mats.
- Slice and bake cookies: Slice each block into twelve ½-inch thick cookies (or eighteen ⅓-inch thick for thinner cookies). Optionally trim edges for neat squares. Arrange 2-3 inches apart on baking sheets. Brush with egg wash made from reserved egg white mixed with 1 tablespoon water, then sprinkle with coarse sugar if desired. Bake 12 to 14 minutes until edges are lightly browned.
- Cool: Let cookies cool on baking sheets for 5 minutes, then transfer to racks to cool completely.
- Store: Keep cookies fresh covered at room temperature for up to one week.
Notes
- Make Ahead Instructions: Baked cookies freeze well for up to 3 months. Thaw overnight in the fridge and bring to room temperature before serving.
- You can shape and chill the checkerboard dough blocks up to 4 days before baking, or freeze blocks for up to 3 months, thawing overnight in refrigerator before slicing and baking.
- Use the saved egg white combined with water as an egg wash to add crunch and sparkle to cookies when brushed on before baking.
- Trimming the dough strips, blocks, and sliced cookies helps create neat checkerboard squares; leftover dough scraps can be rolled out and baked separately.
- Use gel food coloring for vibrant mint green without altering dough consistency.
- Espresso powder in chocolate dough intensifies chocolate flavor but is optional.
Nutrition
- Serving Size: 1 cookie
- Calories: 180 kcal
- Sugar: 12 g
- Sodium: 75 mg
- Fat: 9 g
- Saturated Fat: 5 g
- Unsaturated Fat: 4 g
- Trans Fat: 0 g
- Carbohydrates: 22 g
- Fiber: 1 g
- Protein: 2 g
- Cholesterol: 35 mg


Leave a Reply