There's something wonderfully nostalgic and joyous about a rich, creamy fudge that reminds you of cozy winter nights. This Festive White Chocolate Christmas Fudge Recipe is my go-to treat every holiday season—it's festive, colorful, and surprisingly easy to make. Plus, the swirls of red and green just scream Christmas cheer!

Jump to:
- Why You'll Love This Recipe
- Ingredients & Why They Work
- Make It Your Way
- Step-by-Step: How I Make Festive White Chocolate Christmas Fudge Recipe
- Top Tip
- How to Serve Festive White Chocolate Christmas Fudge Recipe
- Make Ahead and Storage
- Frequently Asked Questions:
- Final Thoughts
- Festive White Chocolate Christmas Fudge Recipe
Why You'll Love This Recipe
This fudge brings together the rich sweetness of white chocolate and the fun of cheerful holiday colors in a way that's both simple and impressive. I always find that it becomes a real conversation starter when I bring it to parties!
- Simple Ingredients: You only need a handful of ingredients, most of which you probably already have on hand.
- Vibrant Colors: The red and green swirls add a festive flair without extra fuss.
- Easy to Make: The stove-top melting method is straightforward—and you'll get smooth, creamy fudge every time.
- Great for Gifting: Cut into small squares, this fudge makes adorable, homemade presents wrapped in holiday paper.

Ingredients & Why They Work
These ingredients come together perfectly to create that melt-in-your-mouth, luxuriously sweet fudge. The condensed milk adds creaminess and helps the fudge set just right, while high-quality white chocolate gives you that silky texture.

- White chocolate chips: I prefer using good brands like Ghirardelli because they melt smoothly and taste deliciously rich.
- Sweetened condensed milk: This adds the perfect creaminess and sweetness, making the fudge luscious without needing extra sugar.
- Unsalted butter: Using cold, cubed butter helps incorporate richness and smooth texture.
- Red and green gel food coloring: Gel-based colors are ideal—they provide vibrant hues without thinning the fudge mixture.
Make It Your Way
I love experimenting with the swirl patterns, sometimes making fun shapes or adding a touch more color for whimsy. You can also customize the fudge with a pinch of peppermint extract or add crushed candy canes on top for extra crunch and festive flavor.
- Peppermint Twist: I once stirred in a half teaspoon of peppermint extract and topped the fudge with crushed candy canes—my family adored the refreshing hint it added!
- Dairy-Free Variation: Substitute with dairy-free white chocolate chips and coconut milk condensed milk to cater to dietary needs. Just be mindful the texture will vary slightly.
- Swirl Creativity: Feel free to try other food coloring shades like gold or silver gel colors to mix up your holiday fudge presentation.
Step-by-Step: How I Make Festive White Chocolate Christmas Fudge Recipe
Step 1: Prepare Your Pan
Line an 8×8 square baking pan with parchment paper—make sure to leave enough parchment over the edges so you can easily lift the fudge out later. I like to lightly spray or butter the parchment so the fudge doesn’t stick, which makes slicing a breeze.
Step 2: Melt the Chocolate Mixture
In a medium saucepan over medium-low heat, combine white chocolate chips, sweetened condensed milk, and cold butter cubes. Stir constantly for 4-6 minutes. This step is crucial—don't rush it, or you risk the chocolate graining. Once smooth and fully melted, remove from heat.
Step 3: Divide and Color Your Fudge
Pour about one-third of your melted mixture into a small bowl; add red gel food coloring bit by bit until you've got a vibrant shade without white streaks. Repeat with another third for the green coloring. The remaining third stays white. Work quickly here, as the fudge will start to set as it cools.
Step 4: Create the Swirls
Dollop spoonfuls of each colored fudge randomly into your prepared pan. Then take a wooden skewer or butter knife and gently swirl the colors together. Don’t overmix—you want pretty marbled patterns that remind you of holiday candies.
Step 5: Smooth and Chill
Press a small piece of parchment paper lightly atop the fudge to smooth out the surface without smearing your beautiful swirls. Pop the pan in the fridge for 2-3 hours until the fudge firms up completely.
Step 6: Slice and Serve
Lift the fudge out of the pan using the parchment overhang. I like to use a warm knife—run it under hot water and dry it well before slicing—to get clean, neat squares. This recipe yields roughly 64 one-inch pieces, perfect for sharing small bites of holiday happiness.
Top Tip
I've made this fudge dozens of times, and a few tricks have always helped me get perfect results:
- Constant Stirring: I can’t stress enough how stirring continuously while melting prevents graininess—stick to that 4-6 minute window.
- Work Fast with Color: Gel colors set quickly into the cold fudge, so add and mix them swiftly to avoid clumps and streaks.
- Use Quality Chocolate: I’ve found that premium white chocolate chips melt smoother and taste much better—trust me, it makes a difference!
- Warm Knife for Slicing: This simple trick keeps your fudge squares neat and lets you cut through without squashing the pieces.
How to Serve Festive White Chocolate Christmas Fudge Recipe

Garnishes
I like to sprinkle just a few finely crushed peppermint candies on top before refrigerating—it adds a little sparkle and a refreshing crunch. Sometimes I add edible glitter for an extra magical touch during parties!
Side Dishes
This fudge pairs beautifully with spiced hot cocoa or a warm cup of mulled wine. For a savory balance, I often serve it alongside a cheese platter or nuts, which help balance out the sweetness.
Creative Ways to Present
I've wrapped individual fudge squares in festive wax paper tied with twine for gifting. For holiday gatherings, arranging the fudge on a wooden serving board with sprigs of pine and cranberries adds that seasonal charm everyone notices.
Make Ahead and Storage
Storing Leftovers
After slicing, keep the fudge in an airtight container in the refrigerator. It stays delicious for up to one week, and the cold keeps it firm and ready to enjoy whenever a sweet craving hits.
Freezing
I’ve frozen this fudge several times with excellent results—just freeze in an airtight container for up to two months. When you pull it out, thaw it overnight in the fridge to keep its creamy texture intact.
Reheating
This fudge doesn’t require reheating, but if it feels too firm, letting it sit at room temperature for 15-20 minutes softens it nicely without melting the swirls.
Frequently Asked Questions:
Regular liquid food coloring can thin out the fudge mixture and affect the texture, so I recommend gel food coloring for vibrant colors without compromising the fudge's consistency.
The key is to stir constantly while melting the chocolate and to not overheat the mixture. Using good-quality chocolate and avoiding rushing the melting process helps you get that smooth, creamy texture.
Absolutely! I sometimes fold in chopped pecans or crushed peppermint candies after melting the mixture, just before pouring it into the pan. Just don’t overdo it, or the fudge might not set properly.
Work quickly when swirling and don’t overmix. Use a gentle hand with the skewer or knife—just enough to create pretty patterns without fully mixing the colors.
Final Thoughts
This Festive White Chocolate Christmas Fudge Recipe really feels like a holiday hug in a bite. I always look forward to making it each year, and it’s become a beloved tradition in my family. Give it a try—you’ll love the creamy texture, the cheerful swirls, and how it instantly brings the Christmas spirit into your kitchen.
Print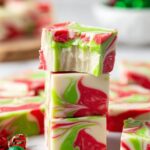
Festive White Chocolate Christmas Fudge Recipe
- Prep Time: 15 minutes
- Cook Time: 6 minutes
- Total Time: 2 hours 15 minutes
- Yield: 64 pieces
- Category: Dessert
- Method: Stovetop
- Cuisine: American
Description
This festive Christmas fudge recipe features creamy white chocolate swirled with vibrant red and green gel food coloring for a beautiful holiday treat. Creamy, rich, and easy to make, it’s perfect for gifting or sharing at seasonal gatherings.
Ingredients
Main Ingredients
- 22 oz white chocolate chips (2 11-oz. bags, preferably Ghirardelli)
- 14 ounce can sweetened condensed milk
- 4 tablespoons unsalted butter, cold and cut into small cubes
Coloring
- ¼-½ teaspoon red gel food coloring (start with ¼ teaspoon, Americolor brand recommended)
- ¼-½ teaspoon green gel food coloring (start with ¼ teaspoon, Americolor brand recommended)
Instructions
- Prepare the pan: Line an 8×8 inch straight-sided baking pan with parchment paper, making sure to leave enough overhang on the sides for easy removal of the fudge after it sets.
- Melt the fudge base: In a medium saucepan over medium-low heat, combine the white chocolate chips, sweetened condensed milk, and cold unsalted butter cubes. Stir constantly for 6 minutes or until the mixture is completely melted and smooth. Remove from heat.
- Divide and color the fudge: Transfer one-third of the melted mixture to a small bowl and stir in the red gel food coloring until fully combined and uniform in color. Repeat with a second one-third portion mixing in the green gel food coloring. Leave the remaining one-third uncolored.
- Assemble the fudge layers: Spoon dollops of the white, red, and green fudge mixtures randomly into the prepared baking pan until all mixtures are used up.
- Swirl the colors: Using a wooden skewer or butter knife, gently swirl the dollops together to create a festive, decorative swirl pattern on top of the fudge.
- Smooth the surface: Lightly press a small piece of parchment paper on top of the fudge to smooth the surface without disturbing the swirl pattern.
- Chill the fudge: Refrigerate the fudge for 2 to 3 hours or until fully set and firm.
- Slice and serve: Once set, lift the fudge out of the pan using the parchment overhang. Cut into 64 pieces measuring 1×1 inch each and serve.
Notes
- Store fudge in an airtight container in the refrigerator for up to 1 week.
- Freeze fudge for up to 2 months; thaw fully in the fridge before serving.
- Line the pan with parchment or waxed paper sprayed with cooking spray or butter to prevent sticking and to help with easier removal.
- Work quickly when adding gel food coloring as the fudge can begin to firm up.
- If needed, gently warm the bowls with the fudge mixture to loosen it before assembling.
- Reheat gently in the microwave if fudge firms, stirring well to avoid burning or seizing.
- Do not overcook the fudge base or it will become grainy; constant stirring is essential.
- Serve fudge in smaller portions due to its richness; warm a sharp knife before slicing for cleaner cuts.
Nutrition
- Serving Size: 1 piece (1x1 inch)
- Calories: 110 kcal
- Sugar: 15 g
- Sodium: 40 mg
- Fat: 5 g
- Saturated Fat: 3 g
- Unsaturated Fat: 2 g
- Trans Fat: 0 g
- Carbohydrates: 16 g
- Fiber: 0 g
- Protein: 1 g
- Cholesterol: 10 mg

Leave a Reply