There’s something magically cool and creamy about this Crème de Menthe Mint Chocolate Pie Recipe that always wins hearts at my table. The blend of minty freshness with rich chocolate creates a dessert that’s as fun to make as it is to eat—trust me, you’re in for a treat that’s both refreshing and indulgent.

Jump to:
- Why You'll Love This Recipe
- Ingredients & Why They Work
- Make It Your Way
- Step-by-Step: How I Make Crème de Menthe Mint Chocolate Pie Recipe
- Top Tip
- How to Serve Crème de Menthe Mint Chocolate Pie Recipe
- Make Ahead and Storage
- Frequently Asked Questions:
- Final Thoughts
- Crème de Menthe Mint Chocolate Pie Recipe
Why You'll Love This Recipe
This pie has quickly become a favorite in my kitchen because it strikes the perfect balance between mint and chocolate without ever feeling too heavy or boring. Plus, it’s surprisingly straightforward, letting you show off your skills without a huge time investment.
- Refreshing Flavor Combo: The Crème de Menthe syrup and peppermint extract team up to give a bright minty punch paired perfectly with smooth chocolate layers.
- Simple Ingredients, Big Impact: Using classic Oreo cookies for the crust makes it easy and adds that nostalgic crunch everyone loves.
- Make-Ahead Friendly: This pie chills beautifully, so you can prepare it well in advance for stress-free entertaining.
- Customizable Touches: You get to decide how much peppermint you want, plus there’s room to add toppings like whipped cream or chocolate curls for that wow factor.
Ingredients & Why They Work
Each ingredient in this Crème de Menthe Mint Chocolate Pie Recipe is chosen to build layers of flavor, texture, and minty freshness. Here’s a little breakdown so you know what to look for and why these choices matter.
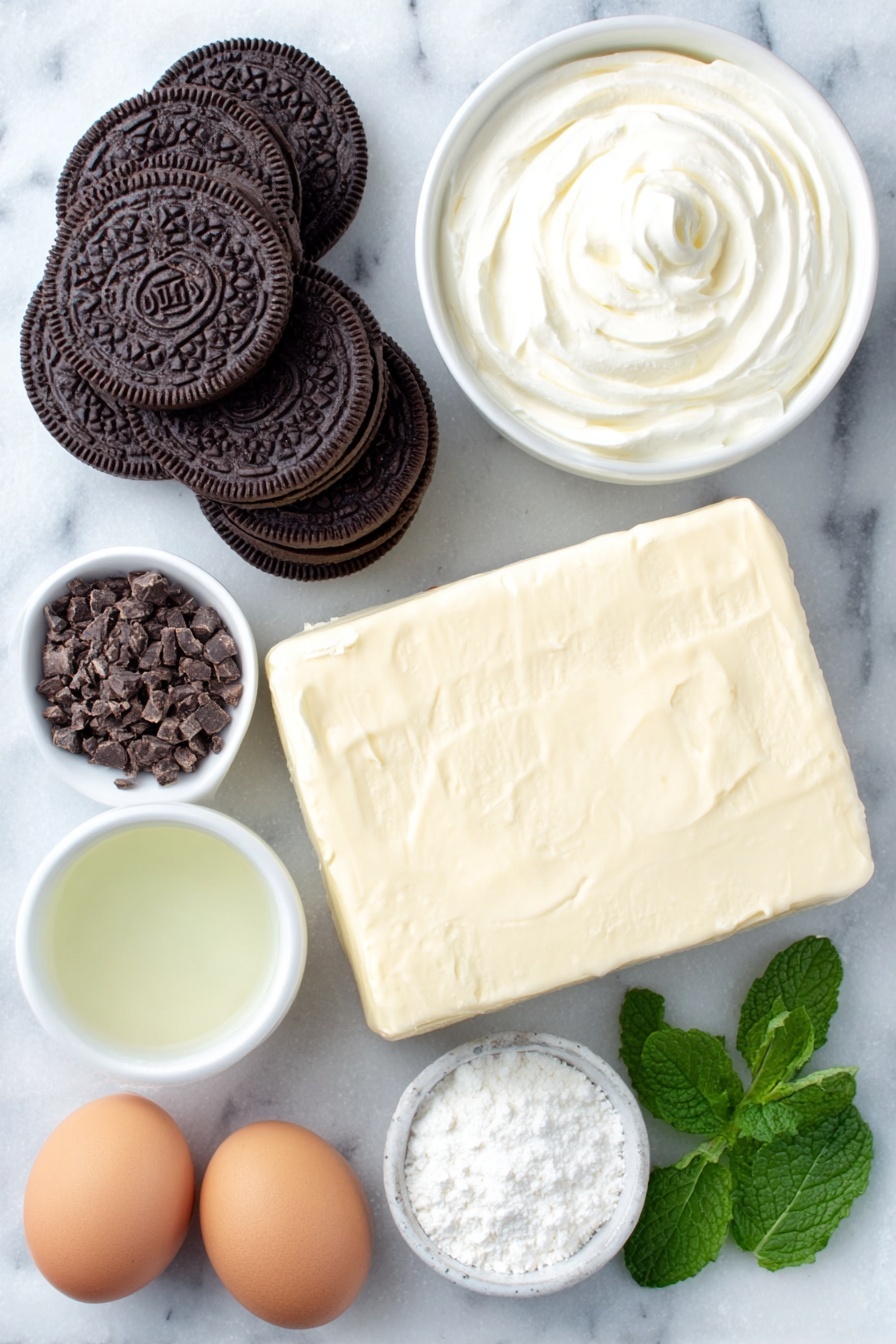
- Oreo Cookies: The classic cookie crust adds crunch and chocolate goodness, and using regular (not Double Stuf) Oreos helps keep the crust firm, not too soft or greasy.
- Unsalted Butter: Melted butter binds those crumbs together to form the perfect crust base that holds while baking.
- Bittersweet or Semi-Sweet Chocolate: Using chopped bars rather than chips ensures smooth, glossy ganache and a richer chocolate flavor.
- Heavy Cream: This gives the ganache a silky texture and helps the filling fluff up beautifully when whipped.
- Peppermint Extract: This provides a crisp, clean mint flavor distinct from the syrup; it’s less toothpaste-y compared to mint extract.
- Crème de Menthe Syrup: A sweet, minty nonalcoholic syrup that brings an authentic crème de menthe flavor without the booze, adding depth to the filling.
- Cream Cheese: It creates a luscious, smooth texture and adds a slight tang that balances the sweetness.
- Confectioners’ Sugar: Sweetens and helps maintain silky consistency with no graininess.
- Optional Toppings (Whipped Cream, Mint Leaves, Chocolate Curls): These garnish options make your pie look professional and enhance the flavor experience.
Make It Your Way
One thing I love about this Crème de Menthe Mint Chocolate Pie Recipe is how easy it is to tailor it to your taste. Maybe you adore a stronger mint punch, or perhaps you prefer to keep the chocolate just a nibble in the background—both work!
- Variation: On one occasion, I swapped half the bittersweet chocolate in the ganache for milk chocolate and it gave a milder, sweeter flavor—great if you’re baking for kids or those less into dark chocolate.
- Dairy-Free Option: You can experiment with coconut cream instead of heavy cream, and use dairy-free cream cheese to make it vegan-friendly—just expect a slight texture shift.
- Extra Minty Kick: If you really adore minty desserts, a sprinkle of finely chopped fresh mint leaves folded into the filling adds a cooling freshness that pairs beautifully with the syrup.
Step-by-Step: How I Make Crème de Menthe Mint Chocolate Pie Recipe
Step 1: Building the Perfect Oreo Crust
I start by pulsing 22 whole Oreos in my food processor until they turn into fine crumbs — don't skip including the creamy filling; it adds moisture and flavor. Add melted butter gradually and stir well until you get a thick, slightly wet mixture that's easy to press into your pie dish. Pat it down firmly so the crust holds together after baking. Baking it at 350°F (177°C) for 10 minutes helps it set perfectly without becoming too crunchy or soft.
Step 2: Crafting the Mint Chocolate Ganache
Next, the ganache. I finely chop my chocolate and place it in a heatproof bowl. While gently heating heavy cream to a simmer (don’t let it boil!), I pour it over the chocolate and let it rest for a few minutes—the magic timing to melt chocolate perfectly smooth. Stir gently to combine, then add peppermint extract for that signature crispness. Pour this luscious mixture over your baked crust, swirling it around so the bottom and sides get a delicate coating. Then chill it in the fridge until set—this step is key for a firm base.
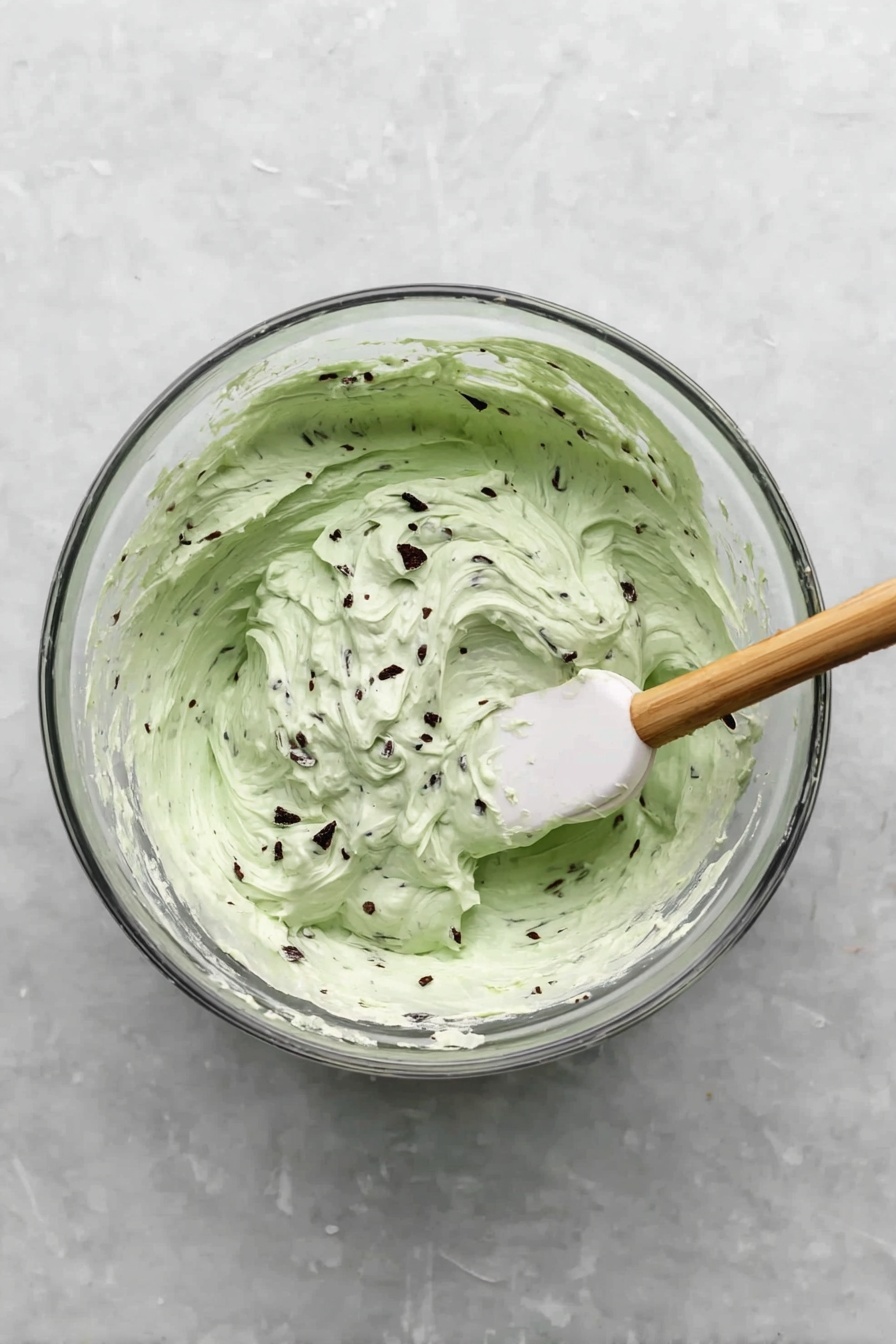
Step 3: Whipping Up the Creamy Filling
For the filling, I whip cold heavy cream to stiff peaks—this adds airy lightness. Separately, I beat softened cream cheese until silky smooth, then combine it with confectioners’ sugar, crème de menthe syrup, and peppermint extract. Folding the whipped cream in gently is essential so you keep all that fluffiness. Finally, a handful of chopped bittersweet chocolate or mini chips adds a delightful crunch throughout. Spread this dreamy filling over the cooled ganache crust and smooth the top.
Step 4: Chill and Serve
Cover your pie and refrigerate for at least 6 hours. I love to make mine the day before so the flavors have time to meld and the pie sets up beautifully. Before serving, I top mine with homemade whipped cream, a few fresh mint leaves, and some chocolate curls to make it look extra special. When slicing, wipe your knife clean between cuts for those perfect, neat pieces everyone will admire.
Top Tip
From all the times I’ve made this pie, a few little tricks have helped me nail the texture and flavor every time—these will definitely help you avoid common pitfalls, so you get flawless results.
- Don’t Skip Chilling: The filling needs plenty of time in the fridge to firm up and let the flavors come together. Rushing this will result in a runny pie.
- Use Room Temperature Cream Cheese: Beat it until perfectly smooth before combining with other ingredients to avoid lumps, which can ruin the creamy texture.
- Choose the Right Peppermint Extract: Mint extract can taste like toothpaste, so stick to peppermint extract for a cleaner, fresher bite.
- Press Crust Firmly: When packing the Oreo crumb crust, press it firmly onto the pie dish with your hands or back of a spoon to prevent crumbling.
How to Serve Crème de Menthe Mint Chocolate Pie Recipe
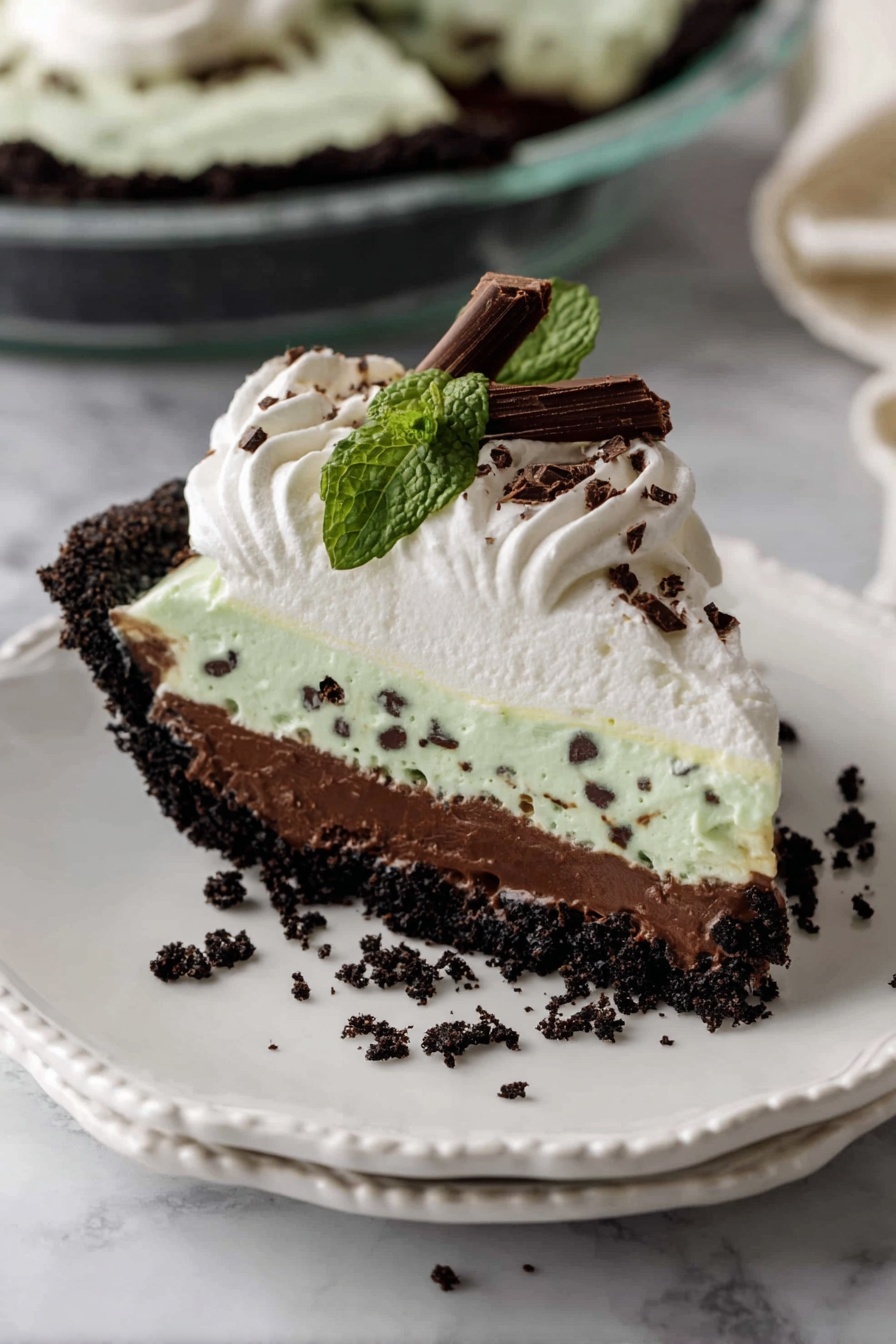
Garnishes
I usually go for simple but elegant garnishes. A dollop of freshly whipped cream piped with a pretty tip always wins. Fresh mint leaves add that bright pop of color and lift the mint flavor. Little chocolate curls or shavings finish it with a sophisticated touch, making the pie look like it’s straight from a fancy bakery.
Side Dishes
This pie is a fantastic finish to a light meal. I like pairing it with a cup of coffee or mint tea to echo the dessert’s cool notes. If you’re making this for a party, some fresh berries or a fruit salad on the side provide a refreshing contrast to the rich pie.
Creative Ways to Present
For holidays or special gatherings, I’ve made mini versions using a muffin tin with the same ingredients. Decorating each with a tiny mint leaf and a chocolate curl turns them into adorable bite-sized treats. You can also serve slices on a plate drizzled with warm chocolate sauce or a splash of crème de menthe syrup for extra flair.
Make Ahead and Storage
Storing Leftovers
After the pie’s been sliced, I tightly cover any leftovers with plastic wrap to keep the crust from getting soggy and store it in the fridge. It holds well for up to 5 days, and honestly, I find it tastes even better after a day or two as the flavors mature.
Freezing
Yes, you can freeze this pie! I usually wrap it tightly with plastic wrap and a layer of foil, then pop it in the freezer for up to 3 months. When ready to enjoy, thaw it overnight in the fridge. The texture stays wonderfully creamy without becoming icy or grainy.
Reheating
This pie is best served chilled, so no reheating needed. Just take it out of the fridge about 10 minutes before serving for an ideal creamy texture and flavor release.
Frequently Asked Questions:
This recipe is designed for the nonalcoholic crème de menthe syrup, which is sweet and gives the right flavor balance. Using liqueur isn't recommended because it contains alcohol and can change the texture and sweetness of the pie. If you can’t find the syrup, try increasing confectioners’ sugar and peppermint extract as a substitute.
Mint Oreos have peppermint oil in their filling, which tends to make the crust greasy and less stable. Regular Oreos without extra mint flavor keep the crust firm and well-textured, giving a better pie overall.
Absolutely! This pie actually benefits from chilling time. You can make the crust and ganache layer up to 3 days ahead, keep them chilled, then add the filling when ready. Once fully assembled, refrigerate the pie for at least 6 hours, preferably overnight, for best results.
You can place the Oreos in a sealed plastic bag and crush them with a rolling pin until they’re finely ground. Just take care to avoid large chunks and get as fine a crumb as possible to ensure the crust maintains its structure when baked.
Final Thoughts
This Crème de Menthe Mint Chocolate Pie Recipe is one of those desserts I keep returning to when I want to impress but keep things easy and delicious. It brings together comforting chocolate and that refreshing mint note in a way that feels both special and familiar. I can’t wait for you to try it in your own kitchen—go ahead and make it your own, and enjoy every creamy, minty bite!
Print
Crème de Menthe Mint Chocolate Pie Recipe
- Prep Time: 45 minutes
- Cook Time: 10 minutes
- Total Time: 7 hours
- Yield: 1 9-inch pie
- Category: Dessert
- Method: Baking
- Cuisine: American
- Diet: Vegetarian
Description
This Crème de Menthe Pie is a luscious, no-bake mint chocolate dessert featuring a crunchy Oreo crust, rich mint chocolate ganache, and a creamy mint-flavored filling. Perfect for mint lovers, it combines smooth cream cheese, whipped cream, and bittersweet chocolate with refreshing crème de menthe syrup for a delightful treat.
Ingredients
Crust
- 22 whole Oreo cookies (250g; not Double Stuf)
- 4 tablespoons (56g) unsalted butter, melted
Mint Chocolate Ganache
- ½ cup (120g/ml) heavy cream
- 4 ounces (113g) bittersweet or semi-sweet chocolate, finely chopped
- ¼ teaspoon peppermint extract
Filling
- 1 cup (240g/ml) heavy cream, cold
- 8 ounces (226g) full-fat brick cream cheese, softened to room temperature
- ¾ cup (90g) confectioners’ sugar
- 3 tablespoons (45g/ml) crème de menthe syrup
- ¼ teaspoon peppermint extract
- 2 ounces (56g) bittersweet or semi-sweet chocolate, finely chopped or mini chocolate chips
Optional Topping
- Homemade whipped cream
- Fresh mint leaves
- Chocolate curls or shavings
Instructions
- Preheat and prepare crust: Preheat your oven to 350°F (177°C). Using a food processor or blender, pulse the Oreo cookies including the filling into fine crumbs. Transfer the crumbs into a large bowl and mix with melted butter until combined and moist. Press this mixture firmly into the bottom and up the sides of an ungreased 9-inch pie dish to form a compact crust. Bake for 10 minutes, then set aside on a cooling rack.
- Make mint chocolate ganache: Place the finely chopped chocolate in a medium heatproof bowl. Heat the heavy cream in a small saucepan over medium heat until it just begins to simmer, then immediately pour it over the chopped chocolate. Let it sit for 2–3 minutes, add peppermint extract, then gently stir until smooth. Pour the ganache into the baked crust, spreading it evenly across the bottom and slightly up the sides. Refrigerate the crust until completely cool to set the ganache.
- Prepare the filling: Whip the cold heavy cream with a mixer on medium-high speed until stiff peaks form, about 4 minutes; set aside. In a separate bowl, beat the softened cream cheese on medium speed until creamy and smooth, scraping the bowl as needed. Add confectioners’ sugar, crème de menthe syrup, and peppermint extract, then beat again until fully combined and smooth.
- Combine filling components: Gently fold the whipped cream into the cream cheese mixture using a silicone spatula to keep the mixture light and airy. Fold in the chopped chocolate or mini chips until evenly distributed.
- Assemble pie: Spread the filling evenly over the cooled crust and ganache layer, smoothing the top with an offset spatula. Cover and refrigerate for at least 6 hours or up to 2 days to allow it to set firmly.
- Serve and garnish: Before serving, garnish with homemade whipped cream, fresh mint leaves, and chocolate curls if desired. For clean slices, wipe your knife between cuts and enjoy chilled. Store leftovers covered in the refrigerator or freezer for up to 5 days.
Notes
- This pie should be refrigerated for at least 6 hours to properly set, making it an ideal make-ahead dessert.
- You can prepare the crust and ganache up to 3 days in advance and add the filling just before serving.
- The fully assembled pie can be frozen for up to 3 months; thaw overnight in the refrigerator before serving.
- Use classic Oreo cookies, not Double Stuf or mint-flavored varieties, to avoid an overly greasy crust.
- Bittersweet or semi-sweet baking chocolate bars are recommended for ganache instead of chocolate chips, which don’t melt as smoothly.
- Crème de menthe syrup is sweetened and nonalcoholic; if unavailable, increase confectioners’ sugar to 1 cup and peppermint extract to ½ teaspoon and add a drop of green food coloring as a substitute.
- Use peppermint extract for the best clean mint flavor instead of mint extract, which can taste like toothpaste.
Nutrition
- Serving Size: 1 slice (⅛ of pie)
- Calories: 420 kcal
- Sugar: 28 g
- Sodium: 190 mg
- Fat: 32 g
- Saturated Fat: 18 g
- Unsaturated Fat: 12 g
- Trans Fat: 0 g
- Carbohydrates: 28 g
- Fiber: 2 g
- Protein: 6 g
- Cholesterol: 95 mg


Leave a Reply