If you’re craving a smooth, luscious dessert with a delightful crackling top, you’re in the right place. This Creamy Vanilla Crème Brûlée Recipe is my absolute favorite for impressing guests or treating yourself after a long day—it’s elegance and comfort all in one.

Jump to:
Why You'll Love This Recipe
I love making this vanilla-infused custard because it’s irresistibly silky but easy enough to prepare in advance—perfect for feeling fancy without stress.
- Classic yet simple: Uses straightforward ingredients you likely already have.
- Spoil-worthy texture: Velvety custard base balanced by a crisp caramelized sugar crust.
- Vanilla bean magic: The subtle, fragrant flavor elevates it beyond ordinary vanilla desserts.
- Perfect for any occasion: Impress at dinner parties or savor solo indulgence.
Ingredients & Why They Work
Gathering quality ingredients is key for this crème brûlée. I always pick a fresh vanilla bean and rich heavy cream to achieve the ideal flavor and texture—you can never go wrong investing in those essentials!
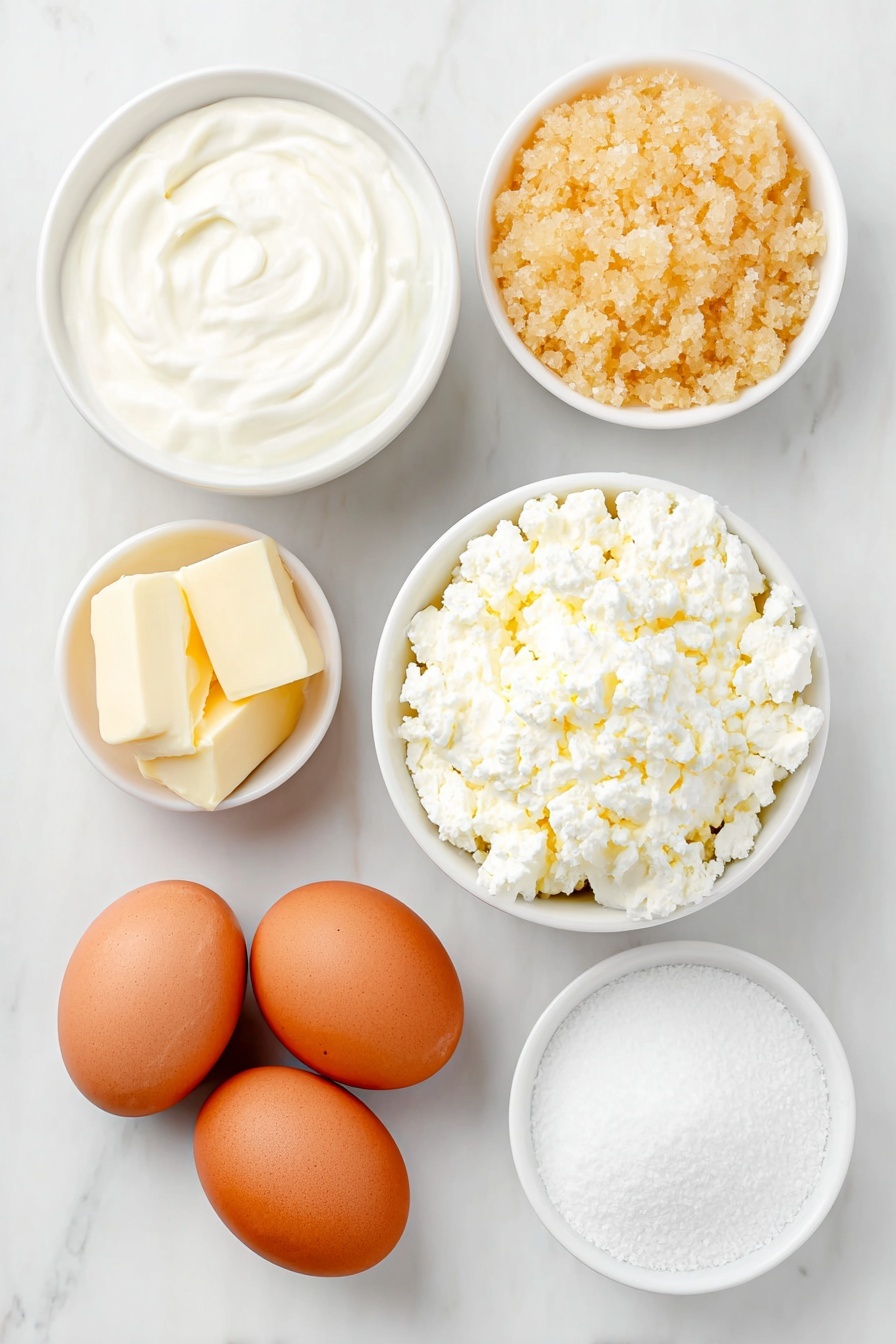
- Heavy cream: Creates the rich, smooth custard texture crème brûlée is famous for.
- Granulated sugar: Divided use for sweetening the custard and caramelizing the top.
- Kosher salt: Just a pinch balances sweetness and enhances flavor complexity.
- Vanilla bean: Adds that authentic, aromatic vanilla flavor you can see and taste.
- Egg yolk: Thickens and enriches the custard for a creamy consistency.
- Large egg: Helps bind the mixture and provides body.
- Vanilla extract: Boosts the vanilla notes alongside the bean.
Make It Your Way
One of the best parts about this Creamy Vanilla Crème Brûlée Recipe is how adaptable it is to your taste and occasion. Feel free to make it truly yours with little twists that add personality and flair!
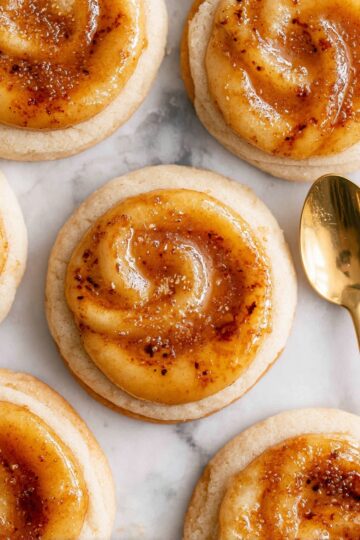
- Variation: I love experimenting with different extracts instead of vanilla. Using almond extract brings a warm, nutty aroma that pairs beautifully with the silky custard. Just remember: a little goes a long way, so start with just a few drops!
- Dietary: For a lighter take, substitute half the heavy cream with whole milk — it will still be rich but a bit less heavy on the palate.
- Seasonal: For a holiday spin, infuse your cream with a cinnamon stick or a few crushed cardamom pods during heating. It adds a cozy warmth perfect for cooler months.
- No Torch? No worries! You can create a luscious caramel crust by melting sugar in a pot and carefully pouring it over your custards. It’s a charming, rustic twist when you’re without a kitchen torch.
Step-by-Step: How I Make Creamy Vanilla Crème Brûlée Recipe
Step 1: Preheat for Perfection
Begin by preheating your oven to 325°F. This gentle heat is essential for cooking the custard evenly and preventing cracks. Meanwhile, prepare a large baking dish where your ramekins will nestle comfortably in a warm, steamy water bath.
Step 2: Infuse the Cream with Vanilla
In a small saucepan, combine 2 cups of heavy cream, half of the sugar (about 2 tablespoons), kosher salt, and the scraped seeds plus pod of half a vanilla bean. Slowly warm over medium heat, stirring occasionally, letting it just come to a simmer. This step gently extracts the intoxicating vanilla aroma that will permeate your custard.
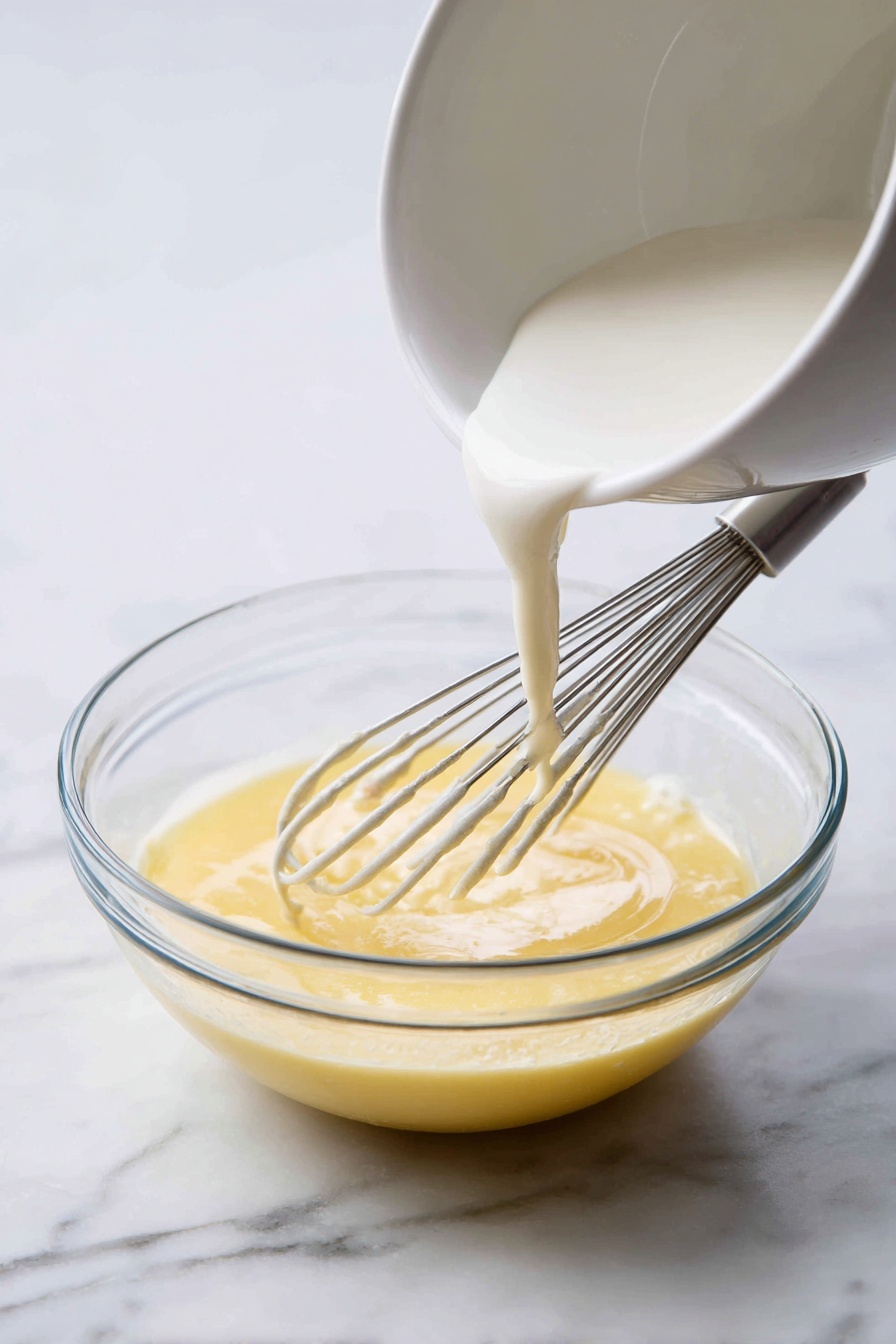
Step 3: Whisk Eggs and Sugar Until Light
In a clean bowl, vigorously whisk together 1 egg yolk, 1 whole large egg, and the remaining sugar until the mixture becomes slightly lighter in color—a technique called blanchir. This aeration ensures your custard will be silky smooth without any graininess.
Step 4: Temper Your Eggs With Care
To avoid scrambled eggs, slowly drizzle a small amount of the hot cream into your egg mixture while whisking constantly. Once combined, continue gradually adding the rest of the cream. A tip: place a kitchen towel under your bowl to keep it steady during this important process.
Step 5: Strain for a Silky Smooth Custard
Skim off any foam from the cream and strain the mixture through a fine sieve to remove the vanilla pod and any cooked egg bits. This extra step guarantees the smoothest texture for your crème brûlée.
Step 6: Distribute Custard Evenly and Prepare Water Bath
Divide the custard evenly between six 3-ounce ramekins. Accuracy helps ensure all cook evenly — I recommend using a kitchen scale or measuring cup. Place the ramekins in a deep baking dish. Cover the dish loosely with foil, leaving a corner ajar to let steam escape.
Step 7: Bake in a Water Bath
Carefully pour hot water into the baking dish until it reaches halfway up the sides of the ramekins. This water bath provides gentle, steady heat that sets the custard without curdling. Bake on the middle rack for 20 minutes until the centers jiggle softly, reminiscent of a gentle wobble like jello but are not liquid.
Step 8: Cool and Chill to Set
Using oven mitts and tongs, carefully remove the ramekins from the water bath. Let them cool to room temperature, then cover each with plastic wrap. Refrigerate for at least 2 hours, though overnight chilling is ideal. This waiting game lets the custard firm up perfectly and enhances flavor melds.
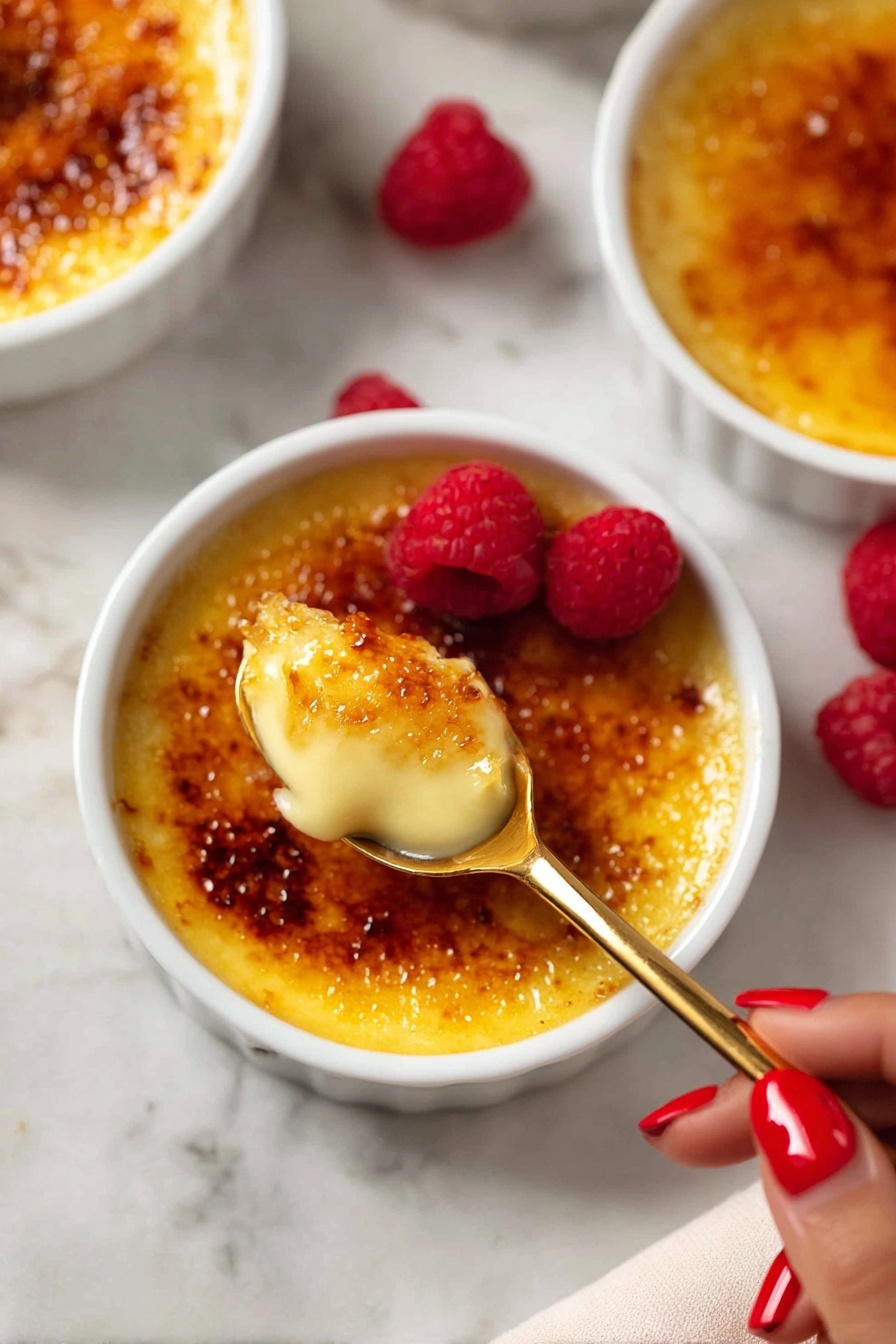
Step 9: Sugar It Up and Torch
Right before serving, sprinkle about half a tablespoon of granulated sugar evenly over each custard’s surface. Tilt the ramekin to form a thin, visible layer of sugar. With a kitchen torch, start melting the sugar from a distance and gradually increase flame proximity until a deep golden caramel crust forms. No torch? No problem! You can pour carefully made dry caramel right on top.
Step 10: Let the Magic Set and Serve
Allow the brûléed sugar to harden for about 3 minutes until crackable. Then dive in immediately for that unbeatable contrast—crunchy caramelized topping over delicate, creamy custard. This is truly the heart of the Creamy Vanilla Crème Brûlée Recipe experience!
Top Tip
These tips will help you master the art of the perfect creamy vanilla crème brûlée — that delightful balance of smooth custard and crisp caramelized top is easier than you think!
- Tempering Eggs: Use a kitchen towel under your mixing bowl to stabilize it while slowly whisking the hot cream into eggs. This dodge keeps the bowl steady and helps avoid scrambled eggs in your custard.
- Water Bath Watch: Be cautious pouring hot water into the baking dish. Pour slowly until it’s halfway up the ramekins without splashing a drop inside — this gentle bath ensures even baking without watery custards.
- Perfect Sugar Crust: Torch the sugar topping just before serving to get that signature crackling, golden caramel crust. Waiting until serving keeps the crust crisp and fresh.
- Don’t Skip Straining: Always strain the custard through a fine sieve after mixing. This extra step removes any tiny cooked egg bits and vanilla pod pieces, giving you an ultra-smooth, silky custard every time.
How to Serve Creamy Vanilla Crème Brûlée Recipe
Garnishes
To elevate your classic crème brûlée, try topping it with fresh berries like raspberries or blueberries for a pop of color and tartness that pairs beautifully with the sweet custard. A sprig of fresh mint adds a refreshing herbal touch and a lovely contrast. If you want a little extra indulgence, a light dusting of edible gold flakes or a thin slice of candied orange peel looks stunning and sophisticated.
Side Dishes
This French dessert is perfectly happy on its own but pairs wonderfully with a crisp glass of dessert wine like Sauternes or a light sparkling rosé. If you’re serving a full meal, keep the main course light and fresh — a citrus salad or a simple green salad with vinaigrette complements the richness of the crème brûlée without overwhelming it.
Make Ahead and Storage
Storing Leftovers
Once your crème brûlée has cooled to room temperature, cover each ramekin tightly with plastic wrap and store them in the refrigerator. Properly stored, they will keep beautifully for up to 1 week. This makes it easy to prepare the custards ahead of time if you’re planning a special dinner.
Freezing
Freezing crème brûlée is not recommended as the texture of the custard changes when thawed, leading to a loss of that silky creaminess. For best results, enjoy this dessert fresh or refrigerated within the week.
Reheating
Since crème brûlée is best served cold with a warm caramelized top, reheating the custard itself isn’t ideal. Instead, if left in the fridge, simply torch the sugar topping anew just before serving to refresh the signature brittle crust and enjoy the contrast with the chilled creamy custard underneath.
Frequently Asked Questions:
Look for the custards’ center to jiggle softly—like jello—without appearing liquid. A small spoon placed on the surface should hold its weight gently. This means the custard is set but still creamy.
Absolutely! You can make a dry caramel in a pot by melting sugar over medium-high heat until golden amber, then carefully pour it over the cold custards for a thicker caramel crust. Just be cautious as caramel is very hot and can burn quickly.
Tempering prevents the eggs from scrambling by gradually raising their temperature before mixing all together. This step is key for a smooth, velvety custard without lumps.
You can store covered crème brûlée in the refrigerator for up to 1 week. Always cool to room temperature before wrapping to maintain the best texture and flavor.
Final Thoughts
Crafting the perfect Creamy Vanilla Crème Brûlée Recipe is a truly rewarding experience — it’s a celebration of texture and flavor that never fails to impress. Whether it’s a special occasion or a quiet evening indulgence, take your time with each step and savor the magic of that crackling sugar top giving way to luscious custard. Happy brûlée-making!
Print
Creamy Vanilla Crème Brûlée Recipe
- Prep Time: 15 minutes
- Cooling Time: 2 hours
- Cook Time: 20 minutes
- Total Time: 2 hours 35 minutes
- Yield: 6 servings
- Category: Dessert
- Method: Baking
- Cuisine: French
- Diet: Vegetarian
Description
Classic crème brûlée features a rich, velvety custard base topped with a perfectly caramelized sugar crust. This elegant dessert is infused with vanilla bean, baked in a water bath for even cooking, and finished with a torch to create the signature crackling top. Ideal for special occasions or anytime indulgence.
Ingredients
Custard Base
- 2 cups heavy cream
- ⅓ cup granulated sugar, divided
- ¼ teaspoon kosher salt
- ½ vanilla bean, scraped
- 1 egg yolk
- 1 large egg
- 1 teaspoon vanilla extract
Topping
- ¼ cup granulated sugar, for brûlée
Instructions
- Preheat Oven: Preheat the oven to 325°F to prepare for baking your custards in a gentle, consistent heat environment.
- Heat Cream Mixture: In a small saucepan, combine the heavy cream, half of the granulated sugar (about 2 tablespoons), kosher salt, and the scraped vanilla bean pod. Bring the mixture just to a simmer over medium heat, stirring occasionally to dissolve the sugar.
- Whisk Eggs and Sugar: In a separate bowl, vigorously whisk together the egg yolk, whole egg, and remaining sugar until the mixture lightens slightly in color, a technique known as blanchir that helps create a smooth custard texture.
- Temper Eggs with Cream: Slowly add a small amount of the hot cream mixture into the eggs while whisking constantly to temper the eggs and prevent scrambling. Continue gradually adding the cream until fully combined.
- Strain and Skim: Skim off any foam from the cream mixture, then strain the custard through a fine sieve into a bowl to remove the vanilla pod and any cooked egg bits for a silky finish.
- Fill Ramekins: Divide the custard evenly among six 3-ounce ramekins, using a scale or measuring cup for precision. Place the ramekins in a large deep baking dish or roasting pan.
- Prepare Water Bath: Cover the baking dish loosely with foil, leaving a corner open for steam escape. Carefully pour hot water into the baking dish until it reaches halfway up the sides of the ramekins, being cautious to avoid splashing water into the custard.
- Bake Custards: Bake in the preheated oven on the middle rack for 20 minutes, or until the centers jiggle softly but are no longer liquid—similar to jello texture.
- Cool and Chill: Using kitchen tongs and oven mitts, carefully remove the ramekins from the water bath. Let them cool to room temperature, then cover with plastic wrap and refrigerate for at least 2 hours or ideally overnight to set fully.
- Add Sugar Topping: When ready to serve, sprinkle about half a tablespoon of granulated sugar evenly over the top of each custard, tilting the ramekin to spread a thin, visible layer.
- Caramelize Sugar: Using a kitchen torch, begin melting the sugar by applying the flame at a distance and gradually moving closer. Continue until the sugar melts and forms a deep golden-brown caramel crust. Alternatively, caramelize sugar in a pot and carefully pour it over the custard if no torch is available.
- Set and Serve: Allow the caramelized sugar topping to harden for about 3 minutes before serving. Enjoy immediately to experience the characteristic crunchy top over the creamy custard.
Notes
- If you don’t have a kitchen torch, you can make dry caramel by melting 1 cup of sugar in a pot over medium-high heat until it turns medium amber. Pour the hot caramel carefully over the cold custards for a thicker crust.
- For the best crust, brûlée the custard right before serving to maintain the crisp sugar layer.
- Variations: Substitute vanilla bean and extract with almond, coffee, or peppermint extracts to customize flavor, adding cautiously as extracts can vary in strength.
- Store leftover crème brûlée covered in plastic wrap in the refrigerator for up to 1 week. Ensure they cool to room temperature before refrigerating to maintain texture.
- Use a kitchen towel under the mixing bowl when tempering eggs with hot cream to prevent slipping and ensure safety.
Nutrition
- Serving Size: 1 ramekin (3 oz)
- Calories: 320 kcal
- Sugar: 30 g
- Sodium: 50 mg
- Fat: 22 g
- Saturated Fat: 14 g
- Unsaturated Fat: 7 g
- Trans Fat: 0 g
- Carbohydrates: 28 g
- Fiber: 0 g
- Protein: 4 g
- Cholesterol: 155 mg


Leave a Reply