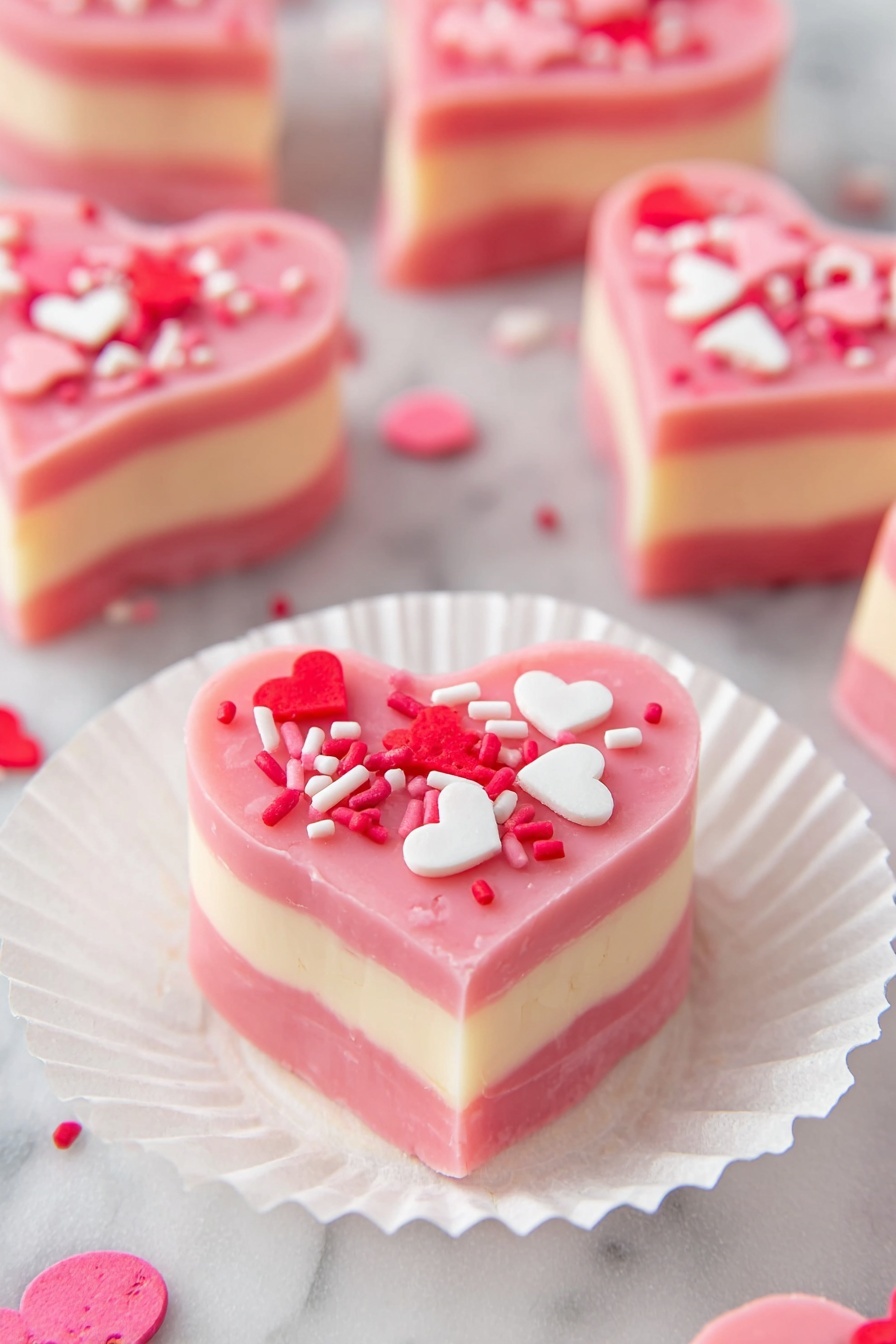
If you’re looking for a charming dessert that’s as delightful to make as it is to eat, then this Creamy Red and White Valentine Heart Fudge Recipe is your new go-to. With luscious layers of white and red chocolate melded into cute heart shapes, it’s perfect for making Valentine’s Day extra sweet.

Jump to:
- Why You'll Love This Recipe
- Ingredients & Why They Work
- Make It Your Way
- Step-by-Step: How I Make Creamy Red and White Valentine Heart Fudge Recipe
- Top Tip
- How to Serve Creamy Red and White Valentine Heart Fudge Recipe
- Make Ahead and Storage
- Frequently Asked Questions:
- Final Thoughts
- Creamy Red and White Valentine Heart Fudge Recipe
Why You'll Love This Recipe
I’ve made this Valentine Hearts Fudge more times than I can count—and honestly, it never fails to impress. It’s creamy, festive, and downright fun to cut into heart shapes. Whether you’re gifting it or sharing with loved ones, it’s sure to bring smiles all around.
- Easy Microwave Method: No fancy equipment needed—just simple microwave steps to melt your way to fudge perfection.
- Eye-Catching Layers: Vibrant red and creamy white layers make for a stunning presentation that captures the Valentine spirit.
- Perfect for Gifting: Cut into heart shapes and topped with sprinkles, it’s a heartfelt homemade gift anyone will adore.
- Lasts Well: Refrigerate for up to two weeks or freeze, so you can make it ahead and enjoy anytime.
Ingredients & Why They Work
Choosing the right ingredients is key here. I always go for top-notch white chocolate chips because they melt smoothly and give you that buttery richness that fudge should have. And don’t skip the sweetened condensed milk—it’s what makes the fudge silky and helps it set beautifully.
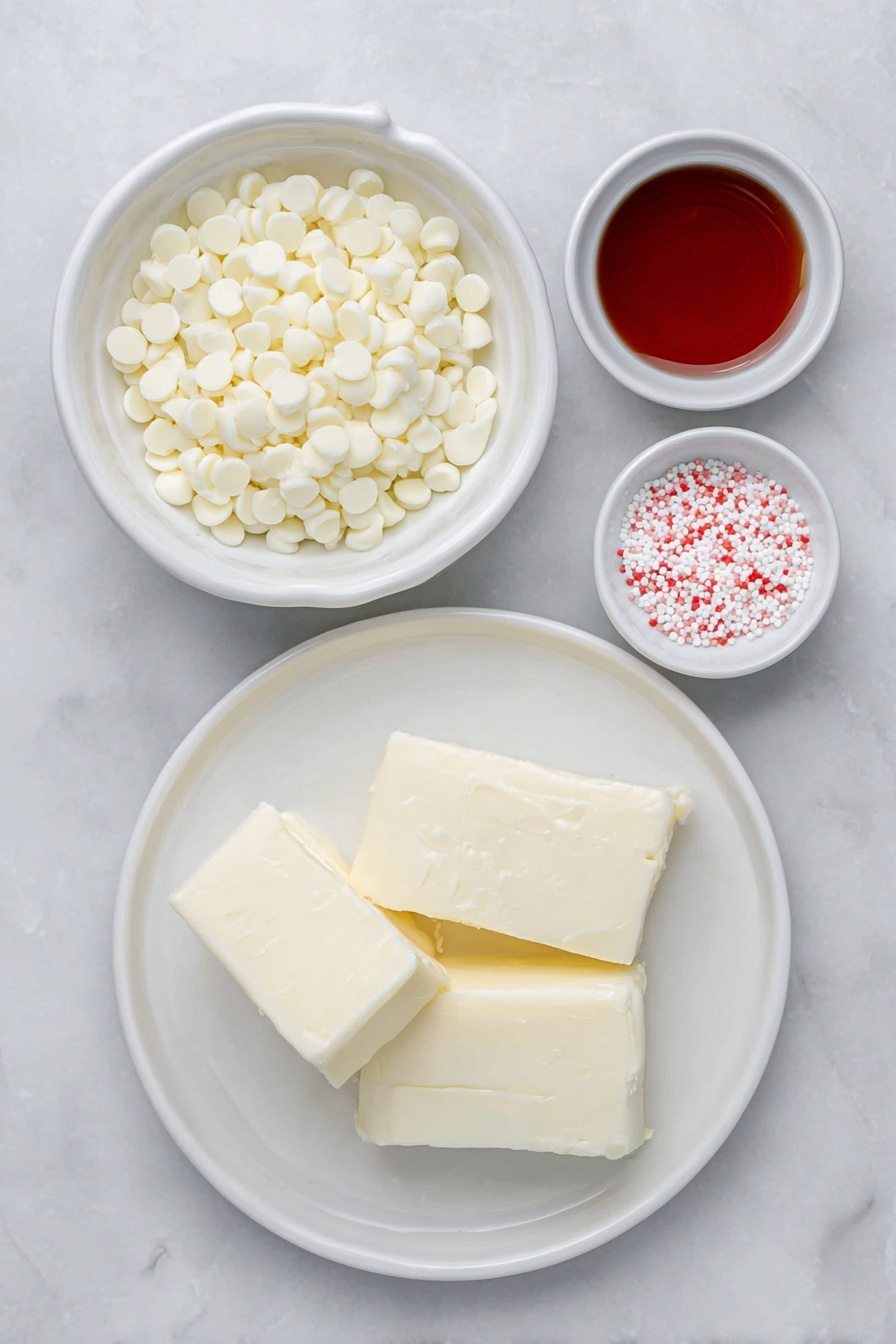
- White Chocolate Chips: Provides a creamy base and sweetness, with the perfect melt for a smooth fudge texture.
- Sweetened Condensed Milk: Essential for that rich, thick consistency that helps the fudge set without fuss.
- Unsalted Butter: Adds richness and a velvety mouthfeel, rounding out the flavor perfectly.
- Red Food Coloring: Gives the festive red layers a vibrant, eye-catching pop to contrast the creamy white fudge.
- Heart-Shaped Sprinkles: A whimsical topping to celebrate Valentine’s Day and add a little crunch.
Make It Your Way
The beauty of the Creamy Red and White Valentine Heart Fudge Recipe lies in its simplicity and versatility. Feel free to personalize it to suit your taste or occasion, whether by swapping colors, adding flavors, or experimenting with decorations — the possibilities are endless!
- Berry Bliss Variation: I once added a teaspoon of raspberry extract to the red fudge layer before adding the food coloring. It gave the hearts a subtle fruity tang that paired beautifully with the creamy white chocolate. Plus, the vibrant red shade was even more enticing!
- Nutty Twist: For a delightful crunch, fold finely chopped toasted almonds or pistachios into the white fudge layer just before spooning it over the set red layer. It added texture and an extra layer of flavor I absolutely loved.
- Vegan Adaptation: By substituting vegan white chocolate chips and a sweetened coconut milk condensed milk alternative, you can enjoy a dairy-free version. Just be mindful that setting times may vary slightly.
- Seasonal Flair: Swap the heart-shaped sprinkles for festive confetti sprinkles or edible glitter for other celebrations like birthdays or Christmas, making this recipe a year-round favorite.
Step-by-Step: How I Make Creamy Red and White Valentine Heart Fudge Recipe
Step 1: Prepare the Pan for Easy Removal
Start by lining an 8 x 8 inch square pan with parchment paper or sprayed aluminum foil. This step is crucial because it allows you to lift the fudge out cleanly when it's ready. I like to make sure the paper overlaps on the edges so I can easily grab and lift the entire fudge slab later. It saves you from any sticky mess and makes cutting your Valentine hearts so much easier!
Step 2: Melt and Color the First Red Fudge Layer
In a microwave-safe bowl, combine 2 ¼ cups of white chocolate chips, ⅔ of the sweetened condensed milk, and 2 tablespoons of unsalted butter. Microwave in 20-second bursts, stirring well after each, until everything is melted and silky smooth—usually under 2 minutes. Be careful not to overcook to avoid graininess. Then, stir in 10 drops of red food coloring, adding more if needed to reach your perfect vibrant shade. The rich, glossy red fudge is the first step toward those charming Valentine hearts.
Step 3: Set the First Red Layer
Spoon half of the red fudge mixture into your prepared pan. The fudge will be sticky, so patience and a gentle touch help in smoothing it out evenly. Once it looks good, pop the pan into the freezer for a few minutes to let this layer set firmly. Meanwhile, keep the remaining red fudge mixture warm by wrapping the bowl in kitchen towels. This makes it easier to work with for the final layer later.
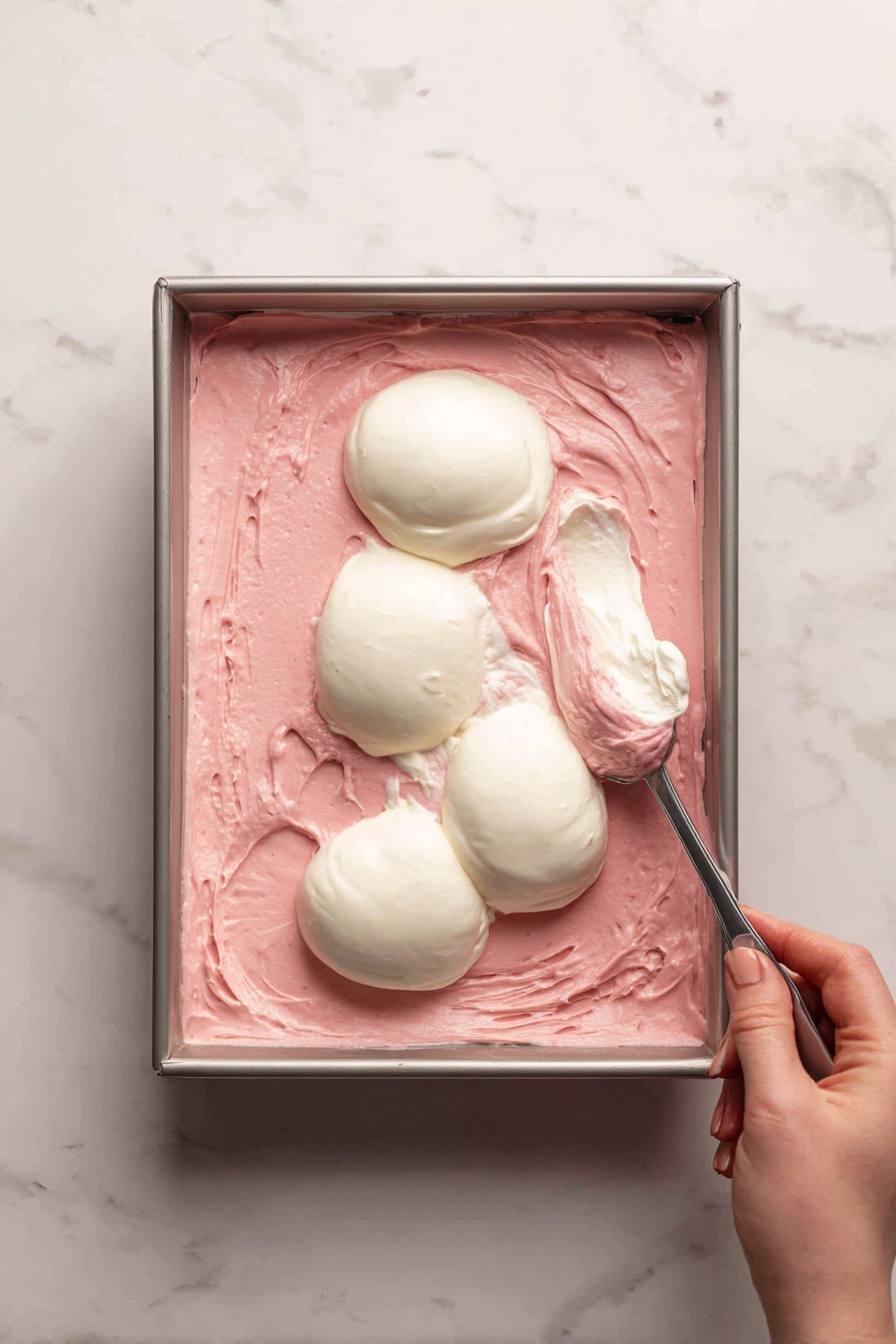
Step 4: Prepare and Layer the White Fudge
In a separate microwave-safe bowl, combine the remaining white chocolate chips, leftover sweetened condensed milk, and 1 tablespoon of butter. Again, microwave in 20-second bursts, stirring each time, until melted and smooth—under 2 minutes is usually enough. Pour this creamy white fudge over the set red layer, spreading it out evenly. For best texture, return the pan to the freezer for a few more minutes so the white layer firms up nicely before adding the final red layer.
Step 5: Top with Final Red Layer and Chill
Warm the remaining red fudge just slightly so it becomes stirrable again (not hot, just soft). Spoon it over the white layer and smooth it as evenly as possible. Once done, cover the pan tightly with plastic wrap and pop it into the refrigerator for a full 2 hours. This chill time is essential to allow the fudge to firm up properly, making it easier to cut perfect heart shapes.
Step 6: Cut Out Your Valentine Hearts and Decorate
After chilling, carefully lift the fudge slab out of the pan using the parchment paper edges. Place it on your countertop and use a small heart-shaped cookie cutter to cut out as many hearts as you can, trying to minimize any leftover pieces. Finally, sprinkle the hearts with your heart-shaped sprinkles to add that festive finishing touch. Now your Valentine's Day dessert is ready to share and swoon over!
Top Tip
Mastering the Creamy Red and White Valentine Heart Fudge Recipe is all about a few key tricks that make the process smoother and the results more beautiful.
- Use Quality Ingredients: From my experience, using high-quality white chocolate chips really makes a difference in meltability and texture—skip the generic brands for this one!
- Watch Your Microwave Time: I learned the hard way that overcooking the fudge mixture results in a grainy texture, so stick closely to those 20-second bursts and stir frequently.
- Layer Like a Pro: Smoothing the sticky red fudge in thin, even layers and freezing briefly between layers keeps the heart shape crisp and clean once cut.
- Line Your Pan Carefully: Using parchment paper or sprayed foil to line the pan allows you to lift the fudge out neatly, making cutting hearts on your countertop much easier.
How to Serve Creamy Red and White Valentine Heart Fudge Recipe
Garnishes
While the heart-shaped sprinkles add a festive touch, you can dress up your fudge with a dusting of edible glitter for some shimmer, or a light drizzle of melted dark chocolate for contrast. If you want an extra pop of texture, finely chopped nuts or freeze-dried strawberry bits also work beautifully.
Side Dishes
This Valentine Hearts Fudge pairs wonderfully with a hot cup of coffee, tea, or even a sparkling rosé for a luxurious treat. For a fuller dessert spread, serve alongside fresh berries or a light vanilla bean mousse to balance the sweetness.
Make Ahead and Storage
Storing Leftovers
Store your Creamy Red and White Valentine Heart Fudge in an airtight container in the refrigerator for up to two weeks. Bringing the fudge to room temperature before serving helps soften it slightly and enhances the creamy texture.
Freezing
To freeze, wrap the fudge tightly in parchment paper and then in aluminum foil to protect it from freezer burn. It keeps well in the freezer for up to 2 months, making it perfect to prepare well in advance for your celebrations.
Reheating
No need to reheat fudge, but if you'd like to soften it faster after chilling or freezing, simply leave it at room temperature for 20–30 minutes before serving. This brings back the creamy, melt-in-your-mouth feel that makes this fudge so special.
Frequently Asked Questions:
This recipe specifically relies on white chocolate chips to create the creamy red and white contrast layers. Using regular chocolate will change the texture and flavor dramatically, and it won’t achieve the signature look of this Heart Fudge.
Sweetened condensed milk helps the fudge thicken and set properly due to its sugar content and consistency. Using evaporated milk instead won’t allow the fudge to firm up as desired.
Make sure to freeze each layer for a few minutes to set before adding the next. Spreading the layers gently and evenly also helps keep the colors distinct and clean for that pretty heart effect.
Absolutely! You can melt your white chocolate, sweetened condensed milk, and butter together on a stovetop using a double boiler. Just stir constantly to avoid overheating and graininess.
Final Thoughts
Whipping up this Creamy Red and White Valentine Heart Fudge Recipe is such a rewarding experience—every colorful layer and heart-shaped cut feels like a little gift made with love. Whether you're gifting it or savoring it yourself, these festive hearts bring joy, sweetness, and warmth to any celebration. Keep these tips in mind to make your fudge look as stunning as it tastes, and enjoy every bite with the people who make your heart smile.
Print
Creamy Red and White Valentine Heart Fudge Recipe
- Prep Time: 10 minutes
- Chill Time: 2 hours
- Cook Time: 3 minutes
- Total Time: 2 hours 13 minutes
- Yield: 10 servings
- Category: Dessert
- Method: Microwave
- Cuisine: American
- Diet: Vegetarian
Description
Valentine Hearts Fudge is a sweet, creamy treat made with layers of white chocolate and red-colored white chocolate, shaped into charming hearts and topped with festive sprinkles. Perfect for gifting or sharing on special occasions.
Ingredients
White Chocolate Layer
- 3½ cups white chocolate chips (2 – 12 ounce packages) divided
- 1 can sweetened condensed milk divided
- 3 tablespoons unsalted butter divided
- red food coloring
- 1 tablespoon heart-shaped sprinkles
Instructions
- Prepare Pan: Line a small square pan (8 x 8 inches) with parchment paper or sprayed aluminum foil to easily lift the fudge out later.
- Melt First Red Fudge Layer: In a microwave-safe bowl, combine 2 ¼ cups white chocolate chips, ⅔ of the sweetened condensed milk, and 2 tablespoons unsalted butter. Microwave in 20-second bursts, stirring after each, until melted and smooth, about under 2 minutes, being careful not to overcook.
- Add Food Coloring: Stir in 10 drops of red food coloring to achieve a vibrant red color, adjusting as needed.
- Set First Layer: Spoon half of the red fudge mixture into the prepared pan, smoothing it carefully despite stickiness. Freeze for a few minutes until set. Keep remaining red mixture warm by wrapping the bowl in towels.
- Melt White Fudge Layer: In another microwave-safe bowl, combine remaining white chocolate chips, remaining sweetened condensed milk, and 1 tablespoon butter. Microwave again in 20-second bursts, stirring until melted and smooth, under 2 minutes.
- Layer White Fudge: Spoon the white fudge evenly over the set red layer, smoothing the surface. Freeze for a few more minutes to set.
- Top with Final Red Layer: Warm the reserved red fudge mixture slightly until stirrable, then spoon it over the white fudge layer and smooth it out.
- Chill to Set: Cover the entire layered fudge with plastic wrap and chill in the refrigerator for 2 hours until firm.
- Cut Hearts: Lift the fudge from the pan using the parchment paper. On a countertop, use a small heart-shaped cookie cutter to cut hearts out of the layered fudge efficiently to minimize waste.
- Add Sprinkles and Serve: Sprinkle the heart-shaped sprinkles evenly over the cut hearts and enjoy your festive Valentine Hearts Fudge.
Notes
- Store the fudge in an airtight container in the refrigerator for up to two weeks. Let it come to room temperature before serving for a softer texture.
- Freeze fudge wrapped first in parchment paper, then tightly in foil, for up to 2 months.
- Use high-quality white chocolate chips for best melting and texture results.
- Ensure you use sweetened condensed milk, not evaporated milk, to allow the fudge to thicken and set properly.
- Take care not to overcook the fudge in the microwave to avoid a grainy texture.
- Lining the pan with parchment or foil helps to easily remove the fudge for cutting.
Nutrition
- Serving Size: 1 heart (approx. 40 grams)
- Calories: 220 kcal
- Sugar: 28 g
- Sodium: 35 mg
- Fat: 11 g
- Saturated Fat: 7 g
- Unsaturated Fat: 3 g
- Trans Fat: 0 g
- Carbohydrates: 27 g
- Fiber: 0.5 g
- Protein: 2 g
- Cholesterol: 15 mg


Leave a Reply