There's something utterly magical about festive treats that bring the joy of the holidays into every bite. These Christmas Tree Cake Truffles with Little Debbie Recipe are a perfect little indulgence — rich, sweet, and so fun to make, especially when shared with friends or family gathered around. Trust me, once you try these, you’ll want to keep making them year after year.

Jump to:
- Why You'll Love This Recipe
- Ingredients & Why They Work
- Make It Your Way
- Step-by-Step: How I Make Christmas Tree Cake Truffles with Little Debbie Recipe
- Top Tip
- How to Serve Christmas Tree Cake Truffles with Little Debbie Recipe
- Make Ahead and Storage
- Frequently Asked Questions:
- Final Thoughts
- Christmas Tree Cake Truffles with Little Debbie Recipe
Why You'll Love This Recipe
I can’t tell you how many times these Christmas Tree Cake Truffles with Little Debbie Recipe have saved me when I needed a delightful dessert that feels homemade but is so quick to make. Plus, they’re irresistibly cute holiday bites that everyone raves about.
- Easy and Fast: You can whip up these truffles in under 30 minutes — perfect for last-minute holiday gatherings.
- No Baking Required: Since you start with Little Debbie Christmas Tree Cakes, there’s zero oven time, which means less stress!
- Festive and Fun: The sprinkles and green sanding sugar turn simple cake balls into festive little ornaments your guests will adore.
- Customizable: You can easily switch up the candy melts or sprinkles to match your holiday theme or personal taste.

Ingredients & Why They Work
Each ingredient plays a special role in making these truffles taste delicious and look festive. Using Little Debbie Christmas Tree Cakes as the base not only gives you that nostalgic, familiar flavor but also the perfect texture for truffles. The candy melts provide that smooth, glossy coating that snaps when you bite into it, while the sprinkles add that signature holiday sparkle.

- Little Debbie Christmas Tree Cakes: These soft, cherry-filled cakes are the star here, giving you a perfect sweet base that crumbles easily.
- White Chocolate or Candy Melts: Ideal for coating the truffles, ensuring a smooth, sweet outer layer that hardens nicely.
- Festive Sprinkles: They’re not just decoration — they add color, crunch, and fun to the cake mixture.
- Red Candy Melts: For drizzling a pop of bright Christmas red, making the truffles look professionally decorated.
- Green Sanding Sugar: Adds a sparkly, textured finish that feels just right for the season.
Make It Your Way
One of the best things about the Christmas Tree Cake Truffles with Little Debbie Recipe is how easy it is to tailor to your preferences or pantry. I've been playing around with flavors and colors to match whatever mood strikes during the holidays.
- Variation: For a chocolate twist, swap the white chocolate candy melts for milk or dark chocolate, and sprinkle with crushed peppermint for a minty touch — it adds a nice layer of holiday flavor that my family loves.
Step-by-Step: How I Make Christmas Tree Cake Truffles with Little Debbie Recipe
Step 1: Crumble the Cake and Mix in Sprinkles
Start by unwrapping your Little Debbie Christmas Tree Cakes and tossing them into a large bowl. Using a handheld mixer (or just your hands, if you don’t have one handy), break the cakes down into a crumbly texture. This will look a little like dough. Then, gently fold in the festive sprinkles. This step not only blends in the flavor but gives your truffles a subtle crunch and color — perfect for the holiday spirit. Tip: Don’t overmix or the cake might get too dense.
Step 2: Shape the Truffles
Using a tablespoon or cookie scoop, portion out the cake mixture. Roll each scoop between your palms until you get smooth little balls. Placing them on a parchment-lined baking sheet helps prevent sticking and makes clean-up easier. Once all the balls are formed, pop them in the fridge — chilling is key because it helps them hold their shape when you dip them in chocolate later.
Step 3: Melt the Chocolate and Dip
Next, melt your white chocolate or candy melts gently in the microwave or a double boiler — I like the microwave for speed, heating in 30-second bursts and stirring in between to avoid burning. Once smooth, grab each chilled cake ball and dip it fully into the melted chocolate using a fork or dipping tool. Let any excess drip off before placing it back on your parchment-lined tray. This part feels a bit messy but trust me, it gets easier with practice.
Step 4: Add Festive Drizzle and Decorations
For that final festive flair, melt your red candy melts the same way and transfer them to a piping or ziplock bag. Snip off a tiny corner and drizzle over the truffles for a pop of red. While the chocolate is still wet, sprinkle with green sanding sugar. I find this creates that perfect holiday sparkle and a nice textural contrast. Then, chill your truffles in the fridge for a few minutes until everything sets and you’re ready to dig in.
Top Tip
From my kitchen to yours, I’ve learned a few tricks that help make this recipe shine every time. These tips save time and frustration — and definitely make your truffles look like they came from a bakery.
- Chill Twice: I always chill the cake balls before dipping and again after decorating to guarantee a neat, set coating without melting your hands through the process.
- Use Parchment Paper: Prevents sticking and makes handling the truffles so much easier. Plus, it keeps your trays clean!
- Gentle Heating: When melting candy melts, heat slowly and stir often to avoid scorching — burnt chocolate is a party pooper.
- Perfect Scoop Size: Use a tablespoon or small scoop for even-sized truffles that look uniform on the platter and set consistently.
How to Serve Christmas Tree Cake Truffles with Little Debbie Recipe

Garnishes
For me, the simple green sanding sugar and red drizzle are more than enough to make these truffles fancy. But I’ve also sprinkled tiny edible gold stars or used mini candy canes crushed on top for a crunch and eye-catching detail. Whatever you choose, keep it festive and fun — these little touches make the truffles feel even more special.
Side Dishes
I love pairing these truffles with hot cocoa or a creamy eggnog — the truffles complement these classic holiday drinks perfectly. They’re also great alongside a cheese and charcuterie board at Christmas parties for guests who want a sweet finish.
Creative Ways to Present
One year, I arranged these truffles standing up on a large platter decorated with pine sprigs and fairy lights, creating a mini “Christmas tree” centerpiece. I’ve also served them in mini cupcake liners with little festive picks — instantly charming for holiday gift boxes or cookie exchanges.
Make Ahead and Storage
Storing Leftovers
Once made, I store leftover truffles in an airtight container in the refrigerator. They keep beautifully for up to a week, and chilling them maintains that crisp candy melt shell and moist inside.
Freezing
Freezing works surprisingly well with these little truffles. I place them in a single layer on a baking sheet to freeze solid, then transfer to a freezer-safe container with parchment paper layers. They thaw quickly in the fridge overnight, ready to enjoy with almost no texture or flavor loss.
Reheating
Since these are more of a cold treat, I usually enjoy them chilled or at room temperature. If your candy melts soften too much, just pop the truffles back in the fridge for a bit, and they’ll firm right up again.
Frequently Asked Questions:
Absolutely! While the Christmas Tree Cakes add a great festive touch and flavor, any Little Debbie cake, like Cosmic Brownies or Zebra Cakes, can be used to make truffles with similar success. Just make sure the cake is easily crumbled and complements your decoration plans.
You can use high-quality white chocolate bars or chips melted gently instead of candy melts. Just be careful when melting so the chocolate doesn’t seize or burn. Candy melts are great for easy melting and firm coatings, but chocolate works just fine if you watch the temperature.
Stored in an airtight container in the fridge, these Christmas Tree Cake Truffles with Little Debbie Recipe last up to a week. For longer storage, freezing is a great option, and they’ll hold well for up to 2 months in the freezer.
Definitely! Kids love rolling the cake balls and decorating with sprinkles. Just be sure to supervise during the chocolate melting and dipping to keep things safe. It’s a joyful holiday activity to do together, making memories as sweet as the truffles themselves!
Final Thoughts
This Christmas Tree Cake Truffles with Little Debbie Recipe has become one of my favorite holiday treats not just because of how delicious it is, but also because it captures that fun, cozy feeling of the season with every bite. Easy, charming, and absolutely festive — I hope you enjoy making and sharing these as much as I do. Grab some cake, melt that chocolate, and get ready for a sweet holiday tradition.
Print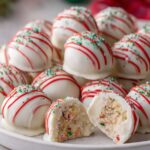
Christmas Tree Cake Truffles with Little Debbie Recipe
- Prep Time: 15 minutes
- Cook Time: 10 minutes
- Total Time: 25 minutes
- Yield: 12 servings
- Category: Dessert
- Method: No-Cook
- Cuisine: American
Description
Delight in these festive Christmas Tree Cake Truffles made with Little Debbie Christmas Tree Cakes dipped in luscious white chocolate and decorated with holiday sprinkles and red candy drizzle. A perfect no-bake sweet treat to celebrate the season.
Ingredients
Truffle Base
- 5 Little Debbie Christmas Tree Cakes (1 box)
- 3 tablespoons Festive sprinkles
Coating and Decoration
- 8 ounces white chocolate or candy melts
- 3 tablespoons Red candy melts (optional, for drizzling)
- Green sanding sugar for decoration
Instructions
- Prepare the cake crumbs: Unwrap the Little Debbie Christmas Tree Cakes and place them in a large mixing bowl. Using a handheld mixer, blend the cakes until a crumbly dough forms. Fold in the festive sprinkles evenly.
- Form the truffle balls: Using a tablespoon, scoop portions of the cake mixture and roll each portion between your palms to form balls. Place each ball onto a parchment-lined baking sheet. Continue until all dough is used.
- Melt the white chocolate: In a microwave-safe bowl, melt the white chocolate or candy melts either in the microwave in 30-second increments or using a double boiler until smooth and fully melted.
- Dip the truffles: Using a fork or dipping tool, dip each chilled cake ball completely into the melted white chocolate. Allow excess chocolate to drip off before placing it back onto the parchment-lined sheet.
- Melt red candy melts: In a piping bag or ziplock bag, melt the red candy melts in the microwave in 30-second increments, massaging the bag between intervals to ensure even melting.
- Decorate the truffles: Snip a small edge from the piping or ziplock bag and drizzle the melted red candy melts over the white chocolate coated truffles. Immediately sprinkle green sanding sugar over the drizzle.
- Set and serve: Place the decorated truffles in the refrigerator for a few minutes to allow the coatings to set before serving. Enjoy your festive treat!
Notes
- Ensure the cake balls are well chilled before dipping to help the chocolate coating set better.
- Use candy melts instead of white chocolate if you prefer easier melting and a smoother finish.
- Substitute festive sprinkles with any holiday-themed or colored sugar sprinkles of your choice.
- If you don’t have a piping or ziplock bag, you can drizzle the red candy melts with a spoon.
- Store finished truffles in an airtight container in the refrigerator to keep them fresh for up to 5 days.
Nutrition
- Serving Size: 1 truffle
- Calories: 150 kcal
- Sugar: 20 g
- Sodium: 50 mg
- Fat: 7 g
- Saturated Fat: 5 g
- Unsaturated Fat: 2 g
- Trans Fat: 0 g
- Carbohydrates: 22 g
- Fiber: 1 g
- Protein: 1 g
- Cholesterol: 10 mg

Leave a Reply