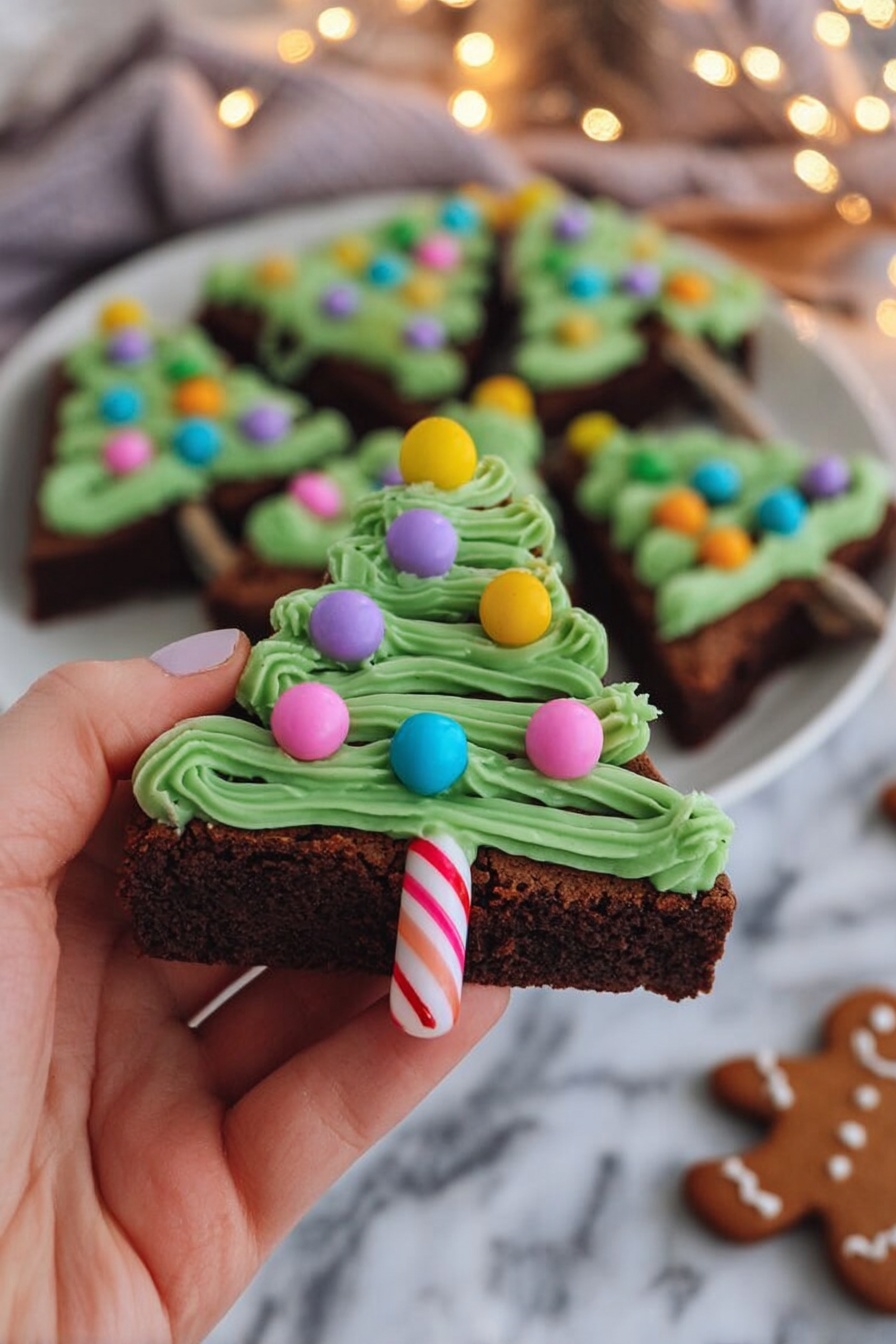
There’s something utterly irresistible about rich, fudgy treats shaped for the season, and this Christmas Tree Brownies Recipe is exactly that—chocolatey, festive, and fun! It’s a perfect way to bring a little Christmas magic to your baking table without any fuss.

Jump to:
Why You'll Love This Recipe
I’ve tried dozens of festive brownies, but this Christmas Tree Brownies Recipe stands out every time for its balance of gooey chocolate richness and playful holiday charm. It’s one of those recipes that’s as delightful to decorate as it is to eat, making it an instant favorite.
- Festive fun: The unique tree shape and candy cane “trunks” make them perfect conversation starters at holiday gatherings.
- Deliciously fudgy: The mix of dark and milk chocolates creates layers of flavor and texture that keep you coming back for more.
- Simple to make: Even if you’re not a baking pro, the step-by-step method ensures success—and lots of smiles.
- Customizable: From different toppings to piping styles, you can adapt these brownies to your personal style or dietary needs.
Ingredients & Why They Work
The genius of this Christmas Tree Brownies Recipe is in how the ingredients come together to make a luscious, tender yet fudgy treat that holds its shape for perfect decoration. And a quick note on shopping—choosing quality chocolate will truly elevate these brownies.
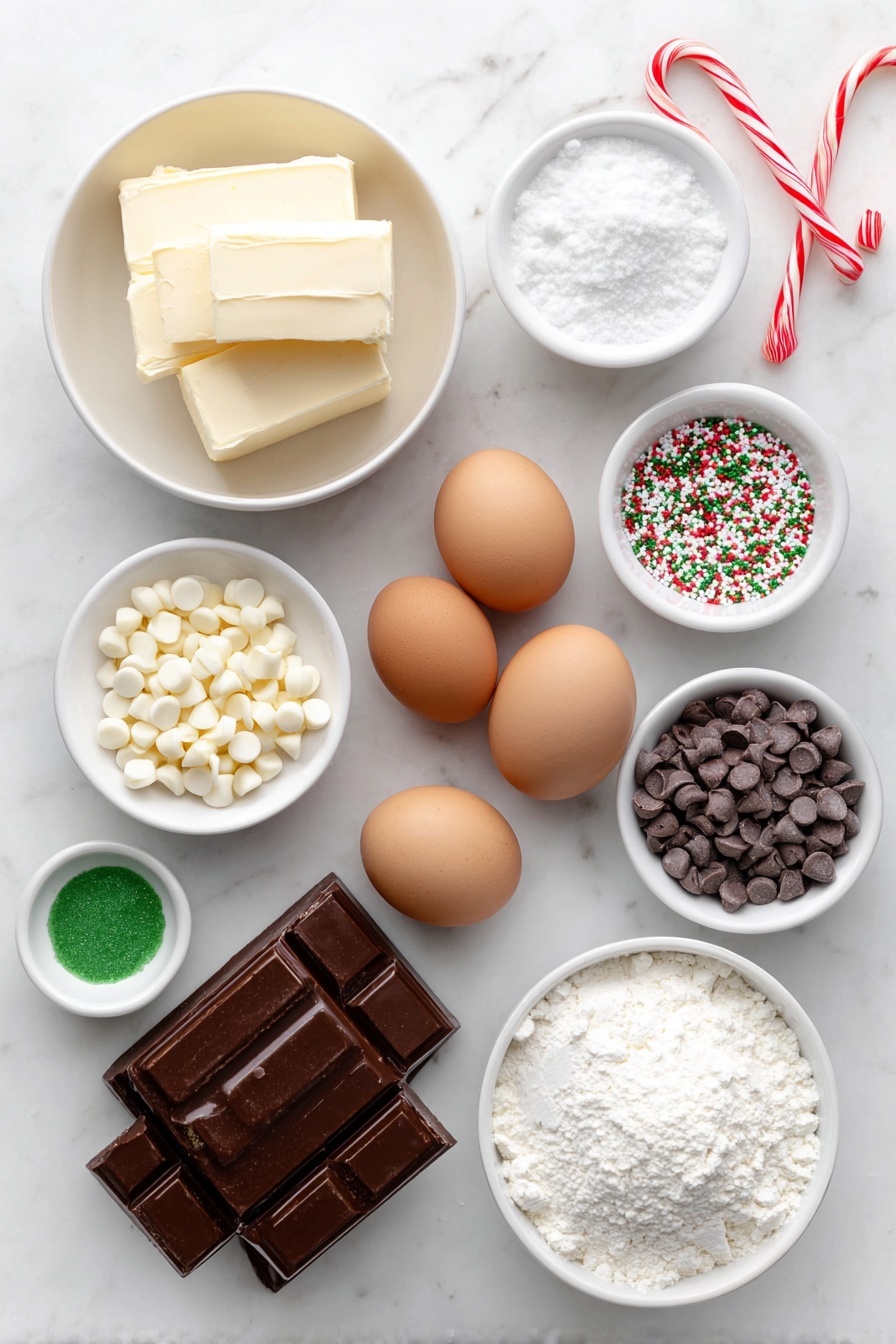
- Unsalted butter: Adds richness and a smooth mouthfeel, melting beautifully with the chocolate.
- Dark chocolate: Provides depth and that classic intense chocolate flavor we crave in brownies.
- Eggs: Essential for the structure and lightness, I find fresh, room temperature eggs whisk best.
- Caster sugar: Dissolves quickly for tenderness and sweetness without graininess.
- Plain flour: Gives just enough body without making the brownies cakey.
- Cocoa powder: Boosts chocolate flavor and adds a rich color, choose Dutch-processed for smoother taste.
- Milk and white chocolate chips: These create delightful pockets of melty sweetness inside.
- Candy canes: The “trunks” of your Christmas trees—pick classic peppermint or your favorite flavor for extra fun.
- Icing sugar: The base for your buttercream, important for that smooth, sweet frosting.
- Green food colouring: Because no Christmas tree brownie is complete without that festive green!
- Sprinkles and sweets: Personalize your decorations—tiny baubles, edible stars, or colorful candies all work beautifully.
Make It Your Way
I love switching up the decorations and sometimes even the mix-ins in the brownie itself. This recipe is forgiving and flexible, so don’t hesitate to put your own twist on it and make it feel like your very own holiday classic.
- Variation: I’ve added chopped nuts for some crunch and swapped peppermint candy canes for butterscotch ones—both totally work and add their own flair.
- Dietary tweak: For a gluten-free version, substitute the plain flour with a gluten-free blend—you’ll still get that great texture.
- Flavor boost: A splash of vanilla extract or a pinch of cinnamon can warm up the flavor nicely during chilly December baking sessions.
Step-by-Step: How I Make Christmas Tree Brownies Recipe
Step 1: Melt the Chocolate and Butter
Start by gently melting the unsalted butter and dark chocolate together—either in a heatproof bowl over simmering water or in short bursts in the microwave. Be sure to stir gently to smooth it out and leave it to cool to room temperature. This is key because pouring hot chocolate mixture over eggs will scramble them, and we want a silky batter instead.
Step 2: Whip Eggs and Sugar Until Fluffy
Using an electric whisk, beat the eggs and caster sugar for several minutes until they turn pale, mousse-like, and about double in volume. The moment you lift the whisk and the mixture leaves a trail before blending back in is your green light. This aeration gives your brownies a lighter texture without losing fudginess.
Step 3: Fold Together the Chocolate and Egg Mixtures
Pour the cooled chocolate-butter mixture gently over your whipped eggs and sugar, folding carefully with a spatula. Patience here is your friend—you want to keep as much air as possible for that lovely texture. No rushing or stirring vigorously!
Step 4: Add Dry Ingredients and Chocolate Chips
Sift the cocoa powder and plain flour over your batter, then fold again gently until fully combined. Fold in the milk and white chocolate chips last—they add that surprise melty goodness in every bite. Then pour everything into your lined baking tray and spread evenly.
Step 5: Bake and Cool Completely
Bake at 180°C (160°C fan) for 25-30 minutes. I like to start checking around 25 minutes—insert a skewer and if it comes out with just a few moist crumbs, it’s perfect. Let the brownies cool fully in the tin; it’s much easier to cut neat shapes when they’re completely cold.
Step 6: Shape and Decorate Your Christmas Trees
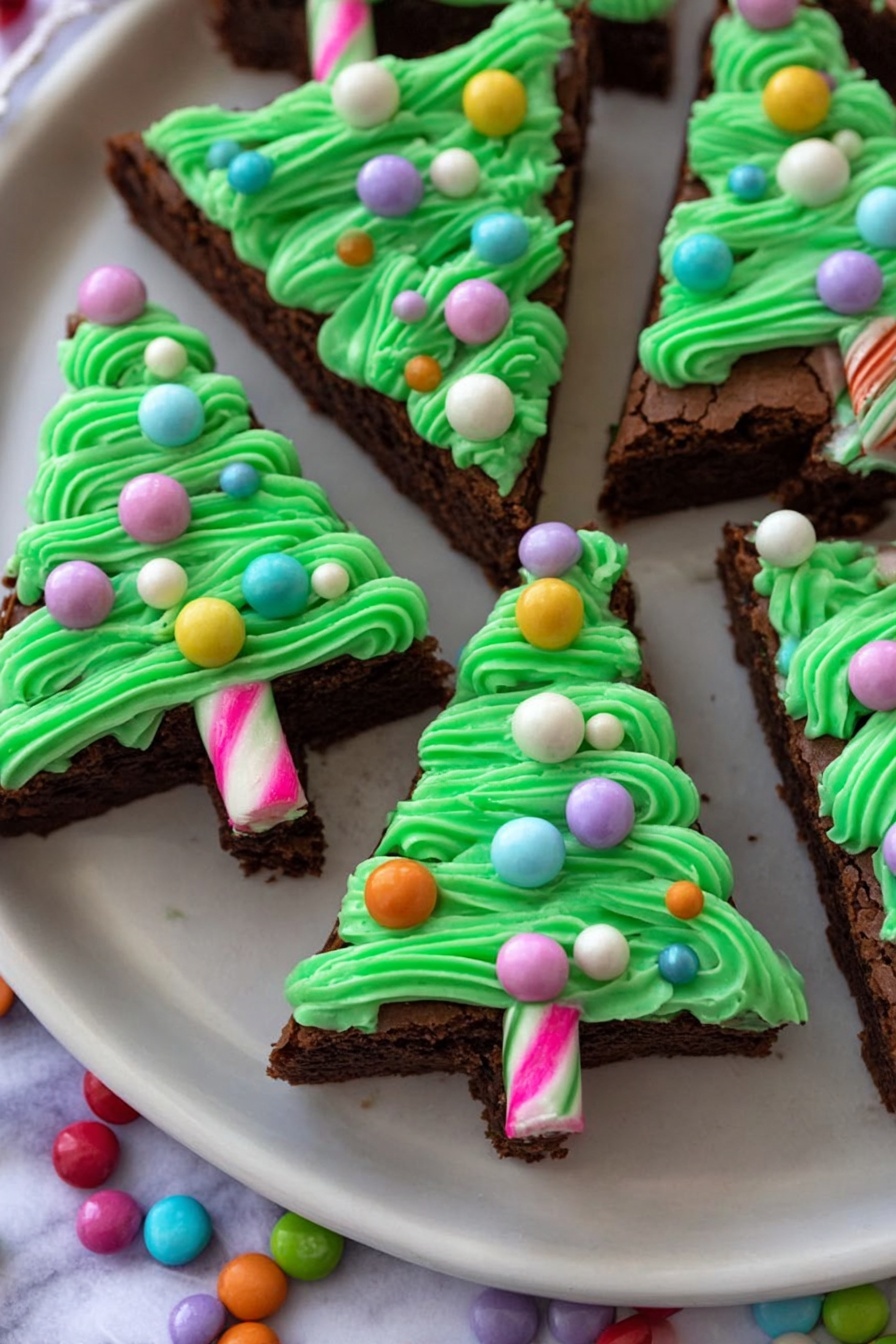
Cut the brownies in half, then shape each half into triangles. This simple method instantly reminds me of the Christmas tree shape without needing special cutters. Use the straight part of candy canes as trunks, carefully inserting them at the base of each tree. Then, whip up a batch of green buttercream to pipe zigzag “garlands,” and top with sprinkles, sweets, and a bright “star” (I love using an M&M) on top.
Top Tip
After making these Christmas Tree Brownies Recipe several times, I’ve learned a few tricks that help everything come together beautifully—and these little insights might make your bake day even easier and more fun.
- Whisking Counts: Don’t rush the eggs and sugar step. If you skip this, the brownies will be dense instead of that perfect fudgy-chewy texture.
- Cool Chocolate: Always let the melted chocolate and butter mixture cool fully before combining with eggs to avoid scrambling.
- Parchment Paper Magic: Line your pan well with parchment; it makes lifting out the brownies for cutting way simpler.
- Decoration Freedom: Feel free to swap sprinkles for crushed nuts or dried fruit—this recipe can handle the creativity!
How to Serve Christmas Tree Brownies Recipe
Garnishes
For me, a dusting of edible glitter over the buttercream adds that magical frosted look that screams holiday cheer. I usually stick with classic colorful baubles and a few mini candy canes for trucks, but feel free to add anything that makes you smile—tiny peppermint stars or crushed candy cane bits also look fantastic.
Side Dishes
These brownies pair beautifully with a simple cup of hot cocoa or spiced tea. If you’re serving at a party, a platter of fresh berries or a light whipped cream on the side balances the chocolate richness perfectly.
Creative Ways to Present
I once arranged these brownies on a platter dusted with edible “snow” — powdered icing sugar — and nestled little gingerbread figures and fairy lights around them. It turned a simple dessert into a stunning Christmas centerpiece that wowed guests and got everyone snapping photos!
Make Ahead and Storage
Storing Leftovers
I keep leftover brownies in an airtight container at room temperature for up to a week, and honestly, they taste just as delicious on day three or four once the flavors have melded. Just be sure to keep them away from strong aromas, or the buttercream might pick them up.
Freezing
Freezing works well if you want to prepare in advance. I wrap each brownie individually in plastic wrap and then pop them in a ziplock bag—this prevents freezer burn and keeps the decorations intact. Thaw overnight in the fridge before serving.
Reheating
I usually enjoy these brownies at room temperature, but if you prefer warm, a quick 10-second zap in the microwave softens them just enough without melting the decorations or buttercream too much.
Frequently Asked Questions:
While you can try, you won’t get the same airy, mousse-like texture that’s key to this recipe’s charm. This recipe relies on whisking eggs and sugar well and folding in melted chocolate gently to create that perfect fudgy bite.
After the brownies have cooled completely, I cut the tray in half and then slice each half diagonally into triangles. It’s simple and creates that classic tree silhouette without special cookie cutters. Plus, you can snack on the offcuts as you go!
Cooling the brownies fully before cutting is crucial—warm brownies are softer and more fragile. Use a sharp knife dipped in hot water and wiped dry for cleaner cuts. When piping frosting, firm but not hard brownies provide the best canvas to avoid cracking.
Absolutely! In fact, decorating ahead lets the buttercream set nicely. Just keep the brownies stored in an airtight container at room temperature. If decorating very early, I recommend refrigerating and bringing them back to room temp before serving for the best flavor and texture.
Final Thoughts
There’s a special kind of joy in sharing these Christmas Tree Brownies Recipe with friends and family. It’s not just the taste, but the whole experience—from mixing that chocolatey batter to piping festive buttercream and watching eyes light up at the finished masterpiece. I hope making these brownies brings a little warmth and sparkle to your holiday celebrations, just like it does for me every year.
Print
Christmas Tree Brownies Recipe
- Prep Time: 10 minutes
- Cook Time: 30 minutes
- Total Time: 40 minutes
- Yield: 10 brownies
- Category: Dessert
- Method: Baking
- Cuisine: British
Description
Delight in festive cheer with these Christmas Tree Brownies, featuring rich dark chocolate and buttery icing decorated with candy canes and sprinkles, perfect for holiday celebrations and gifting.
Ingredients
Brownies
- 200 g unsalted butter
- 200 g dark chocolate
- 4 medium eggs
- 275 g caster sugar
- 100 g plain flour
- 50 g cocoa powder
- 100 g milk chocolate chips
- 100 g white chocolate chips
Decorations
- 10 candy canes
- 100 g unsalted butter
- 200 g icing sugar
- Green food colouring
- Bauble sprinkles and sweets
- 1 yellow star candy (e.g., M&M)
Instructions
- Preheat oven and prepare tray: Preheat your oven to 180C/160C Fan and line a 9″ square baking tray with parchment paper for easy removal.
- Melt chocolate and butter: Melt together the 200 g unsalted butter and 200 g dark chocolate in a heatproof bowl over a pan of boiling water or in the microwave for 1-2 minutes until smooth. Leave to cool to room temperature.
- Whisk eggs and sugar: Using an electric whisk or stand mixer, whisk 4 medium eggs with 275 g caster sugar until pale, mousse-like, and doubled in volume. The mixture should leave a trail when the whisk is lifted up, lasting a couple of seconds.
- Combine chocolate mixture and egg mixture: Pour the cooled chocolate mixture into the egg and sugar mixture and fold gently to combine, taking care to retain the air you incorporated during whisking.
- Add dry ingredients: Sift 50 g cocoa powder and 100 g plain flour over the mixture, then fold carefully again to maintain the airiness.
- Fold in chocolate chips and bake: Fold in 100 g milk chocolate chips and 100 g white chocolate chips evenly. Pour the batter into the prepared baking tray and bake in the oven for 30 minutes. Allow to cool completely in the tin.
- Cut brownies into tree shapes: Once fully cooled, cut the brownies in half, then cut each half into triangles to resemble Christmas trees. Save any offcuts to eat or use in other treats.
- Prepare buttercream icing: Cream together 100 g unsalted butter and 200 g icing sugar until smooth. Add green food colouring to achieve your desired shade for decoration.
- Pipe icing and decorate: Transfer the green buttercream to a piping bag fitted with a 2D closed star tip. Pipe zigzag lines onto each brownie tree. Decorate with bauble sprinkles, sweets, and carefully insert candy cane sticks into the base of each brownie as tree trunks. Top each tree with a yellow star candy like an M&M.
- Serve and enjoy: Allow the decorations to set slightly before serving. These brownies are perfect for festive gifting or holiday treats.
Notes
- Break candy canes and use only the straight parts for sturdy tree trunks; use offcuts in other Christmas treats like bark.
- Store brownies in an airtight container for up to 1 week to maintain freshness.
- This recipe was adapted from a BBC Good Food brownie recipe with custom decoration ideas.
- Use gel-based green food colouring for vibrant icing without altering texture.
- Use disposable piping bags and a 2D closed star piping tip for best decorative results.
Nutrition
- Serving Size: 1 brownie
- Calories: 350 kcal
- Sugar: 30 g
- Sodium: 150 mg
- Fat: 22 g
- Saturated Fat: 13 g
- Unsaturated Fat: 7 g
- Trans Fat: 0 g
- Carbohydrates: 35 g
- Fiber: 3 g
- Protein: 5 g
- Cholesterol: 70 mg


Leave a Reply