If you love bold flavors with a bit of a kick but want to skip the traditional chicken wings, this Buffalo Cauliflower Wings Recipe is just the thing for your next snack attack or game day gathering. Let me walk you through why these crispy, tangy bites might become your new favorite!

Jump to:
Why You'll Love This Recipe
I’ve made buffalo cauliflower wings more times than I can count, and honestly, they never disappoint. Whether I’m entertaining friends or just craving a flavorful snack, these wings hit the spot every time without weighing me down.
- Simple ingredients: Uses everyday pantry staples so you can whip them up anytime.
- Healthier alternative: Baked, not fried, for crispy wings with less guilt.
- Bold flavor: That classic tangy buffalo sauce punches through beautifully.
- Versatile & crowd-pleasing: Perfect for game days, parties, or casual snacking.
Ingredients & Why They Work
Before you start chopping, let’s talk ingredients. I always recommend using fresh cauliflower — firm heads with tight florets give the best texture. And for the batter, the spices pack in flavor while the buttermilk helps achieve that perfect crispy coating once baked.
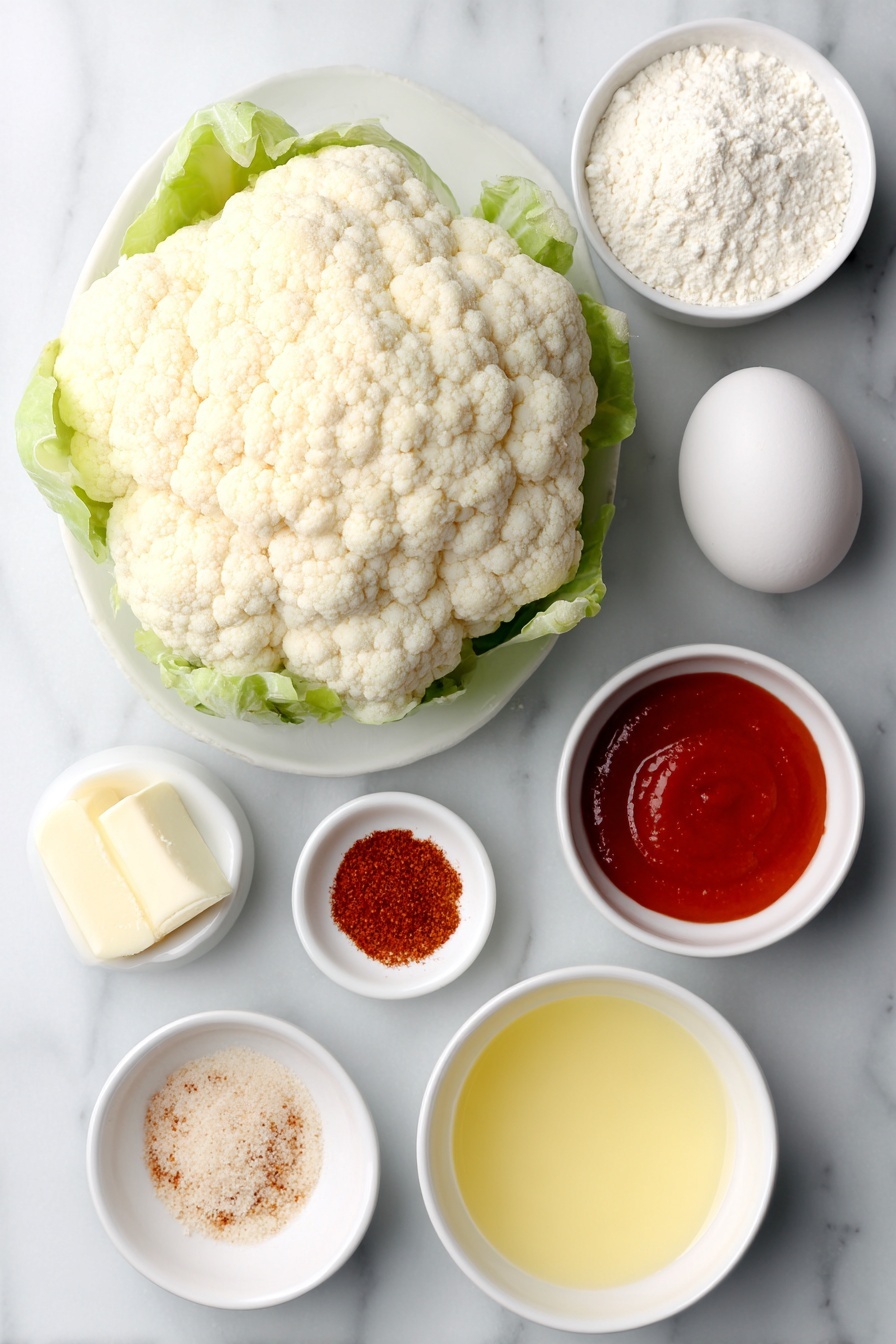
- Cauliflower: The star of the show, cut into florets so each piece bakes evenly and crisps up perfectly.
- Flour: Creates the batter base, ensuring a nice crispy shell when baked.
- Ground paprika: Adds subtle smoky warmth to the coating mix.
- Onion powder: Boosts savory depth without overpowering the buffalo sauce.
- Garlic powder: Provides classic aromatic flavor essential for buffalo seasoning.
- Salt: Enhances all the other ingredients, balancing out the flavors.
- Buttermilk: Tenderizes cauliflower and helps the batter stick—plus adds tangy richness.
- Butter: Melts into the buffalo sauce, soothing the heat and making it silky smooth.
- Buffalo Sauce: The bold, spicy coating that transforms simple cauliflower into crave-worthy wings.
Make It Your Way
The beauty of this Buffalo Cauliflower Wings Recipe lies in its versatility. Whether you’re catering to dietary needs or just want to mix things up, there are plenty of ways to customize these crispy, flavorful bites to suit your taste buds.
- Vegan Variation: I love swapping out the buttermilk for a plant-based version and using coconut oil instead of butter. It still delivers that classic buffalo zing with zero dairy, and my vegan friends rave about it every time!
- Gluten-Free Option: When making this with a gluten-free flour blend, you get the same crispy texture that impresses guests who need to avoid gluten. I always double-check the flour brand to keep things safe and tasty.
- Extra Crispy Kick: For those who want a crunchier finish, try giving the coated cauliflower a light spray of oil before baking. It adds a golden crisp that’s hard to resist.
- Mild or Spicy: Adjust the buffalo sauce amount or switch to a hotter sauce if you like more heat. Personally, I start with the recommended amount and then serve extra sauce on the side for dipping!
Step-by-Step: How I Make Buffalo Cauliflower Wings Recipe

Step 1: Preheat and Prepare with Care
First things first, preheat your oven to 375°F and line two baking sheets with parchment paper. This not only prevents sticking but also makes cleanup a breeze. Spacing the baking sheets apart is key—this allows heat to circulate and ensures your cauliflower wings get nice and crispy all around.
Step 2: Whisk Together Your Flavor-Packed Batter
In a large bowl, combine the flour, ground paprika, onion powder, garlic powder, and salt. Pour in the ¾ cup of buttermilk and stir until you have a thick, smooth batter. The consistency is important here—a batter that’s too runny won’t stick well, so it should coat your cauliflower nicely without dripping.
Step 3: Coat Each Floret Evenly
Drop your cauliflower florets into the batter bowl and toss gently but thoroughly so each piece is coated in that flavorful mixture. Then, spread them out evenly on your lined baking sheets. Be sure to leave space between pieces for the air to crisp up every side—crowding them will lead to sogginess, something we definitely want to avoid!
Step 4: Bake and Flip for Even Crispiness
Bake the cauliflower for 20 minutes at 375°F. When the timer goes off, carefully flip each floret to the other side using tongs or a spatula. This flip ensures a beautifully even bake and browning. Pop them back in the oven for another 20 minutes—this second bake is what really firms up that coating to a perfect crunch.
Step 5: Whip Up That Classic Buffalo Sauce
While the wings are baking, mix your buffalo sauce and melted butter in a bowl. Whisk until completely combined. The butter adds richness and mellows the vinegar’s tang, giving you that iconic buffalo flavor that’s rich but balanced.
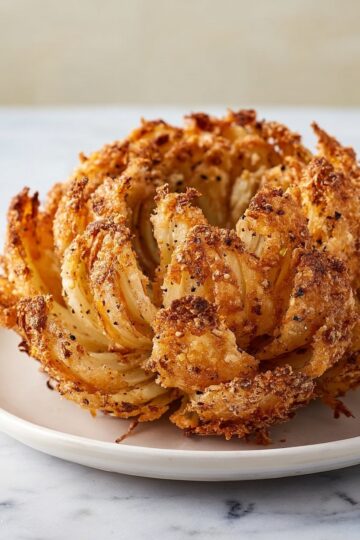
Step 6: Toss and Serve Warm
As soon as your cauliflower florets come out of the oven, transfer them directly to the bowl with buffalo sauce. Toss gently but thoroughly, making sure each wing is coated in that spicy, buttery goodness. Serve immediately for the best taste and texture—warm, crispy, and packed with flavor!
Top Tip
Getting crispy and flavorful buffalo cauliflower wings isn’t just about the recipe—it’s about the little details that make a big difference. Here are some tips from my kitchen to yours!
- Perfect Batter Consistency: Make sure your batter is thick enough to cling to each cauliflower floret without dripping off—that’s key for that perfect coating.
- Space for Crispiness: Don’t crowd your cauliflower on the baking sheets! Giving them room ensures air circulates well so each “wing” crisps up beautifully on all sides.
- Flip with Care: When flipping the florets halfway through baking, use tongs gently so you don’t knock off the batter, keeping that crispy crust intact.
- Buffalo Sauce Toss: Toss the cauliflower in buffalo sauce right after baking while it’s hot so it soaks up all that delicious zing without getting soggy.
How to Serve Buffalo Cauliflower Wings Recipe

Garnishes
Adding fresh garnishes can elevate this Buffalo Cauliflower Wings Recipe and bring extra pop to the plate. Try sprinkling chopped fresh parsley or cilantro for a burst of color and freshness. A drizzle of ranch or blue cheese dressing pairs perfectly to cool down the heat. For a tangy twist, some thinly sliced scallions or celery sticks on the side add crunch and contrast.
Side Dishes
This appetizer shines on game day alongside some classic sides. Serve your buffalo cauliflower wings with crispy sweet potato fries, celery sticks, or a simple green salad tossed with a light vinaigrette to balance the bold flavors. If you’re feeling indulgent, some cheesy spinach artichoke dip makes a fantastic companion.
Make Ahead and Storage
Storing Leftovers
Store any leftover buffalo cauliflower wings in an airtight container in the refrigerator for up to 3 days. To keep that satisfying crunch, avoid tossing them in sauce until you’re ready to serve again.
Freezing
You can freeze cooked buffalo cauliflower wings by first baking and cooling them completely, then placing them in a single layer on a baking sheet to flash freeze. Once frozen, transfer to a freezer-safe bag or container. They freeze well for up to 1 month.
Reheating
For the best texture when reheating, place leftovers on a baking sheet and warm in a 375°F oven for about 10-15 minutes until heated through and crispy again. After reheating, toss the wings in fresh buffalo sauce and serve warm.
Frequently Asked Questions:
Absolutely! Simply swap the buttermilk for plant-based buttermilk and replace the melted butter with coconut oil or your favorite vegan butter. This way, you get all the delicious flavor without any animal products.
Just replace the all-purpose flour in the batter with a gluten-free flour blend. Make sure to check that your buffalo sauce is gluten-free as well. This swap keeps your wings crispy and flavorful without gluten.
Spacing the cauliflower florets out evenly on parchment-lined baking sheets is key. The air needs to circulate to crisp up all sides. Also, flipping them halfway through baking helps achieve that perfect crunch.
It’s best to prepare the batter fresh just before coating the cauliflower to ensure the right thickness and to avoid it getting too thick or watery over time.
Final Thoughts
There’s something truly satisfying about biting into these crispy, tangy buffalo cauliflower wings—they’re proof you don’t need traditional wings to have big bold game day flavor. Whether you’re serving them to friends, family, or just treating yourself, this Buffalo Cauliflower Wings Recipe is a keeper. I hope these tips and serving ideas inspire you to make this appetizer a new favorite in your rotation. Happy cooking and enjoy every crunchy, spicy bite!
Print
Buffalo Cauliflower Wings Recipe
- Prep Time: 10 minutes
- Cook Time: 40 minutes
- Total Time: 50 minutes
- Yield: 6 small servings
- Category: Appetizer
- Method: Baking
- Cuisine: American
- Diet: Vegetarian
Description
This easy buffalo cauliflower wings recipe is a perfect crowd-pleasing appetizer for game day or any snack craving. Made with simple ingredients and baked to crispy perfection, these buffalo cauliflower wings offer a healthier alternative to traditional wings, full of bold flavor and crunch.
Ingredients
Cauliflower Wings
- 1 head of cauliflower, cut into florets
- ¾ cup flour
- 1 teaspoon ground paprika
- 1 teaspoon onion powder
- 1 teaspoon garlic powder
- 1 teaspoon salt
- ¾ cup buttermilk
Buffalo Sauce
- 2 tablespoons butter, melted
- ⅓ cup Buffalo Sauce (e.g., Frank's)
Instructions
- Preheat oven and prepare baking sheets: Preheat the oven to 375°F and line two baking sheets with parchment paper. Set aside.
- Make batter: In a large bowl, combine the flour, ground paprika, onion powder, garlic powder, and salt. Add the buttermilk and stir until the mixture is thick and combined.
- Coat cauliflower: Add the cauliflower florets to the batter, tossing to coat each piece evenly. Arrange the coated cauliflower florets on the prepared baking sheets, spacing them out to allow air circulation for crispiness.
- Bake first side: Bake the cauliflower for 20 minutes at 375°F.
- Flip and bake second side: Flip each cauliflower floret to the other side for even baking, then bake an additional 20 minutes.
- Make buffalo sauce: While the cauliflower bakes, whisk together the melted butter and buffalo sauce in a bowl until combined.
- Toss cauliflower in sauce and serve: When the cauliflower is done baking, immediately transfer the florets to the buffalo sauce bowl and toss to coat evenly. Serve warm and enjoy!
Notes
- If you don’t have buttermilk, make your own by adding 1 tablespoon apple cider vinegar or lemon juice to ¾ cup milk (dairy or plant-based), let it sit for 5 minutes, then use as directed.
- For a vegan version, substitute the buttermilk with plant-based buttermilk and the butter with coconut oil or vegan butter.
- To make the recipe gluten free, replace all-purpose flour with a gluten free flour blend.
- Ensure cauliflower pieces are spaced out on the baking sheets for maximum crispiness on all sides.
Nutrition
- Serving Size: 1 serving (approx. 6-7 florets)
- Calories: 150 kcal
- Sugar: 2 g
- Sodium: 450 mg
- Fat: 7 g
- Saturated Fat: 3 g
- Unsaturated Fat: 3 g
- Trans Fat: 0 g
- Carbohydrates: 18 g
- Fiber: 4 g
- Protein: 4 g
- Cholesterol: 15 mg


Leave a Reply